
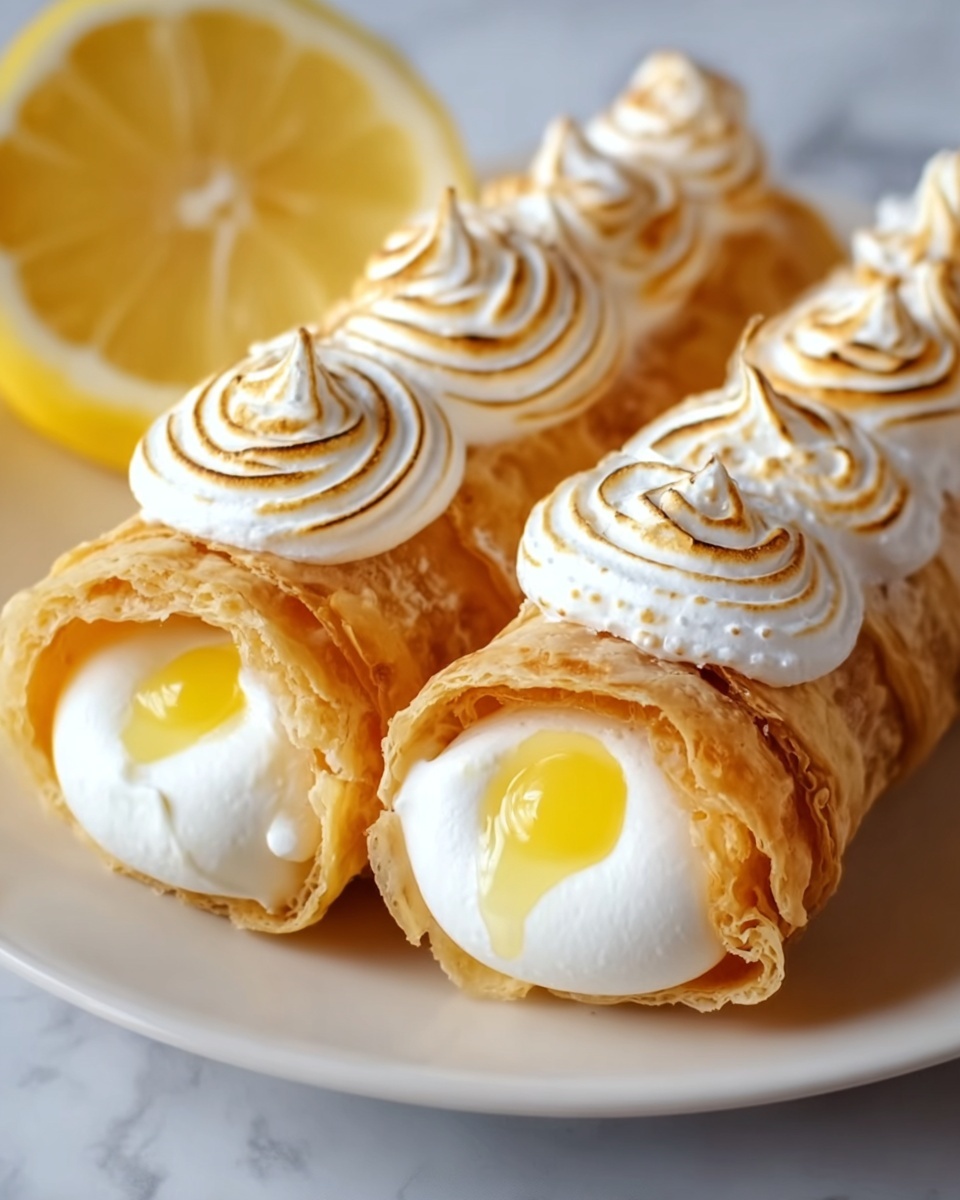
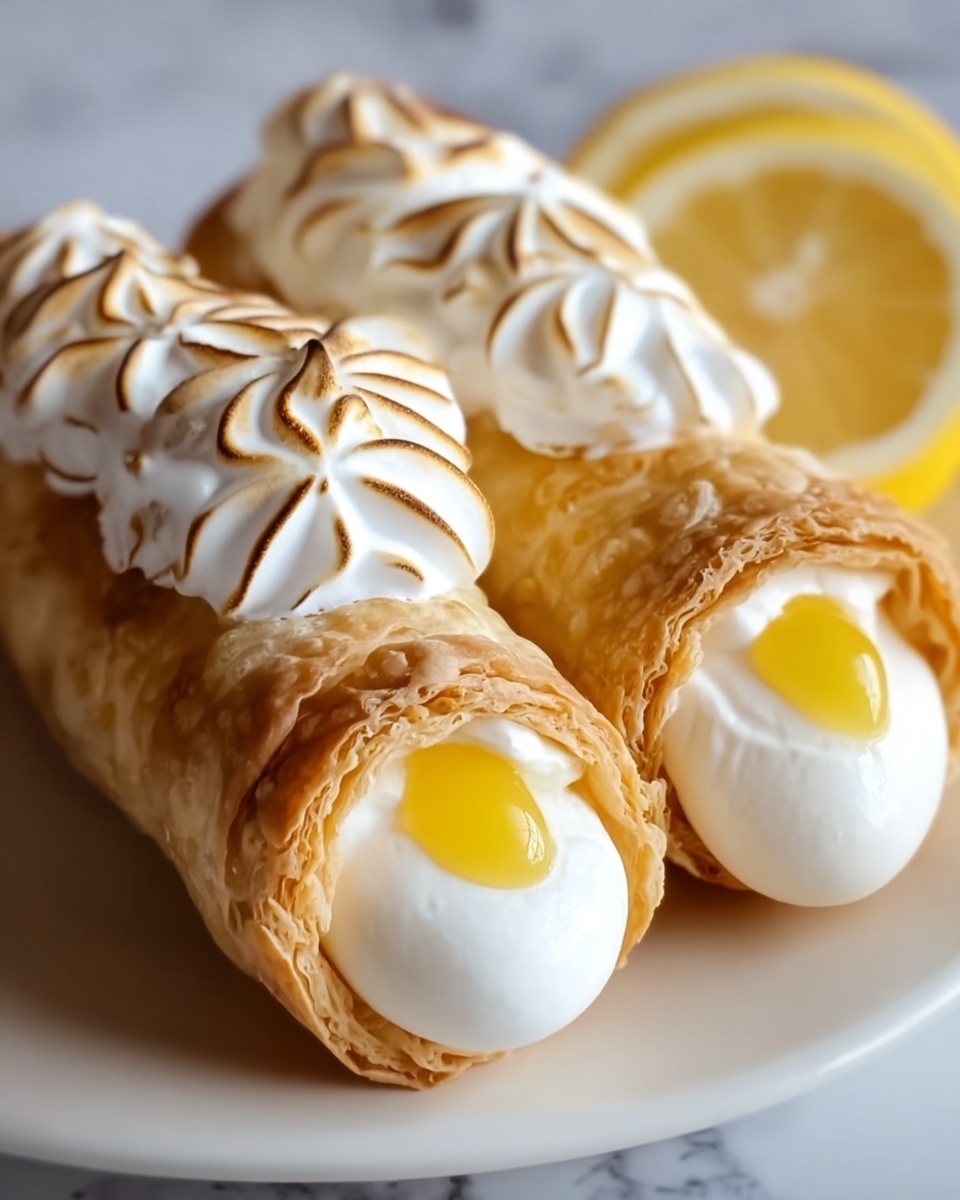
If you love the bright, sunny flavors of lemon combined with the irresistible crunch of a classic Italian treat, you are going to absolutely adore this Zesty Lemon Meringue Pie Cannolis Recipe. These delightful desserts perfectly marry the tangy burst of lemon curd and fluffy marshmallow with crisp, golden cannoli shells made from simple pie dough. Every bite is a dance of textures and flavors that feels both fresh and indulgent. Whether you’re craving a refreshing summer dessert or a show-stopping finale for dinner parties, this recipe brings a playful twist to two beloved favorites—lemon meringue pie and cannolis—in one stunning bite.
Ingredients You’ll Need
Gathering the ingredients for this recipe is a breeze because each component is straightforward yet essential to achieve the perfect balance of flavors and textures. From the flaky pie dough creating that iconic crunch to the luscious lemon curd adding zesty brightness, every ingredient contributes something special to this delightful creation.
- 2 (9-inch) round pie dough circles: Pillsbury Pie Crusts work wonderfully here for convenience and a reliably flaky texture.
- 1 egg (for egg wash): This helps to seal the dough around the cannoli forms and ensures a beautiful golden finish.
- 1 teaspoon water (for egg wash): Lightens the egg wash for easy brushing and perfect adhesion.
- ¾ cup lemon curd: The star ingredient, giving that punch of tart, sunny lemon flavor.
- ½ cup marshmallow fluff: Adds creamy sweetness and a marshmallow cloud-like texture.
- 1 cup frozen whipped topping, thawed: Keeps the filling light and airy, mimicking meringue’s delicate texture.
- 1 teaspoon fresh lemon zest (optional): Gives an extra zing and aromatic lift for lemon lovers.
- 1 teaspoon powdered sugar: Perfect for dusting over the finished cannolis to add a touch of elegance and sweetness.
How to Make Zesty Lemon Meringue Pie Cannolis Recipe
Step 1: Prepare the Cannoli Forms and Oven
Start by preheating your oven to a robust 425°F (218°C). Lightly spraying your metal cannoli forms with non-stick cooking spray is crucial—it ensures your crisp shells will easily release after baking. This preparation sets the stage for those perfectly golden, flaky tubes that hold the luscious filling.
Step 2: Shape and Bake the Cannoli Shells
Cut four 4 ½-inch circles from each pie crust round. Wrapping each circle snugly around the cannoli forms, brush the edge with your egg wash—a quick mix of egg and water—to seal the dough and keep it tight during baking. After freezing the wrapped forms for 10 minutes to help maintain their shape, bake them for 10 to 12 minutes until the shells are a beautiful golden brown. Once out of the oven, make sure to let them cool fully before gently sliding the forms out to reveal those crisp, hollow shells.
Step 3: Make the Zesty Lemon Meringue Filling
In a mixing bowl, combine the bright lemon curd with fluffy marshmallow fluff. This unexpected pairing creates a rich yet airy texture that’s pure indulgence. Gently fold in the thawed whipped topping and, if you’re feeling adventurous, stir in the fresh lemon zest for an additional citrus burst. Pop this luscious mixture into the fridge while you finish the shells—chilling helps the flavors meld and makes the filling easier to pipe.
Step 4: Assemble the Cannolis
Once your shells are fully cooled, fill a piping bag or even a sturdy plastic bag with the lemon meringue filling. Carefully pipe the luscious mixture into each cannoli shell, filling from end to end to ensure every bite is bursting with flavor. Finally, dust each dessert with a sprinkle of powdered sugar for just the right touch of sweetness and a picture-perfect finish.
How to Serve Zesty Lemon Meringue Pie Cannolis Recipe
Garnishes
Enhance your cannolis with a variety of garnishes to make them even more visually stunning and flavorful. Consider adding thin lemon twists, a few edible flowers, or even tiny dollops of extra marshmallow fluff on each end. A sprinkle of extra lemon zest over the powdered sugar can also amp up the citrus aroma and look incredibly inviting.
Side Dishes
These cannolis shine on their own but also pair wonderfully with complementary sides. Think fresh berries to add bright color and natural sweetness or a small scoop of vanilla bean ice cream for an extra creamy contrast. A cup of herbal tea or espresso nicely balances the richness without overpowering the dessert.
Creative Ways to Present
Presentation can turn this dessert from delightful to unforgettable. Serve your cannolis nestled in a bed of crushed graham crackers for a subtle nod to pie crust, or line them up on a rustic wooden board with fresh lemon wedges for zesty flair. If you’re hosting a party, consider placing them in mini dessert cups filled with fresh whipped cream to hold them upright, allowing your guests to pick them up without worry.
Make Ahead and Storage
Storing Leftovers
If you happen to have leftovers (though that’s difficult with such a crowd-pleaser), store the filled cannolis in an airtight container in the refrigerator for up to 2 days. Keep in mind the shells may soften slightly over time as they absorb moisture from the filling.
Freezing
You can freeze the unbaked cannoli shells once wrapped on the forms, ideally for up to one month. When ready to use, bake directly from frozen, adding a couple of extra minutes to the baking time. However, filling and freezing the assembled cannolis is not recommended since the texture can become soggy upon thawing.
Reheating
Because these cannolis are best enjoyed fresh, reheating filled ones is not ideal. If you want to warm the shells, do so separately before filling by gently warming them in a low oven for a few minutes—but always allow them to cool before adding the filling to keep that classic crunch.
FAQs
Can I make the cannoli shells from scratch instead of using pie crust?
Absolutely! Traditional cannoli shells are made from a dough that’s a bit different from pie crust, but if you prefer homemade, look for cannoli shell recipes online. The pie crust method is a great shortcut that still yields satisfying crunch and flavor.
Is there an alternative to marshmallow fluff in the filling?
If you don’t have marshmallow fluff on hand, you can substitute it with homemade meringue or even sweetened cream cheese mixed with a bit of whipped cream to maintain the fluffy texture.
Can I make these cannolis gluten-free?
You can try using gluten-free pie crusts available in stores or make your own gluten-free dough. Just keep in mind the texture may differ slightly, but the flavor-packed filling will still shine beautifully.
How long do filled cannolis stay fresh?
Filled cannolis are best eaten within 24 to 48 hours for optimal texture and freshness. Beyond that, the shells start to soften as they absorb moisture from the filling.
Can I adjust the tartness of the lemon filling?
Definitely! If you prefer a milder lemon flavor, reduce the lemon curd slightly or add extra whipped topping to mellow out the tartness. Conversely, for an extra zing, a touch more lemon zest can brighten it right up.
Final Thoughts
Making the Zesty Lemon Meringue Pie Cannolis Recipe is truly a joyous experience that combines ease, creativity, and absolutely irresistible flavors. From the very first crisp bite filled with fluffy, tangy delight, these cannolis bring sunshine to your dessert table. Whether for a special occasion or just because, I wholeheartedly encourage you to give this recipe a try—your taste buds will thank you for it!
Print
Zesty Lemon Meringue Pie Cannolis Recipe
- Prep Time: 30 minutes
- Cook Time: 12 minutes
- Total Time: 42 minutes
- Yield: 8 servings
- Category: Dessert
- Method: Baking
- Cuisine: American
- Diet: Vegetarian
Description
These Zesty Lemon Meringue Pie Cannolis are a delightful fusion dessert combining the crispness of golden baked pie crusts with a light, tangy lemon curd filling blended with fluffy marshmallow and whipped topping. Perfect for a refreshing and elegant treat, these cannolis offer a bright citrus flavor balanced by a sweet, creamy texture that’s easy to assemble and sure to impress.
Ingredients
Pie Shells
- 2 (9-inch) round pie dough circles (Pillsbury Pie Crusts recommended)
- 1 egg (for egg wash)
- 1 teaspoon water (for egg wash)
Filling
- ¾ cup lemon curd
- ½ cup marshmallow fluff
- 1 cup frozen whipped topping, thawed
- 1 teaspoon fresh lemon zest (optional)
Garnish
- 1 teaspoon powdered sugar
Instructions
- Prepare Cannoli Forms: Preheat your oven to 425°F (218°C) and lightly spray 8 metal cannoli forms with non-stick cooking spray to prevent sticking.
- Shape and Bake Shells: Cut four 4 ½-inch circles from each pie crust. Wrap each circle securely around a cannoli form, sealing the edges with egg wash made from beaten egg and water. Freeze these formed shells for 10 minutes to hold their shape, then bake in the preheated oven for 10-12 minutes, or until the shells turn golden brown. Allow them to cool completely before removing the cannoli forms.
- Make the Filling: In a bowl, combine the lemon curd and marshmallow fluff until smooth. Fold in the thawed whipped topping gently and stir in the fresh lemon zest if using. Refrigerate this mixture until you are ready to assemble the cannolis.
- Assemble and Serve: Using a piping bag or spoon, fill each cooled cannoli shell with the lemon meringue filling. Finish by dusting the tops with powdered sugar for a light, sweet garnish. Serve immediately to enjoy the crisp shell and creamy filling.
Notes
- Freezing the pie crust wrapped around cannoli forms helps maintain their shape during baking.
- Use metal cannoli forms for best results; if unavailable, tightly rolled foil tubes can be substituted.
- The lemon zest is optional but adds a fresh, bright flavor to the filling.
- Ensure shells are completely cooled before removing the forms to avoid breaking.
- This recipe is best served the day it is made for optimal crispness.


