If you’ve ever wanted to make a turkey that is juicy, evenly cooked, and boasts wonderfully crispy skin, then this Spatchcock Turkey Recipe is your new best friend in the kitchen. This method of preparing turkey, by removing the backbone and flattening the bird, allows for faster roasting and a more even cook, making your holiday or special occasion feast a total showstopper. The simplicity of the technique combined with the incredible flavor and texture ensures you’ll be craving turkey long after the holidays are over.
Ingredients You’ll Need
These ingredients are straightforward but absolutely essential to nailing the perfect balance of flavor, moisture, and texture. Each one plays a crucial role in enhancing the natural richness of the turkey while complementing the dish’s heartiness and color.
- 1 large turkey (approximately 14 lbs) (spatchcocked or butterflied): This bird is the hero of the dish, perfect for even roasting and quick cooking.
- 1 tablespoon sea salt (kosher salt): Essential for seasoning and bringing out the turkey’s natural flavors.
- 1 tablespoon fresh cracked pepper: Adds a subtle spice and depth to the savory taste.
- 3 tablespoons butter (soft): Butter makes the skin irresistibly golden and crisp while infusing luscious richness.
- 3 pounds chopped vegetables (Brussel sprouts, carrots, butternut squash, sweet potato): Perfect for roasting alongside the turkey, these veggies add sweetness and color.
- 2 cups chicken stock: Keeps the turkey moist during roasting and creates flavorful pan juices for gravy.
How to Make Spatchcock Turkey Recipe
Step 1: Prep the Turkey
If you have the time, I cannot recommend enough prepping the turkey ahead by resting it uncovered and unseasoned in the fridge for 12 to 24 hours. This simple trick helps dry the skin, which leads to that coveted golden and crispy texture that everyone dreams about when roasting turkey.
Step 2: Prepare the Vegetable Base (Optional)
Chop your vegetables in advance and toss them lightly with olive oil, salt, and pepper. Layer them at the bottom of your roasting pan; they’ll act as a natural rack, infusing the bird with extra flavor and preventing it from sitting directly on the pan.
Step 3: Remove the Backbone and Prep the Cavity
Start by removing any plastic packaging and securing ties. Extract the gizzards and neck from the cavity—they’re great for stock if you’re feeling resourceful! Trim any extra skin from the neck and tail area for tidiness and better presentation.
Step 4: Cut Along Each Side of the Backbone
Using sharp kitchen shears, carefully cut along both sides of the backbone. This step requires a bit of hands-on work but trust me, it’s worth it. If the shears struggle with bone, a small serrated knife can assist. Save the backbone to make your own rich turkey stock.
Step 5: Flatten the Turkey and Tuck the Wings
After flipping the bird so the breast side faces up, press firmly in the center of the breastbone with the heel of your hand until it cracks. This flattens the turkey for even cooking. Then, roll the legs inward and tuck the wings underneath to avoid burning them during roasting.
Step 6: Dry and Season the Turkey
Pat the entire bird dry with paper towels; dry skin is key for crispiness. Combine sea salt and cracked pepper in a bowl to prevent contamination, then thoroughly rub this mixture along with the softened butter all over every surface of the turkey. This butter rub transforms flavor and texture, making each bite irresistibly savory and tender.
Step 7: Place the Turkey in the Pan with Stock
Set the bird on top of your vegetable “rack” or wire rack in the pan. Pour 1 cup of chicken stock or water into the bottom of the roasting pan to keep the environment moist, which means juicy meat and delicious pan drippings for extra flavor.
Step 8: Roast with Care
Preheat your oven to 400 degrees Fahrenheit and roast the turkey for about an hour. Keep an eye on the skin—if it browns too quickly, tent it loosely with aluminum foil to protect it. Then lower the heat to 375 degrees and continue roasting for another 90 minutes. The combination of high heat at first and moderate heat after is magic for that crispy skin and perfect doneness.
Step 9: Check for Doneness
Use a quality meat thermometer to check the thickest part of the breast and thigh. Aim for 165 degrees Fahrenheit for the breast and 175 degrees for the thigh. These temperatures ensure the turkey is cooked perfectly and safe to eat without drying out.
Step 10: Rest and Carve
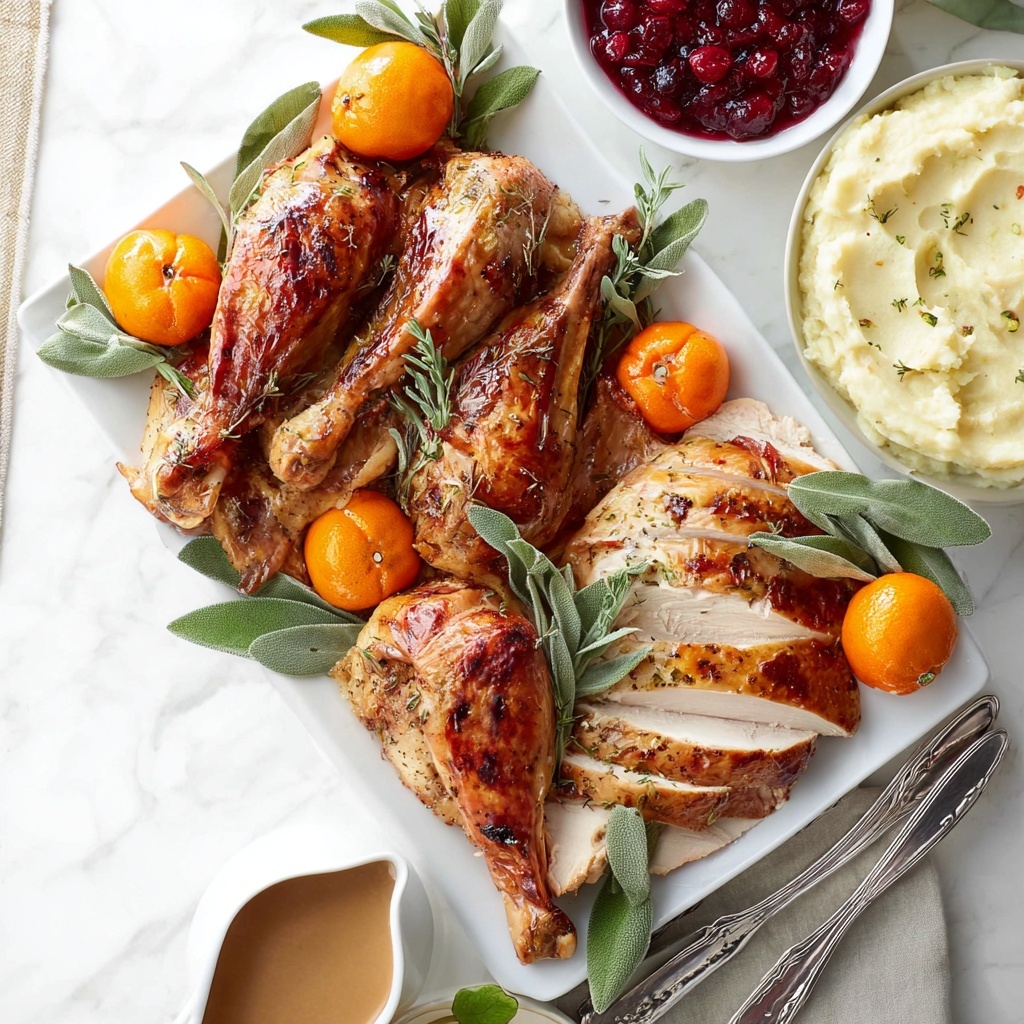
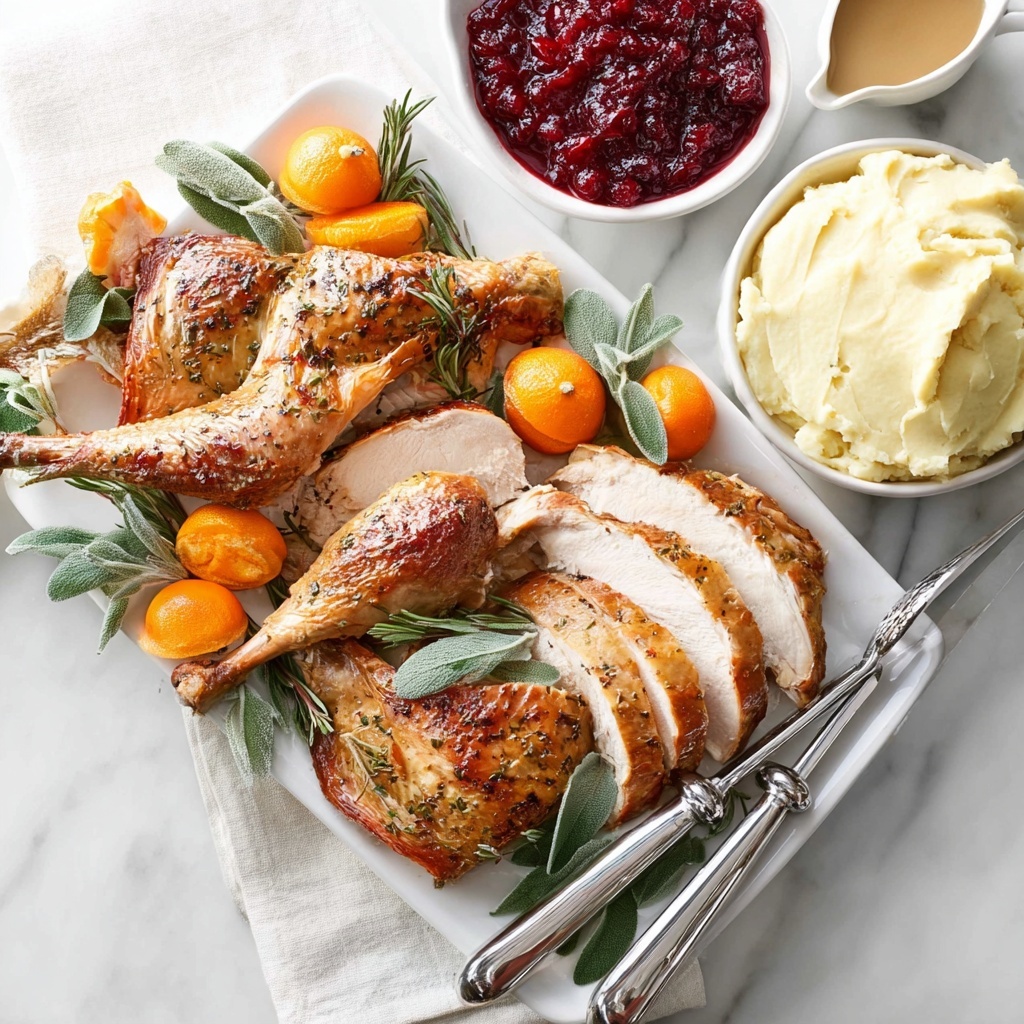
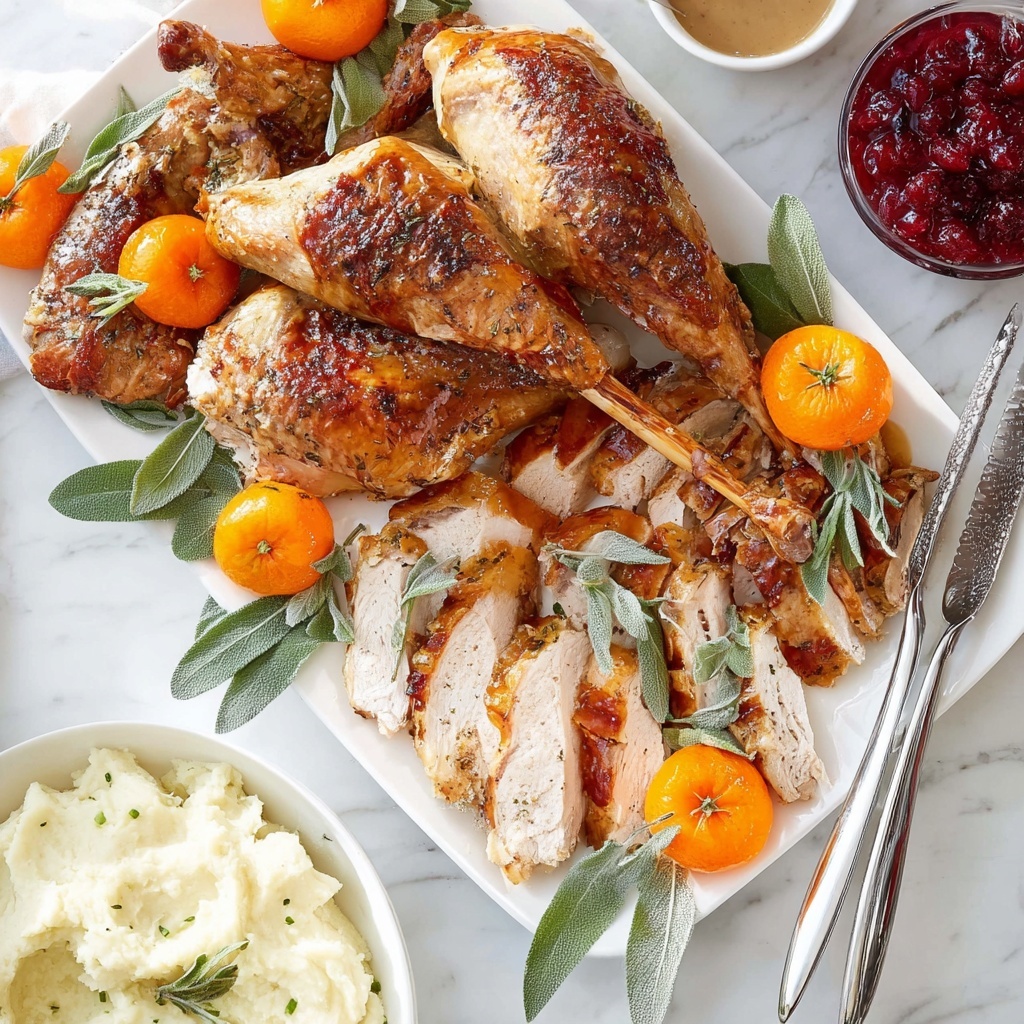
Once out of the oven, let the turkey rest for 10-15 minutes uncovered to keep skin crisp. This resting period allows juices to redistribute, ensuring every slice is juicy and tender. Then carve with a sharp knife and prepare to enjoy your masterpiece!
How to Serve Spatchcock Turkey Recipe
Garnishes
Adding fresh herbs like rosemary, thyme, or parsley around the carved turkey slices not only adds a splash of vibrant color but also gives the presentation an aromatic lift. Lemon wedges or a drizzle of good quality olive oil can add brightness that balances the richness beautifully.
Side Dishes
Since the turkey itself is richly flavorful and moist, pairing it with roasted root vegetables, mashed potatoes, or a tangy cranberry sauce complements the entire meal fabulously without overpowering the main star. Don’t forget a crisp green salad for a refreshing contrast!
Creative Ways to Present
If you want to impress your guests, present the spatchcocked turkey whole and carved right at the table to showcase the beautiful crispy skin and juicy interior. For casual gatherings, arrange slices on a rustic wooden board surrounded by roasted veggies and fresh herbs for an inviting farmhouse feel.
Make Ahead and Storage
Storing Leftovers
Leftover spatchcock turkey stores beautifully in an airtight container in the refrigerator for up to four days. Be sure to cool the meat completely before sealing to maintain freshness and prevent sogginess of the skin.
Freezing
You can freeze cooked turkey slices wrapped tightly in foil or plastic wrap inside a freezer-safe bag for up to three months. This way, you have quick, delicious meals ready to go whenever you crave that Spatchcock Turkey Recipe magic again.
Reheating
To keep the skin from turning rubbery, reheat the turkey slices gently in an oven set to 325 degrees Fahrenheit. Cover with foil after 10 minutes to avoid drying out. Alternatively, warming them in a skillet with a splash of broth or water can also help maintain tenderness and flavor.
FAQs
What does spatchcocking mean?
Spatchcocking is a technique where the turkey’s backbone is removed and the bird is flattened for faster and more even cooking. This method results in crispy skin and juicy meat throughout.
Can I use a frozen turkey for the Spatchcock Turkey Recipe?
It’s best to fully thaw your turkey before spatchcocking. Attempting to spatchcock a frozen turkey is difficult and unsafe because the bird needs to be pliable for cutting and flattening.
How long should I roast a spatchcock turkey?
For a 14-pound turkey, roasting at 400 degrees for one hour and then lowering to 375 degrees for an additional 90 minutes works well. However, always use a meat thermometer to check for proper internal temperature instead of relying solely on time.
Do I need to baste the turkey during roasting?
Basting isn’t necessary with this recipe since the butter rub and roasting at higher temperatures help keep the turkey moist and the skin crispy. Opening the oven too often can lower the temperature and extend cooking time.
Can the leftover turkey be used in other recipes?
Absolutely! Leftover spatchcock turkey is fantastic in soups, sandwiches, salads, and casseroles. Its rich flavor and moist texture make it versatile for countless delicious meals.
Final Thoughts
Making this Spatchcock Turkey Recipe is truly a game-changer for anyone who loves turkey but wants a faster, tastier, and juicier version. It’s a technique and recipe I hold dear, perfect for holidays or any time you want to impress friends and family. Dive in, have fun with it, and enjoy every crispy, flavorful bite!
Print
Spatchcock Turkey Recipe
- Prep Time: 20 minutes
- Cook Time: 2 hours 30 minutes
- Total Time: 2 hours 50 minutes
- Yield: 12 servings
- Category: Main Course
- Method: Baking
- Cuisine: American
Description
This Spatchcock Turkey recipe yields a crispy-skinned, evenly roasted turkey perfect for holiday meals or large gatherings. By removing the backbone and flattening the bird, it roasts faster and more evenly, locking in juicy flavors. Served with roasted vegetables and pan juices, this recipe offers a delicious and visually impressive centerpiece.
Ingredients
Turkey
- 1 large turkey (approximately 14 lbs), spatchcocked or butterflied
- 1 tablespoon sea salt (kosher salt)
- 1 tablespoon fresh cracked black pepper
- 3 tablespoons soft butter
Vegetables and Stock
- 3 pounds chopped vegetables (Brussel sprouts, carrots, butternut squash, sweet potato)
- 2 cups chicken stock
Instructions
- Prep the Turkey Ahead (Optional)
For best results, if time allows, prep the turkey ahead by resting it uncovered and unseasoned in the fridge for 12-24 hours. This step develops a golden, crisp skin during roasting. - Prepare Vegetables (Optional)
Chop vegetables and place them in the bottom of the roasting pan. Toss with olive oil, salt, and pepper. The vegetables serve as a flavorful rack if used. - Set Up the Roasting Pan
If not using vegetables, place a wire rack in the roasting pan. Remove the plastic net, wrapper, and leg ties from the turkey. Remove gizzards and neck from cavity; trim excess skin. - Spatchcock the Turkey
Using sharp poultry shears, cut along both sides of the backbone to remove it. Use a serrated knife if necessary. Reserve backbone for stock if desired. - Flatten the Turkey
Flip the turkey breast-side up and press down with the heel of your hand to crack the breastbone. Tuck legs inward and wings under to prevent overcooking. - Season the Bird
Pat the bird dry with paper towels for crisp skin. Rub all sides evenly with kosher salt, cracked black pepper, and soft butter. Optionally use compound herb butter beneath skin for extra flavor. - Prepare to Roast
Place turkey in the pan. Pour 1 cup of water or chicken stock into the bottom of the pan to keep the meat moist and create pan juices. - Roast the Turkey
Preheat oven to 400°F. Roast the turkey for 1 hour; tent with foil if browning too fast. Reduce heat to 375°F and roast for another 90 minutes, tenting if necessary. - Check Temperature
Use an instant-read thermometer to check the internal temperatures: breast meat should reach 165°F, and thigh meat 175°F, avoiding bone contact for accuracy. - Rest and Serve
Once cooked, let the turkey rest uncovered for 10-15 minutes. Carve with a sharp knife and serve warm with side dishes or use leftovers in other recipes.
Notes
- Resting the turkey uncovered in the fridge before cooking improves skin crispness.
- Using vegetables as a roasting rack adds flavor and prevents the turkey from sticking.
- The backbone can be saved to make homemade turkey stock.
- Butter under the skin enhances flavor and browning.
- Tenting with foil prevents skin from burning during roasting.
- Always use a reliable meat thermometer to ensure safe cooking temperatures.
- Letting the turkey rest keeps it juicy and makes carving easier.


