Description
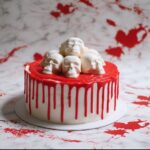
This visually stunning Skull Cake combines moist red velvet cake layers with creamy buttercream frosting adorned with white candy skull decorations. Perfect for Halloween or themed parties, this cake features carefully crafted candy skulls stacked on top with a striking red drip icing effect, creating an impressive centerpiece dessert.
Ingredients
Scale
For the Candy Skulls
- 3 (8 oz) bags Wilton white candy melts
- Chocolate skull molds
For the Cake
- 3 packets Red Velvet cake mix
- 6 large eggs
- 1 ½ cups unsalted butter, softened
- 3 cups whole milk
For the Buttercream Frosting
- 2 cups unsalted butter, softened
- 6 cups powdered sugar
- 1 tablespoon pure vanilla extract
- 7 tablespoons heavy whipping cream
For Decoration
- 3 tubes red cookie icing
Instructions
- Melt Candy Melts: Follow the package instructions on the Wilton white candy melts to carefully melt them to a smooth consistency.
- Create Candy Skulls: Using the chocolate skull molds, pour the melted candy melts to create about 15 small skulls and 5 to 6 large skulls. Allow them to set and harden completely.
- Set Candy Skulls Aside: Once hardened, remove skulls from molds and set them aside for decorating later.
- Prepare Oven and Pans: Preheat your oven to 350°F (175°C) and spray your cake pans with a non-stick baking spray such as Pam.
- Mix Cake Batter: In a standing mixer or with a hand beater, combine the red velvet cake mix, eggs, softened butter, and whole milk. Beat the mixture until smooth and fully incorporated.
- Bake Cake Layers: Pour the batter evenly into your prepared cake pans. Bake for 25-28 minutes or until a toothpick inserted in the center comes out with a few moist crumbs.
- Cool Cakes: Remove the baked cakes from the oven and allow them to cool completely on a wire rack.
- Remove Cakes from Pans: Once cooled, carefully remove the cakes from their pans and place each on cake boards for assembling.
- Level Cake Layers: Use a cake leveler or serrated knife to trim the tops of the cakes for an even, flat surface, ensuring stable stacking.
- Make Frosting: In a standing mixer with the paddle attachment, beat together the softened butter, powdered sugar, vanilla extract, and heavy whipping cream until the frosting is creamy, stiff, and spreadable.
- Assemble Cake Layers: Place one cake layer on your serving board and spread about 1 cup of frosting evenly over the surface.
- Add Second Layer: Place the second cake layer on top of the frosted layer.
- Frost Second Layer: Scoop another 1 cup of frosting onto the second layer and spread it out evenly.
- Add Final Cake Layer: Place the last cake layer on top of the frosted second layer.
- Frost Exterior: Use the remaining frosting to fully frost the outside of the entire cake, smoothing surfaces as desired.
- Chill the Cake: Refrigerate the frosted cake for a few hours to set the frosting hard and cold, making it easier to decorate.
- Create Red Drip Effect: Using the red cookie icing tubes, carefully squeeze red icing around the top edge of the chilled cake to produce a realistic drip effect flowing down the sides.
- Decorate with Skulls: Build a mound of the pre-made candy skulls in the center top of the cake, using any remaining frosting as adhesive to stack and secure the skulls.
- Serve and Enjoy: Once decorated, your Skull Cake is ready to be sliced, served, and enjoyed at your celebration.
Notes
- Be sure to follow candy melt package instructions carefully to avoid overheating and seizing of the candy melts.
- Use a serrated knife when leveling cake layers to achieve a smooth, even finish.
- Chilling the cake before decorating ensures the drip icing does not melt the frosting.
- You can prepare the candy skulls a day in advance to save time on the day of assembly.
- For precise drip effect, practice squeezing cookie icing on the edge using gentle pressure.