
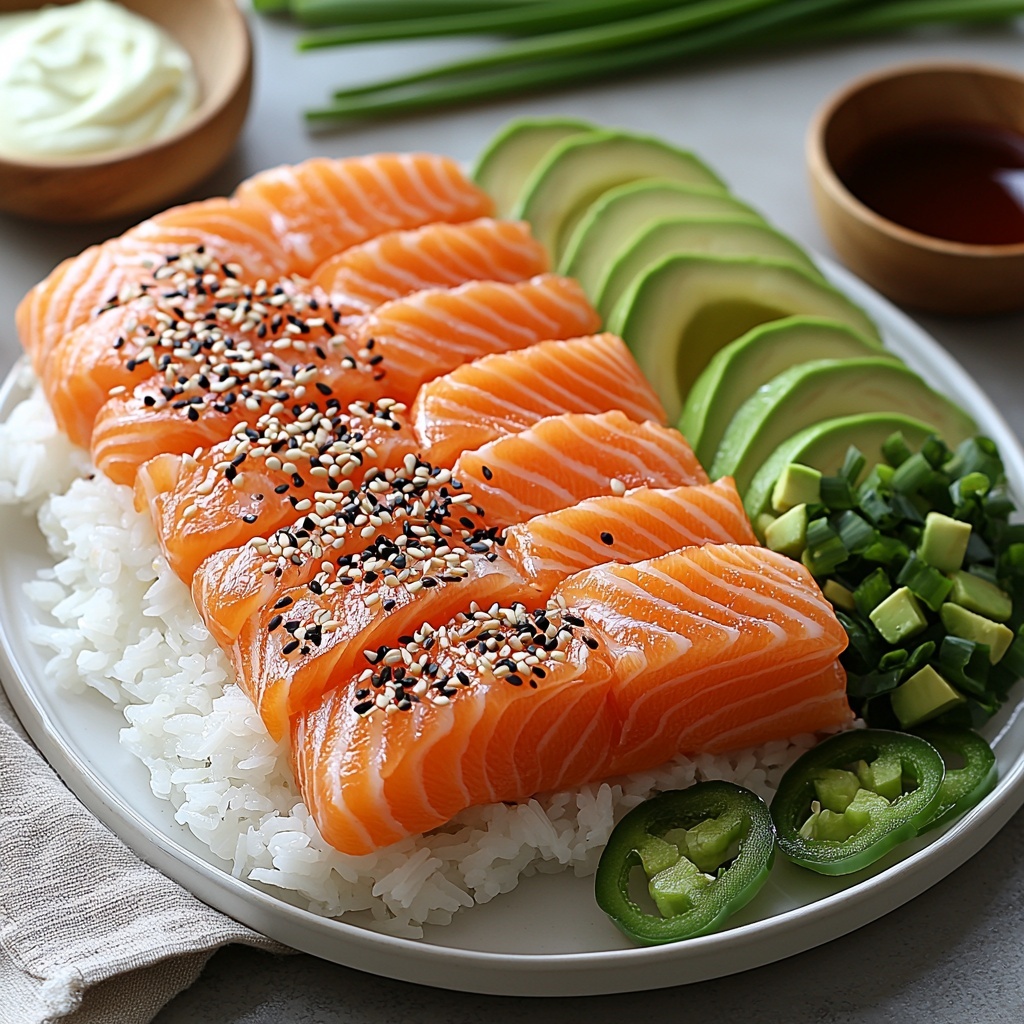
If you’re searching for a dish that’s equal parts playful, flavorful, and downright addictive, let me introduce you to the magic of the Salmon Crispy Rice Recipe. This dish combines perfectly crisped sushi rice squares topped with luscious, fresh sushi-grade salmon, all elevated by creamy Kewpie mayo and a spicy kick of Sriracha. It’s the perfect harmony of textures and flavors—the crunch of the crisped rice, the melt-in-your-mouth smooth salmon, and the punchy toppings that make every bite unforgettable. Whether you’re making this for a fun dinner with friends or a special treat for yourself, this recipe promises to deliver irresistible satisfaction.
Ingredients You’ll Need
The beauty of this recipe lies in its simplicity—each ingredient plays a starring role that contributes essential textures, flavors, and colors to the final dish. From the sticky sushi rice providing the foundation, to the fresh salmon lending luxury, every component matters.
- 3 cups cooked sushi rice: Ideally seasoned and chilled, this forms the crispy base that brings delightful crunch.
- 1 lb sushi-grade salmon: Fresh, high-quality salmon ensures melt-in-your-mouth richness and vibrant color.
- 4 tbsp Kewpie mayo: This Japanese mayo’s creamy, slightly sweet flavor adds perfect smoothness and umami.
- 2 tbsp Sriracha: A spicy, garlicky sauce that brings a punch without overpowering the delicate salmon.
- 2 tbsp scallions: Thinly sliced for a bright, fresh bite and a pop of green color.
- Avocado, jalapeño, sesame seeds for garnish: These optional extras bring creaminess, heat, and nuttiness to round out the dish beautifully.
How to Make Salmon Crispy Rice Recipe
Step 1: Prepare the Sushi Rice
Start by creating a well-seasoned bed for your crispy squares. Mix rice vinegar, sugar, and salt until dissolved, then gently fold this into your cooked sushi rice. This seasoning is key—it balances flavor and adds that classic sushi rice tang that complements the salmon perfectly.
Step 2: Chill the Rice
Spread the seasoned sushi rice evenly in a baking pan lined with plastic wrap. Press it down firmly to create a compact, uniform layer. Then, chill it in the fridge for at least four hours. This step might feel like a waiting game, but it’s crucial to help the rice firm up so that it crisps up beautifully when fried.
Step 3: Fry the Rice Squares
Once your rice layer is chilled and set, cut it carefully into bite-sized squares. Heat a frying pan with enough oil to crisp the rice evenly, and fry the rice pieces until they turn golden brown on both sides. This frying technique creates a crunchy crust on the outside while keeping the rice tender inside—absolute perfection!
Step 4: Assemble the Crispy Rice
Top each golden rice square with a slice of fresh sushi-grade salmon. Then drizzle generously with Kewpie mayo and a touch of Sriracha to bring creamy heat. Finish with scallions and your favorite garnishes like avocado, jalapeño, or sesame seeds to elevate all the flavors and add those finishing touches.
How to Serve Salmon Crispy Rice Recipe
Garnishes
Garnishing is where you can let your creativity shine. Creamy avocado slices add a smooth counterpoint, thin slices of jalapeño pack a gentle heat, while toasted sesame seeds bring nuttiness and visual appeal. A sprinkle of scallions offers a crisp freshness, making every bite lively and vibrant.
Side Dishes
This dish stands strong on its own but pairs beautifully with light, complementary sides. Think of a crisp seaweed salad, pickled ginger for zest, or a simple cucumber sunomono. These sides keep the meal balanced and refreshing, enhancing the delightful japanese-inspired vibe of the Salmon Crispy Rice Recipe.
Creative Ways to Present
Want to impress your guests? Serve the crispy rice squares on a bamboo sushi board or slate platter to channel that authentic sushi bar feel. Arrange the garnishes artistically around the plate, or even serve the dish family-style to let everyone help themselves. Small dips of extra Kewpie mayo and Sriracha on the side invite custom flavor bursts.
Make Ahead and Storage
Storing Leftovers
If you have any leftovers (which might be hard!), wrap the crispy rice squares separately from the salmon in airtight containers. The rice’s crispness will soften over time, so it’s best to enjoy within a day or two. Keep the salmon refrigerated, stored properly to maintain freshness and safety.
Freezing
Freezing isn’t highly recommended for this dish because the texture of the crispy rice will change once thawed and reheated. If you must freeze, separate the rice from the salmon and store them individually in freezer-safe containers. Expect some loss of crispness after thawing.
Reheating
For reheating, a quick pan-fry or toaster oven session is your best bet to revive the crispiness of the rice. Avoid the microwave if you want to keep that delightful crunch intact. Gently warm your leftover salmon separately or enjoy it chilled for the best fresh flavors.
FAQs
Can I use non-sushi-grade salmon for this recipe?
It’s best to use sushi-grade salmon because this dish involves no cooking of the fish. Sushi-grade ensures it’s safe to eat raw and offers the best texture and flavor for your crispy rice squares.
What can I substitute for Kewpie mayo?
If you can’t find Kewpie mayo, use a good-quality Japanese-style mayonnaise or regular mayo with a hint of rice vinegar for added tang. Kewpie’s unique umami and creaminess do add something special though!
Is it necessary to chill the rice before frying?
Yes, chilling the rice helps it firm up and hold together when frying, resulting in perfectly crispy squares. Skipping this step can lead to rice falling apart when cooked.
Can I make this recipe vegetarian or vegan?
For a vegetarian twist, you can swap the salmon with marinated tofu or grilled vegetables. Vegan mayo and sriracha are widely available, so it’s possible to adapt the recipe while keeping its crisp, spicy essence.
How spicy is the dish with Sriracha?
The Sriracha adds a moderate heat that complements the creamy mayo and delicate salmon. You can always adjust the quantity to suit your spice preference or omit it for a milder flavor profile.
Final Thoughts
The Salmon Crispy Rice Recipe is one of those remarkable dishes that impresses every time without requiring a mountain of effort or exotic ingredients. It’s a perfect balance of textures and flavors, creamy and crunchy, mild and spicy. I encourage you to give it a try—you’ll quickly see why it becomes a beloved favorite to share with friends and family. Once you make it, this recipe will have a permanent spot in your culinary rotation!
Print
Salmon Crispy Rice Recipe
- Prep Time: 10 minutes
- Cook Time: 15 minutes
- Total Time: 25 minutes plus 4 hours chilling
- Yield: 6 servings
- Category: Appetizer
- Method: Frying
- Cuisine: Japanese
Description
Crispy Salmon Rice Squares topped with spicy mayo and fresh garnishes make a perfect appetizer or light meal. This recipe combines crunchy fried sushi rice with delicate sushi-grade salmon slices, finished with a creamy and spicy drizzle and vibrant garnishes for an irresistible flavor and texture contrast.
Ingredients
Rice Base
- 3 cups cooked sushi rice
- 2 tbsp rice vinegar
- 1 tbsp sugar
- 1 tsp salt
Toppings
- 1 lb sushi-grade salmon, thinly sliced
- 4 tbsp Kewpie mayo
- 2 tbsp Sriracha
- 2 tbsp scallions, finely chopped
Garnishes
- Avocado slices
- Jalapeño slices
- Sesame seeds
- Vegetable oil for frying
Instructions
- Prepare the sushi rice: In a small bowl, combine rice vinegar, sugar, and salt until the sugar and salt are completely dissolved. Mix this seasoning gently into the cooked sushi rice, ensuring even coating without mashing the rice grains.
- Chill the rice: Line a baking pan with plastic wrap and spread the seasoned sushi rice evenly, pressing it down firmly to create a compact layer. Place the pan in the refrigerator and chill for at least 4 hours to help the rice firm up for frying.
- Fry the rice: Heat a generous amount of vegetable oil in a frying pan over medium heat. Remove the chilled rice from the pan and cut it into evenly sized squares. Carefully place the rice squares into the hot oil and fry until both sides are golden brown and crispy. Remove and drain on paper towels.
- Assemble the crispy rice bites: Place the fried rice squares on a serving platter. Top each square with a slice of sushi-grade salmon. Drizzle with Kewpie mayo and Sriracha. Garnish with finely chopped scallions, avocado slices, jalapeño slices, and a sprinkle of sesame seeds. Serve immediately to enjoy the contrast of crispy rice and fresh toppings.
Notes
- Ensure sushi-grade salmon is fresh and properly sliced for food safety and best taste.
- Sushi rice must be chilled well to achieve crispy texture when frying.
- Adjust Sriracha quantity to taste depending on your spice preference.
- Use neutral vegetable oil with a high smoke point for frying to avoid burning.
- This dish is best served immediately after assembly to retain crunchiness.


