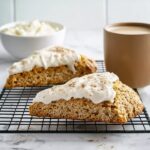
Description
These Pumpkin Cream Cheese Scones are tender, flaky, and filled with warm fall spices and pumpkin flavor. Perfect for breakfast or an afternoon treat, they feature a moist crumb enhanced by pumpkin puree and a rich cream cheese icing. With a crisp exterior and soft interior, they are easy to make and bake to golden perfection.
Ingredients
Scale
Dry Ingredients
- 2 cups (240g) all-purpose flour, use fresh for a tender crumb
- 1/3 cup (67g) brown sugar, packed (light or dark for flavor and moisture)
- 1 tablespoon (15g) baking powder, reliable brand recommended
- 1/2 teaspoon (3g) kosher salt
- 1 1/2 teaspoons (3.3g) ground cinnamon, freshly ground if possible
- 1/2 teaspoon (1.1g) ground nutmeg, freshly grated preferred
- 1/2 teaspoon (1.1g) ground ginger, quality ground ginger
- 1/4 teaspoon (0.5g) ground cloves
Wet Ingredients
- 1/2 cup (120g) pumpkin puree, pure pumpkin with no additives
- 1/3 cup (80ml) heavy cream, plus 1 tablespoon (15ml) for brushing
- 1 large egg, room temperature
- 1 teaspoon (5ml) vanilla extract
Fat
- 1/2 cup (115g) unsalted cold butter, high quality and chilled
Instructions
- Prepare Baking Sheet: Line a large baking sheet with parchment paper to prevent sticking. Set aside.
- Mix Dry Ingredients: In a medium bowl, whisk together the all-purpose flour, brown sugar, baking powder, kosher salt, ground cinnamon, nutmeg, ginger, and cloves until fully combined.
- Combine Wet Ingredients: In another medium bowl, whisk the pumpkin puree, 1/3 cup heavy cream, egg, and vanilla extract until smooth.
- Cut in Butter: Add pieces of cold butter to the dry ingredients. Lightly toss to coat all pieces. Using a pastry cutter or your fingers, quickly cut the butter into the flour mixture until the texture resembles pebbly sand. Avoid overmixing to maintain flaky texture.
- Mix Dough: Pour the pumpkin mixture over the dry ingredients. Using a spatula, gently stir together just until no dry flour remains. Stop mixing as soon as combined to prevent dense scones.
- Knead Dough: Turn the dough out onto a lightly floured surface. Knead the dough just a few times until it holds together. Do not overwork to keep crumb tender.
- Shape Dough: Pat the dough into a 1-inch (2.5 cm) thick circle. Use a ruler if preferred to measure thickness for even baking.
- Cut Scones: Slice the dough circle into 8 equal triangles using a sharp knife. Cut firmly from the edge without twisting or dragging to maintain shape.
- Chill Dough: Place the cut scones on the prepared baking sheet. Freeze for 15-20 minutes. Chilling helps maintain shape and promotes a flaky, well-risen scone.
- Preheat Oven: While scones chill, preheat oven to 400°F (204°C). Position rack in middle of oven.
- Brush and Bake: Brush the tops of the scones with 1 tablespoon of heavy cream before baking. Bake on the prepared sheet for 15-22 minutes, checking at the 15-minute mark to avoid overbaking. If browning unevenly, rotate the pan halfway through cooking.
- Cool: Remove baked scones to a wire rack. Cool completely before frosting with cream cheese icing to prevent melting off.
Notes
- Use cold butter and avoid overmixing to ensure tender, flaky scones.
- Chilling the cut scones before baking helps maintain their shape and promotes better rise.
- Rotate the baking sheet halfway through baking for even browning.
- Allow scones to cool completely before adding cream cheese icing to prevent melting.
- Freshly ground spices enhance the flavor but you can use pre-ground if necessary.