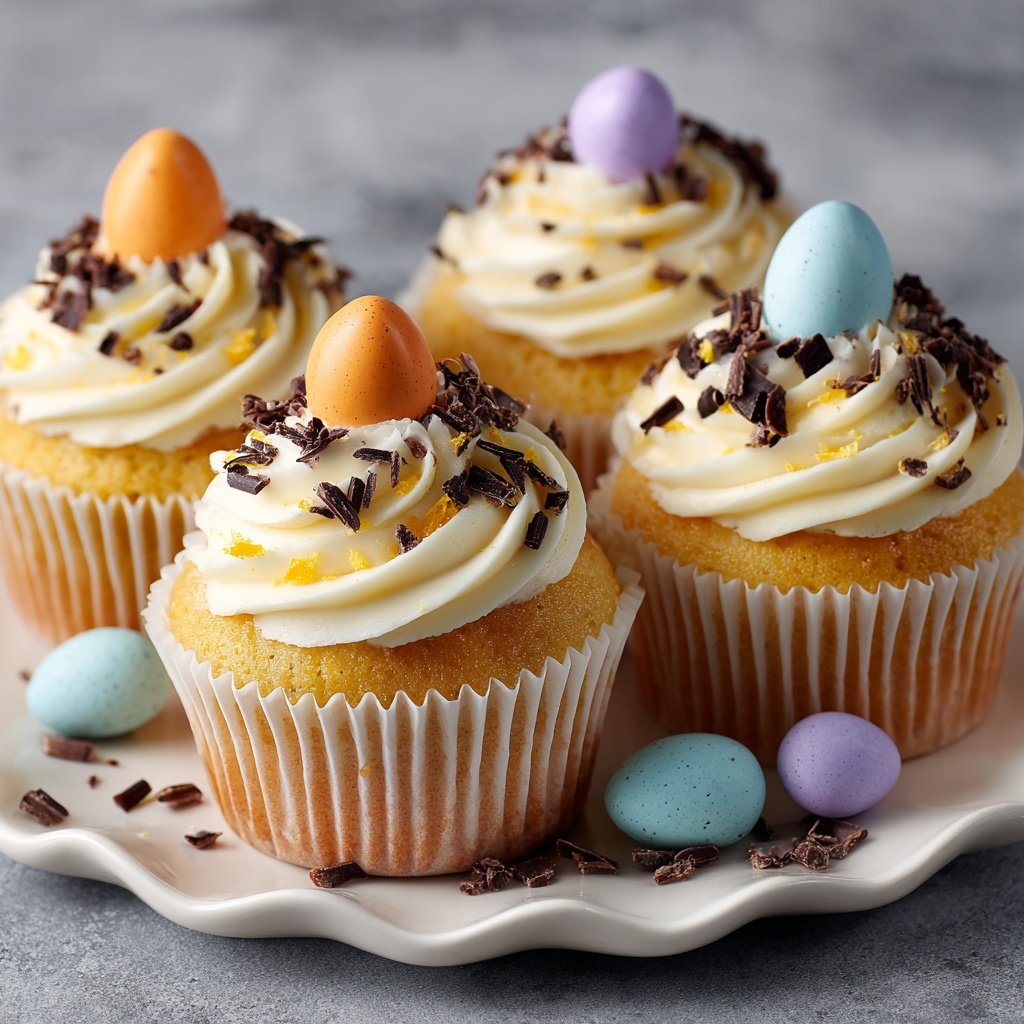
If you are looking for a charming and delightful treat to celebrate springtime, the Mini Easter Egg Cheesecake Bites Recipe is an absolute showstopper. These tiny cheesecake morsels boast a creamy, tangy filling nestled atop a buttery graham cracker crust, all dressed up in pastel swirls that bring the Easter spirit to your table. Topped with colorful mini chocolate eggs, they perfectly balance sweetness and texture, making them irresistible bites that everyone will adore at your holiday gatherings or anytime you need a cheerful dessert fix.

Ingredients You’ll Need
The magic behind these Mini Easter Egg Cheesecake Bites lies in their simple yet thoughtfully chosen ingredients. Each element plays a crucial role in building the delightful contrast of flavors, textures, and colors that make this recipe so special and inviting.
- Graham cracker crumbs: Provide a classic, crunchy base with just the right amount of sweetness and texture.
- Granulated sugar: Used both in the crust and the cheesecake filling to add balanced sweetness throughout.
- Melted butter: Binds the crust together and adds a rich, buttery flavor.
- Cream cheese (softened): The star ingredient that creates the luscious, creamy filling you’ll love.
- Eggs: Give structure to the cheesecake, helping it set perfectly without being over-dense.
- Vanilla extract: Adds a warm, fragrant note that enhances the overall flavor.
- Sour cream: Adds tenderness and a slight tang to keep the filling smooth and luscious.
- Gel food coloring (pastel colors): Brings a festive and playful look to each bite, perfect for Easter.
- Mini chocolate eggs or candy-coated eggs: Provide a colorful, crunchy topping that seals the festive deal.
How to Make Mini Easter Egg Cheesecake Bites Recipe
Step 1: Prepare the crust
Start by preheating your oven to 325°F and lining a mini muffin pan with paper liners—this makes cleanup easier and helps your bites hold their shape beautifully. In a small bowl, combine graham cracker crumbs, 2 tablespoons sugar, and melted butter, stirring until the mixture holds together like moist sand. Press about a teaspoon of this mixture into the bottom of each liner, gently flattening it to form an even crust. This crumbly base is the perfect foundation for your creamy cheesecake.
Step 2: Make the cheesecake filling
Next, in a medium bowl, beat the softened cream cheese with ½ cup sugar until the texture is smooth, creamy, and free of lumps. Adding the eggs one at a time ensures a silky consistency while enhancing the cheesecake’s structure. Mix in the vanilla extract and sour cream until everything is fully combined, making a luscious filling that’s just begging to be swirled with color.
Step 3: Add pastel colors
Divide the cheesecake batter into a few small bowls, then tint each portion with a different pastel gel food coloring. These light hues not only brighten the appearance but also create an irresistible visual that’s as fun to make as it is to eat. For a whimsical, marbled effect, use a piping bag or carefully layer small spoonfuls of each color in the liners on top of the crust.
Step 4: Bake the cheesecake bites
Slide the pan into the preheated oven and bake for 15 to 18 minutes. You want the centers to be just set with a slight wobble when you gently shake the pan—this ensures they stay creamy and tender once chilled. Once baked, allow the bites to cool in the pan before transferring them to the fridge to chill for at least 2 hours, so they firm up to the perfect texture.
Step 5: Add the finishing touch
Right before serving, place a mini chocolate egg or candy-coated egg atop each cheesecake bite. These little pops of color and crunch complete the look and add a satisfying texture contrast, making these bites as delightful to the eyes as they are to the palate.
How to Serve Mini Easter Egg Cheesecake Bites Recipe

Garnishes
Enhance these cheesecake bites with a light dusting of powdered sugar for an elegant finish or add a few edible flowers to your serving plate for a fresh, spring-inspired touch. Alternatively, drizzle with melted white chocolate for an extra layer of sweetness that complements the pastel colors beautifully.
Side Dishes
This dessert pairs wonderfully with a cup of hot coffee, a glass of sparkling rosé, or even a fruity iced tea. Fresh berries or a fruit compote served alongside add a juicy tartness that cuts through the richness perfectly, balancing each bite with a burst of refreshing flavor.
Creative Ways to Present
Arrange the Mini Easter Egg Cheesecake Bites Recipe on a tiered dessert stand for eye-catching appeal at any gathering. You can also serve them on pastel-colored plates or nestle them in a bed of shredded paper or edible grass to mimic an Easter basket vibe, making your dessert table festive and inviting.
Make Ahead and Storage
Storing Leftovers
These cheesecake bites keep beautifully covered in the refrigerator for up to 5 days. Storing them in an airtight container protects their creamy texture while preserving the vibrant colors so you can enjoy them fresh throughout the week.
Freezing
To freeze, place the bites on a baking sheet lined with parchment paper and freeze until solid. Then transfer them to a freezer-safe container or bag. They can be frozen for up to 2 months without losing taste or texture. When ready, thaw overnight in the fridge before serving.
Reheating
Since these are best served cold, reheating is not recommended. Instead, let frozen bites thaw naturally in the refrigerator to preserve their texture and flavor. Enjoy them chilled for that perfect creamy cheesecake experience.
FAQs
Can I make these Mini Easter Egg Cheesecake Bites recipe dairy-free?
Substituting the cream cheese and sour cream with plant-based alternatives can work, but they may affect the texture and flavor slightly. Look for dairy-free cream cheese and sour cream options designed for baking to get the best results.
What if I don’t have mini muffin liners?
You can grease your mini muffin pan well if you don’t have liners, but liners make removing the bites so much easier and keep them intact. Foil or silicone liners work as great alternatives that are reusable and convenient.
Can I use regular food coloring instead of gel?
Gel food coloring is recommended because it provides vibrant colors without thinning your batter, but if you only have regular food coloring, use it sparingly to avoid changing the batter’s consistency.
Is it possible to make these bites without eggs?
Eggs are important for setting the cheesecake filling properly, so skipping them would change the texture considerably. Some vegan or egg-replacement options exist, but they require different recipes designed specifically for egg-free cheesecakes.
How do I achieve the swirl effect with the colored batter?
To create a pretty swirl, spoon small amounts of each colored batter into the muffin liners, then use a toothpick or skewer to gently swirl the colors together. Be careful not to overmix, or you’ll lose the lovely pastel marbled look.
Final Thoughts
I cannot recommend the Mini Easter Egg Cheesecake Bites Recipe enough for your next spring or Easter celebration. They deliver joyful color, irresistible creaminess, and cute festive charm all in one perfect bite. Give this recipe a try, and watch how these little cheesecakes become the star of your dessert spread, sparking smiles and sweet memories with every serving.
Print
Mini Easter Egg Cheesecake Bites Recipe
- Prep Time: 20 minutes
- Cook Time: 18 minutes
- Total Time: 2 hours 38 minutes
- Yield: 24 mini cheesecake bites
- Category: Dessert
- Method: Baking
- Cuisine: American
- Diet: Vegetarian
Description
These Mini Easter Egg Cheesecake Bites are a delightful and festive spring dessert. Featuring a buttery graham cracker crust and creamy, pastel-colored cheesecake layers, they are perfect bite-sized treats topped with charming mini chocolate eggs. Ideal for Easter celebrations or any special occasion, these colorful cheesecakes are easy to make and sure to impress.
Ingredients
Crust
- 1 cup graham cracker crumbs
- 2 tablespoons granulated sugar
- 4 tablespoons melted butter
Cheesecake Filling
- 16 oz cream cheese, softened
- 1/2 cup granulated sugar
- 2 large eggs
- 1 teaspoon vanilla extract
- 1/4 cup sour cream
- Gel food coloring (pastel colors)
Topping
- Mini chocolate eggs or candy-coated eggs
Instructions
- Preheat and Prepare Pan: Preheat your oven to 325°F (163°C) and line a mini muffin pan with paper liners to prevent sticking and make removal easy.
- Make the Crust: In a small bowl, combine the graham cracker crumbs, 2 tablespoons of granulated sugar, and melted butter. Mix until the crumbs are evenly coated and the mixture holds together slightly. Press about a teaspoon of this mixture into the bottom of each muffin liner, flattening gently to create an even crust layer.
- Prepare Cheesecake Batter: In a medium mixing bowl, beat the softened cream cheese with 1/2 cup granulated sugar until the mixture is smooth and creamy. Add eggs one at a time, beating well after each addition to fully incorporate. Stir in vanilla extract and sour cream until the batter is smooth and homogenous.
- Color the Batter: Divide the cheesecake batter into separate small bowls according to how many pastel colors you want to use. Tint each portion with gel food coloring until you achieve the desired pastel shades.
- Assemble Cheesecake Bites: Spoon small amounts of each colored batter into the prepared muffin liners over the crust. You can layer or swirl the colors for a pretty marbled effect.
- Bake: Bake the cheesecake bites in the preheated oven for 15–18 minutes, or until the centers are just set and no longer jiggly.
- Cool and Chill: Allow the mini cheesecakes to cool completely in the pan. Once cooled, refrigerate them for at least 2 hours to set properly.
- Add Toppings and Serve: Just before serving, top each cheesecake bite with a mini chocolate egg or candy-coated egg for a festive finishing touch.
Notes
- Use a piping bag to create a marbled or swirled design with the colored cheesecake batters for a more elegant look.
- For extra texture, try mixing crushed candy eggs into the crust before pressing it into the pan.
- Make sure the cream cheese is fully softened to avoid lumps in your cheesecake batter.
- Don’t overbake; the centers should still jiggle slightly when you remove them from the oven.


