
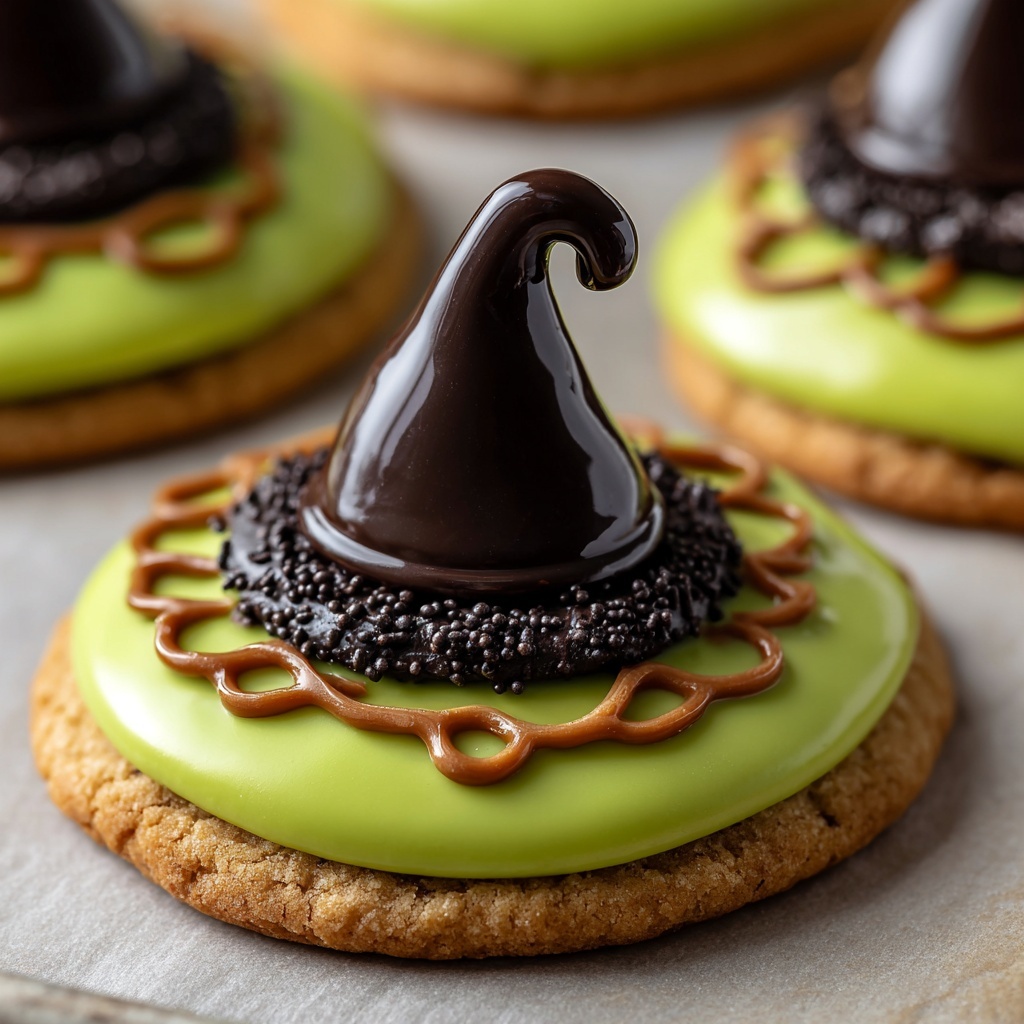
If you’re searching for a show-stopping Halloween treat that’s as fun as it is delicious, the Melted Witch Cookies Recipe is your new best friend. These whimsical cookies combine soft, buttery dough with a playful “melted” chocolate effect and charming miniature witch hats, making them irresistible for kids and adults alike. Perfect for parties or cozy evenings, this recipe brings together simple ingredients into a magical creation that captures the spooky spirit with a sweet twist.
Ingredients You’ll Need
Ingredients You’ll Need
Every ingredient in the Melted Witch Cookies Recipe plays a crucial role in creating the perfect combination of flavor, texture, and appearance. From the creamy butter that keeps the cookies tender to the vibrant food coloring that adds that enchanting green “melted” look, each element ensures these cookies are as delightful to eat as they are to admire.
- Unsalted butter: 1 cup softened butter gives the cookies a rich, tender base.
- Granulated sugar: 1 cup adds sweetness and helps create a light, fluffy dough.
- Large egg: Acts as a binder to hold your dough together with perfect texture.
- Vanilla extract: 1 teaspoon enhances the flavor with a warm, fragrant note.
- All-purpose flour: 2 ½ cups provide structure for the cookies to keep their shape.
- Baking powder: 1 teaspoon helps the cookies rise slightly, making them soft and airy.
- Salt: ½ teaspoon balances and intensifies the sweetness.
- Chocolate kiss candies: 24 pieces form the pointed tip of our witch hats.
- White chocolate chips: 1 cup, melted to create the signature green “melt” effect with food coloring.
- Vegetable oil: 1 tablespoon keeps the melted chocolate smooth and glossy.
- Miniature peanut butter cups: 12, placed upside down to serve as the wide brim of the witch hats.
- Green food coloring gel: Adds that iconic eerie green to the “melted” chocolate puddle.
- Black decorating gel: Essential for drawing the witch hat bands with precision.
- Orange and purple sprinkles: Provide festive pops of color and sparkle for decoration.
How to Make Melted Witch Cookies Recipe
Step 1: Prepare the Oven and Dough
Start by preheating your oven to 350°F (175°C) and lining a baking sheet with parchment paper to prevent sticking. Next, cream together the softened butter and granulated sugar in a large bowl until the mixture is light and fluffy — this step is crucial for a tender cookie. Then, beat in the egg and vanilla extract to build the base flavor and texture your cookies need.
Step 2: Mix Dry Ingredients and Combine
In a separate bowl, whisk together the all-purpose flour, baking powder, and salt. Gradually add this dry mixture to the wet ingredients, stirring continually until a soft dough forms. This slow incorporation ensures your cookies have the perfect crumb and do not turn out dense.
Step 3: Shape and Bake the Cookies
Scoop tablespoon-sized portions of dough and roll them into balls with your hands, placing each on the prepared baking sheet. Gently flatten each ball slightly to help the cookies spread evenly. Bake for 8 to 10 minutes, watching for edges to set while keeping the centers soft and chewy. Let them cool on the baking sheet for 5 minutes before transferring to a wire rack to cool completely.
Step 4: Create the Melting Effect and Witch Hats
While the cookies cool, melt the white chocolate chips with vegetable oil in the microwave, heating in 20-second intervals and stirring until smooth and creamy. Add a few drops of green food coloring gel and stir thoroughly until the color is even. Spoon a small amount of this green melted chocolate onto the center of each cooled cookie, allowing it to drip slightly to mimic a “puddle” of melted magic. Quickly press a miniature peanut butter cup upside down into the center of each puddle, then top with a chocolate kiss candy to create the witch’s hat.
Step 5: Add Final Decorative Touches
Use black decorating gel to draw a neat hat band around the base of each peanut butter cup, adding character and detail. Finish by sprinkling orange and purple sprinkles around each cookie for a festive burst of Halloween fun. Allow the chocolate to set completely before serving to keep your whimsical witch hats perfectly in place.
How to Serve Melted Witch Cookies Recipe
Garnishes
These cookies shine with their own unique decorations, but you can add edible glitter or candy eyes to intensify the playful, spooky vibe. A little extra sparkle or creepy eyes can transform them into even more enchanting conversation starters at your Halloween gathering.
Side Dishes
Pair the Melted Witch Cookies Recipe with a warm cup of spiced apple cider or a spooky hot chocolate topped with whipped cream and cinnamon. These comforting beverages complement the sweet richness of the cookies and make for a perfect autumn treat.
Creative Ways to Present
Arrange these delightful cookies on a rustic wooden board alongside seasonal décor like mini pumpkins, autumn leaves, or faux spider webs. For parties, stack them in a tiered candy dish or place them in festive cellophane bags tied with colorful ribbons to gift out to friends and family.
Make Ahead and Storage
Storing Leftovers
Keep any leftover Melted Witch Cookies in an airtight container at room temperature. They maintain their softness and decorated charm for up to 5 days, making it easy to enjoy the festive fun over several days.
Freezing
If you want to prepare these cookies in advance, freeze the baked and fully decorated cookies in a single layer on a baking sheet. Once solid, transfer them to a sealed freezer bag. When you’re ready to indulge, thaw at room temperature to keep the decorations intact and fresh.
Reheating
Reheating isn’t generally necessary for these cookies, but if you prefer them warm, pop in the microwave for about 10 seconds. Beware that the decorations may soften slightly, so handle gently to preserve your melted witch masterpieces.
FAQs
Can I use candy melts instead of white chocolate chips?
Absolutely! Candy melts can be easier to melt and work with, especially for adding vibrant colors. They provide a smooth texture similar to melted white chocolate and often set faster.
What if I don’t have miniature peanut butter cups?
If miniature peanut butter cups aren’t available, small chocolate-covered cookies or mini tart shells can serve as a whimsical hat base. Just be sure they are sturdy enough to hold the chocolate kiss on top.
How do I keep the decorations from sliding off?
Allow the cookies to cool fully before adding the melted chocolate “puddle,” and press the hats in while the chocolate is still wet so it acts like edible glue. Let everything set completely on a flat surface for best results.
Can these cookies be made gluten-free?
Yes, you can swap the all-purpose flour with a gluten-free baking blend that’s a one-to-one substitute. The texture might be slightly different but still delicious and festive.
Are these cookies suitable for vegetarians?
Yes, this Melted Witch Cookies Recipe is vegetarian-friendly since it doesn’t include any animal-derived gelatin or other non-vegetarian ingredients.
Final Thoughts
Making the Melted Witch Cookies Recipe is not just about baking a treat; it’s about bringing a little magic and joy to your kitchen and celebrations. The combination of soft, buttery cookies with artistically melted chocolate and festive decorations makes these cookies unforgettable. I can’t wait for you to try them out and create your own bewitching batch to share with friends and family — it’s fun, simple, and guaranteed to cast a delicious spell!
Print
Melted Witch Cookies Recipe
- Prep Time: 20 minutes
- Cook Time: 10 minutes
- Total Time: 30 minutes
- Yield: 12 cookies
- Category: Dessert
- Method: Baking
- Cuisine: American
- Diet: Vegetarian
Description
Melted Witch Cookies are whimsical Halloween-themed treats featuring soft, buttery cookies topped with a green, melted white chocolate ‘puddle,’ a miniature peanut butter cup hat, and a chocolate kiss candy, decorated with festive sprinkles and black gel for a spooky yet delicious holiday dessert.
Ingredients
Cookie Dough
- 1 cup unsalted butter, softened
- 1 cup granulated sugar
- 1 large egg
- 1 teaspoon vanilla extract
- 2 ½ cups all-purpose flour
- 1 teaspoon baking powder
- ½ teaspoon salt
Toppings & Decorations
- 24 chocolate kiss candies
- 1 cup white chocolate chips
- 1 tablespoon vegetable oil
- 12 miniature peanut butter cups
- Green food coloring gel
- Black decorating gel
- Orange and purple sprinkles
Instructions
- Preheat and prepare baking sheet. Preheat the oven to 350°F (175°C) and line a baking sheet with parchment paper.
- Cream butter and sugar. In a large bowl, cream together the softened butter and granulated sugar until the mixture is light and fluffy, which ensures a tender cookie.
- Add egg and vanilla. Mix in the egg and vanilla extract until fully combined to enrich the dough with flavor and moisture.
- Combine dry ingredients. In a separate bowl, whisk together the all-purpose flour, baking powder, and salt to evenly distribute the leavening agents and seasoning.
- Form the dough. Gradually add the dry ingredients to the wet mixture, stirring until a cohesive dough forms without overmixing.
- Shape cookies. Scoop tablespoon-sized portions of dough, roll into balls, and place them on the prepared baking sheet. Flatten each ball slightly using your hand to help the cookies spread evenly.
- Bake the cookies. Bake for 8–10 minutes, or until the edges are set but the centers remain soft, creating a tender texture.
- Cool the cookies. Allow the cookies to cool on the baking sheet for 5 minutes to firm up, then transfer to a wire rack to cool completely before decorating.
- Melt and tint chocolate. Melt the white chocolate chips with vegetable oil in the microwave using 20-second intervals, stirring between each until smooth. Stir in a few drops of green food coloring gel until the chocolate is evenly tinted.
- Decorate with melted chocolate. Spoon a small amount of the green melted chocolate onto the center of each cooled cookie, letting it drip slightly to simulate a puddle effect.
- Add the witch hats. Immediately press a miniature peanut butter cup upside down into the middle of each green puddle, then top each hat with a chocolate kiss candy.
- Detail decorations. Use black decorating gel to draw a hat band around the base of each peanut butter cup and scatter orange and purple sprinkles around the cookie to enhance the festive Halloween look.
- Set chocolate. Allow the chocolate to set completely before serving to preserve the shape and design.
Notes
- For easier melting, substitute white chocolate chips with candy melts.
- Add candy eyes on the peanut butter cup hats to create a fun twist.
- Store cookies in an airtight container at room temperature for up to 5 days to maintain freshness.


