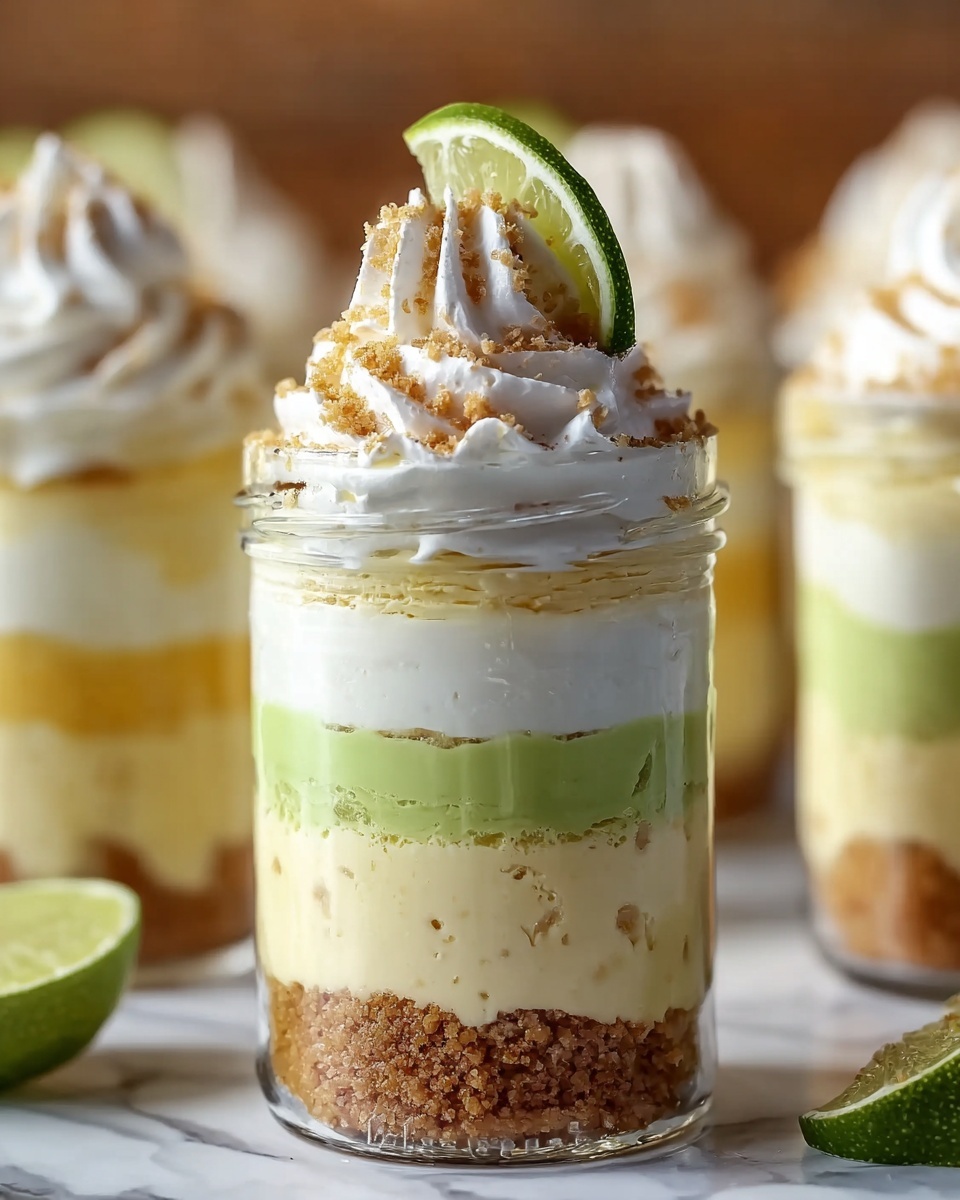
If you are searching for a vibrant, tangy, and utterly delightful dessert to impress your friends or simply treat yourself, the Key Lime Pie Jars Recipe is an absolute winner. This playful twist on the classic key lime pie creates individual servings packed with creamy, zesty filling balanced perfectly by a crisp graham cracker crust. Not only are these jars visually charming and portable, but they also deliver that refreshing citrus punch that screams summer in every bite. Whether it’s a casual get-together or a special occasion, this recipe brings brightness and joy to the table like no other.
Ingredients You’ll Need
Gathering simple ingredients is the first step to making your Key Lime Pie Jars Recipe a smashing success. Each element plays a crucial role—from the buttery crust providing crunch to the creamy filling bursting with lime flavor that lifts the whole dessert to dreamy heights.
- Graham cracker crumbs: Essential for that classic, buttery crust base; crushed just right for a perfect texture.
- Granulated sugar: Adds subtle sweetness and helps the crust set firmly when mixed with butter.
- Unsalted butter, melted: Binds the crust ingredients together and gives a rich taste.
- Sweetened condensed milk: The secret to a silky, sweet filling that balances the tart lime.
- Key lime juice: Provides the signature tangy zip that makes this dessert stand out—fresh or bottled works.
- Lime zest: Adds intense citrus aroma and enhances the flavor complexity of the filling.
- Heavy cream, whipped: Or whipped topping for fluffy, light texture that folds beautifully into the filling.
- Extra lime zest: For garnishing, lending a pretty, finishing touch and more zing.
- Optional garnishes (graham cracker crumbs or lime slices): Make each jar look irresistible and add a bit of crunch or fresh citrus flair.
How to Make Key Lime Pie Jars Recipe
Step 1: Create the Crust Layers
Begin by mixing your graham cracker crumbs, sugar, and melted butter in a medium bowl until the mixture holds together slightly. Then, press this crumbly blend firmly into the bottom of each mason jar—this crunchy base balances the creamy filling perfectly. Around 2 to 3 tablespoons per jar works beautifully, providing a solid but not overwhelming foundation.
Step 2: Whisk the Creamy Lime Filling
Next, in a large bowl, combine sweetened condensed milk, key lime juice, and lime zest. Whisk these together vigorously until the mixture thickens and becomes smooth. The sweetened milk lends creaminess while the key lime juice and zest introduce that much-loved tartness and bright citrus flavor that’s essential to this recipe.
Step 3: Fold in the Whipped Cream
Gently incorporate the whipped heavy cream or topping into your lime mixture. Folding ensures you keep it light and airy, giving the filling the perfect fluffy texture that melts in your mouth. This step transforms the tangy filling into a velvety dream ready to be layered.
Step 4: Assemble the Jars
Spoon the luscious lime filling over each graham crust layer, filling the jars about two-thirds full. Be generous—about one-third of a cup per jar, depending on the jar size. Make sure there’s enough filling to hit that perfect balance of crust and cream in every spoonful.
Step 5: Add the Whipped Cream Topping
Now for the crowning glory—add a smooth dollop of whipped cream on top of each jar’s filling. Spread it gently to create an inviting, glossy layer that invites you in. This topping not only adds richness but also balances the tartness with its hint of vanilla sweetness.
Step 6: Garnish and Chill
Sprinkle extra lime zest and a pinch of graham cracker crumbs on top of the whipped cream, or place a thin lime slice for a pop of color and freshness. Refrigerate the jars for at least two hours to let the flavors meld and the filling set to that perfect spoonable consistency. Your Key Lime Pie Jars Recipe is now ready to dazzle.
How to Serve Key Lime Pie Jars Recipe
Garnishes
Beyond the zest and crumbs, try adding fresh mint leaves or a tiny edible flower for an elegant touch. These little extras elevate the presentation and add a subtle aroma that pairs beautifully with the lime.
Side Dishes
Serve these jars alongside fresh fruit salads or a crisp cucumber mint salad to complement the pie’s tartness. Light, refreshing sides keep the meal balanced and enhance the overall citrus theme without overwhelming your palate.
Creative Ways to Present
If you’re entertaining, consider layering your jars with alternating layers of crushed graham crackers and filling for a striped visual effect. Using clear mini dessert cups or even petite wine glasses can add a sophisticated twist. Tie a colorful ribbon around each jar for an extra festive look perfect for parties or picnics.
Make Ahead and Storage
Storing Leftovers
Keep any leftover Key Lime Pie Jars tightly sealed in the refrigerator to preserve their creamy texture and fresh flavor. They will stay delicious and fresh for up to three days—making them great for preparing in advance.
Freezing
While freezing isn’t ideal due to the whipped cream topping, you can freeze the lime filling separately in an airtight container for up to one month. Thaw overnight in the fridge before folding in fresh whipped cream and assembling the jars.
Reheating
This dessert is best enjoyed chilled, so reheating isn’t recommended. If you prefer, remove from the fridge about 10 minutes before serving to take the chill off, allowing flavors to shine perfectly without melting the delicate topping.
FAQs
Can I use regular lime juice instead of key lime juice?
Yes! Regular lime juice works well and still provides that refreshing citrus punch, though key limes offer a slightly more floral and tart flavor that’s traditional for this dessert.
Is it necessary to use heavy cream, or can I use whipped topping instead?
Whipped topping is a fine substitute if you want a quicker or lighter option. Just make sure it’s thoroughly folded into the filling to maintain that creamy texture.
How long before serving can I prepare these Key Lime Pie Jars Recipe?
You can assemble the jars up to two days in advance. Just keep them refrigerated, and add garnishes like lime zest or slices right before serving for the freshest look and flavor.
Can these jars be made gluten-free?
Absolutely! Simply swap out regular graham cracker crumbs for a gluten-free version, and you’ll have a delicious gluten-free Key Lime Pie Jars treat.
What’s the best way to crush graham crackers?
The easiest method is to place crackers in a plastic bag and gently crush them with a rolling pin or the bottom of a glass until you get fine crumbs, perfect for a uniform crust.
Final Thoughts
There’s something truly special about the Key Lime Pie Jars Recipe that makes dessert time feel joyful and bright. It combines simplicity, freshness, and a visual charm that invites everyone to dig in and savor every bite. Whether you’re a dessert novice or a seasoned baker, this recipe is worth trying again and again—your friends and family will thank you! So, go ahead and whip up these little jars of sunshine, and enjoy the celebration of deliciousness that they bring to your table.
Print
Key Lime Pie Jars Recipe
- Prep Time: 20 minutes
- Cook Time: 0 minutes
- Total Time: 2 hours 20 minutes (including chilling)
- Yield: 6 to 8 servings
- Category: Dessert
- Method: No-Cook
- Cuisine: American
Description
These Key Lime Pie Jars offer a delightful and portable twist on the classic dessert. Combining a buttery graham cracker crust with a tangy and creamy key lime filling, topped with whipped cream and garnished with lime zest, these jars are perfect for summertime treats or any occasion needing a refreshing, easy-to-serve dessert. No baking required—just mix, assemble, chill, and enjoy!
Ingredients
Crust
- 1 1/2 cups graham cracker crumbs (about 12 full crackers, crushed)
- 1/4 cup granulated sugar
- 6 tablespoons unsalted butter, melted
Filling
- 1 (14 oz) can sweetened condensed milk
- 1/2 cup key lime juice (fresh or bottled)
- 1 tablespoon lime zest (from key limes or regular limes)
- 1 cup heavy cream, whipped (or 2 cups whipped topping)
Topping and Garnish
- 1 cup whipped cream (or whipped topping)
- Extra lime zest (for garnish)
- Graham cracker crumbs or lime slices (optional, for garnish)
Instructions
- Prepare the crust. In a medium bowl, combine graham cracker crumbs, sugar, and melted butter until the mixture is evenly blended. Press about 2-3 tablespoons of this mixture into the bottom of each of 6-8 (8 oz) mason jars or dessert cups to form the base.
- Make the key lime filling. In a large bowl, whisk together the sweetened condensed milk, key lime juice, and lime zest until the mixture is smooth and slightly thickened. Gently fold in the whipped heavy cream or whipped topping until fully incorporated, creating a creamy and tangy filling.
- Assemble the jars. Spoon the key lime filling over the graham cracker crust in each jar, filling them about two-thirds full (roughly 1/3 cup per jar, depending on jar size).
- Add whipped cream topping. Top each jar with a generous dollop of whipped cream, spreading it evenly across the surface for a smooth finish.
- Garnish and chill. Sprinkle extra lime zest and a pinch of graham cracker crumbs on top, or add a small lime slice for decoration. Refrigerate the jars for at least 2 hours to allow the filling to set and flavors to meld.
- Serve and enjoy. Enjoy these refreshing Key Lime Pie Jars chilled, eating straight from the jars with a spoon for a fun and convenient dessert experience.
Notes
- Use fresh key lime juice for the best authentic flavor, but bottled juice works well in a pinch.
- If you prefer a lighter topping, you can use whipped topping instead of whipped heavy cream.
- These jars can be prepared a day ahead and kept refrigerated until serving.
- For added texture, try sprinkling chopped toasted coconut or chopped nuts on top before serving.
- Ensure to press the crust firmly so it holds together under the filling.
