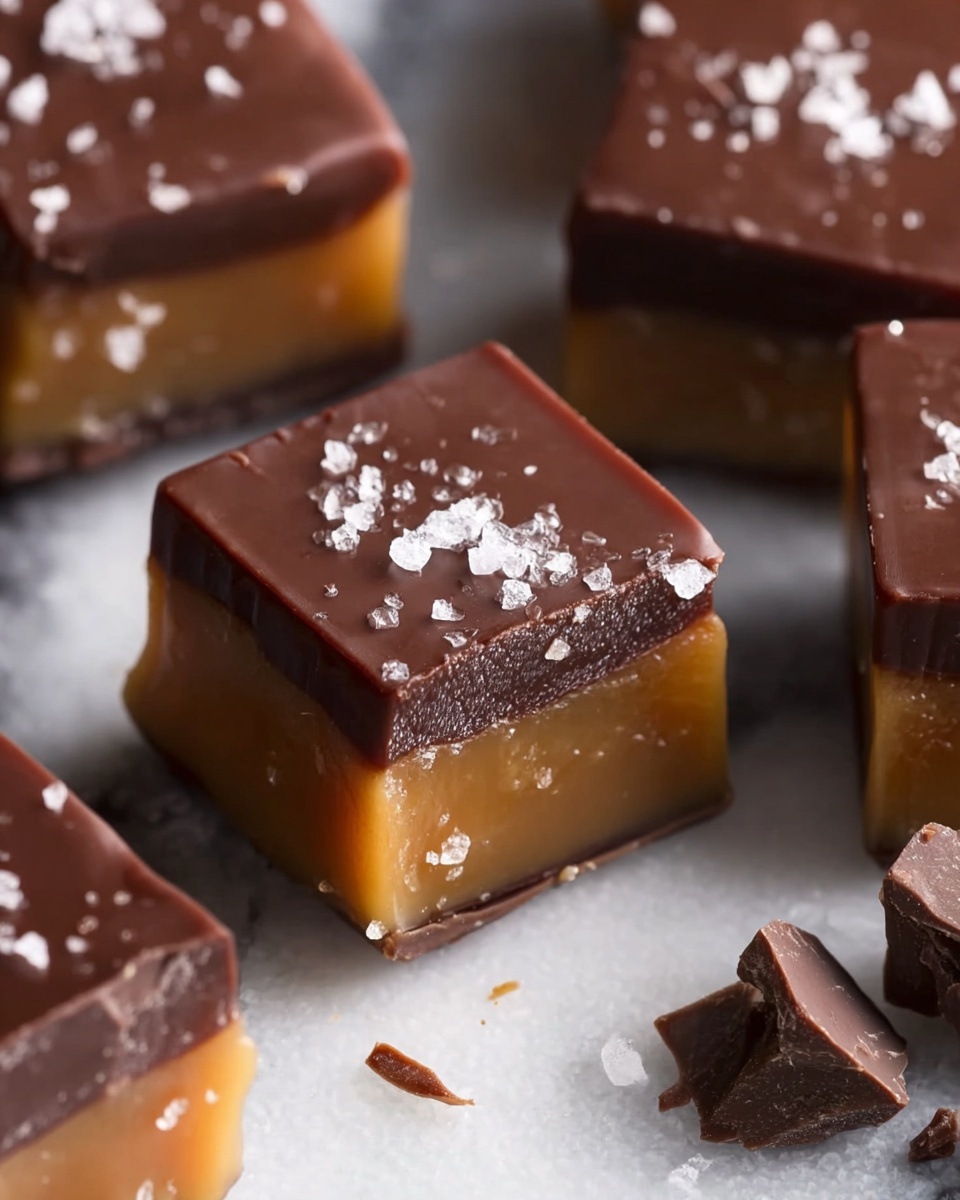
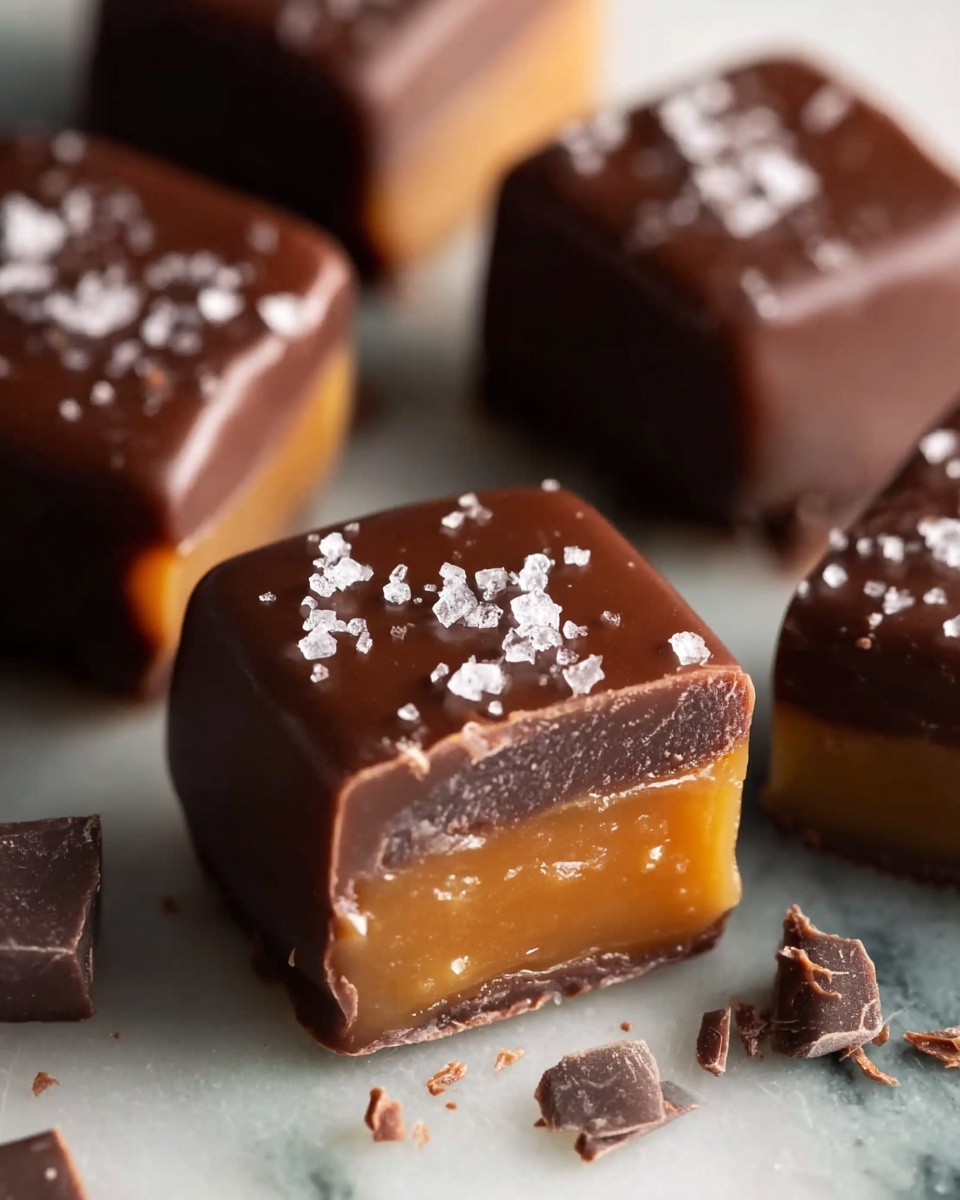
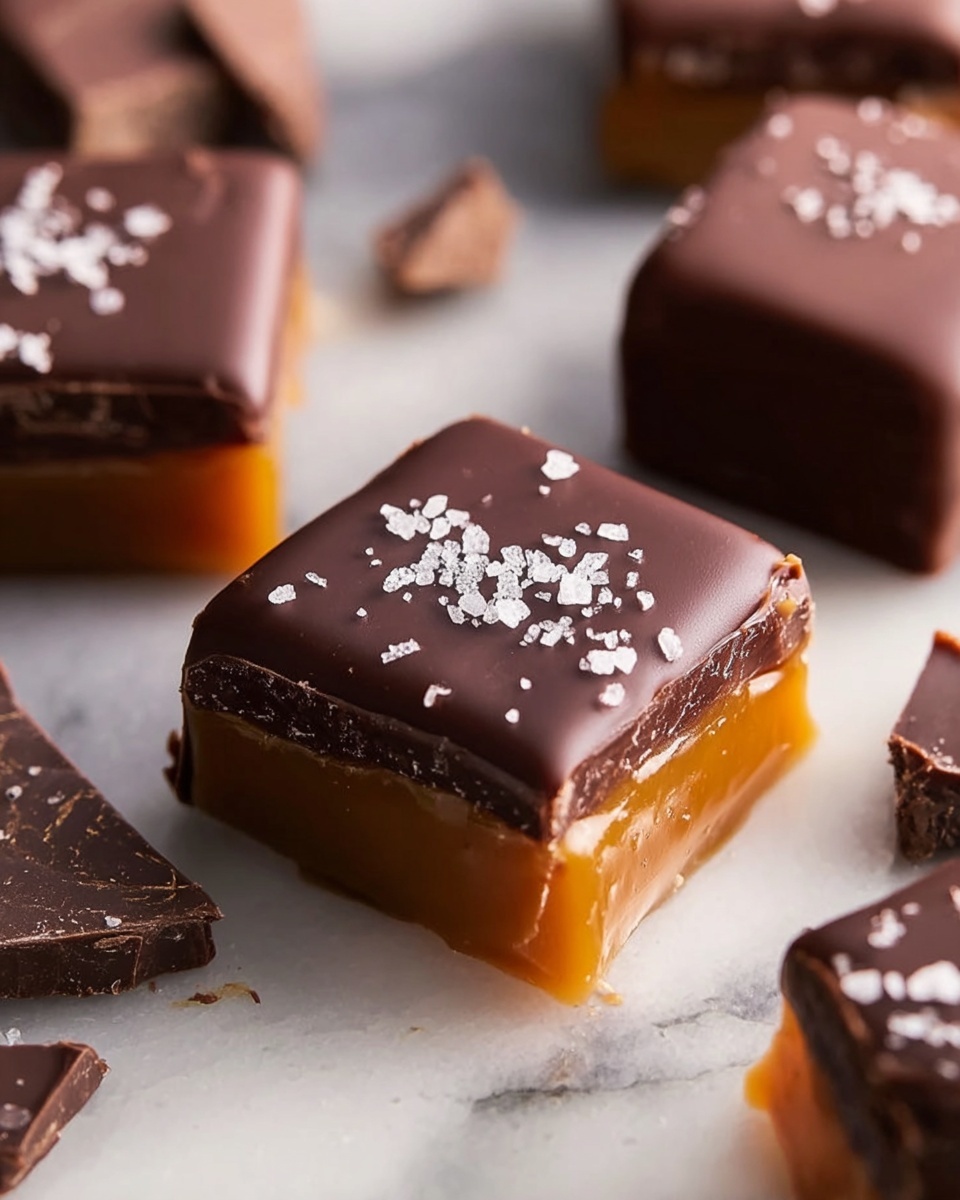
If you have a sweet tooth and a love for rich, gooey treats, this Homemade Chocolate Caramels Recipe will absolutely become your new favorite indulgence. Imagine the perfect blend of buttery caramel with silky semisweet chocolate melted right in—each bite offering a chewy, melt-in-your-mouth experience that feels both luxurious and comforting. These delightful candies strike a beautiful balance between sweetness and deep chocolate flavor, making them a wonderful treat to share, gift, or simply savor anytime you want a little joy in your day.
Ingredients You’ll Need
Each ingredient in this recipe plays a crucial role in creating the ideal texture, flavor, and appearance of your caramels. From the smooth butter contributing richness to the corn syrup ensuring that perfect chewy consistency, these simple essentials work harmoniously to bring your Homemade Chocolate Caramels Recipe to life.
- Granulated sugar: Provides sweetness and caramelizes to create the foundational flavor.
- Light corn syrup: Adds smoothness and prevents crystallization for a silky texture.
- Heavy cream: Brings creaminess and tenderizes the caramel for that soft chew.
- Unsalted butter: Adds richness and depth to the caramel’s flavor.
- Salt: Enhances all the flavors and balances sweetness perfectly.
- Vanilla extract: Offers warmth and a subtle aromatic lift to the final candy.
- Semisweet chocolate: Melts into the caramel, infusing it with luscious chocolate flavor.
- Flaky sea salt (optional): Sprinkled on top, it complements the sweet caramels with a satisfying crunch and contrast.
How to Make Homemade Chocolate Caramels Recipe
Step 1: Prepare Your Pan
Begin by lining an 8×8-inch baking pan with parchment paper, ensuring the paper extends over the edges for easy removal. Lightly grease the parchment with butter or non-stick spray—the non-stick step ensures your caramels will release effortlessly once set, which saves time and preserves their perfect shape.
Step 2: Combine Sugar, Corn Syrup, and Cream
In a heavy-bottomed saucepan over medium heat, mix the granulated sugar, light corn syrup, and half of the heavy cream. Stir constantly to dissolve the sugar evenly and prevent burning. Once the mixture reaches a boil, you’ll be ready to add the remaining ingredients for that iconic caramel base.
Step 3: Add the Remaining Cream, Butter, and Salt
Slowly pour in the remaining 1/2 cup of heavy cream, and add the butter pieces and salt. Stir gently to combine everything thoroughly. This step is essential for integrating the fat and liquid, which give your caramels a luscious, creamy texture.
Step 4: Cook to the Perfect Temperature
Continue cooking the mixture without stirring, allowing it to reach 245°F. Using a candy thermometer here is key because this “firm ball” stage ensures your caramels will be chewy but not too hard. Precision in temperature makes or breaks the texture, so be patient as you wait.
Step 5: Add Vanilla and Melted Chocolate
Remove the pot from heat and stir in the vanilla extract followed by the chopped semisweet chocolate. Stir vigorously until the chocolate fully melts and the caramel becomes silky smooth. This step transforms your caramel into a decadent chocolate treat, adding depth of flavor and richness.
Step 6: Pour and Set
Pour the hot caramel mixture carefully into your prepared pan, using a spatula to spread it evenly. Let it cool at room temperature for at least 4 hours or until firm. This patient step allows the caramels to solidify perfectly so they’re easy to cut and enjoy.
Step 7: Cut and Add Finishing Touches
Once the caramel has set completely, lift it from the pan using the parchment overhang and cut into 1-inch squares. If you love a hint of sea salt contrast, sprinkle flaky sea salt on top of each piece for a delightful finish. For storage, wrap individual caramels in wax paper to keep them fresh and prevent sticking.
How to Serve Homemade Chocolate Caramels Recipe
Garnishes
While the flaky sea salt is a classic choice that pairs perfectly with your homemade caramels, you can also experiment with a light dusting of cocoa powder or finely chopped toasted nuts. These garnishes add texture and a subtle flavor twist that can elevate your homemade chocolates from everyday goodies to elegant gifts.
Side Dishes
Pair your caramels with a robust cup of coffee or a rich dark hot chocolate for an indulgent treat. These combinations highlight the chocolate and caramel flavors beautifully, creating a comforting snack or dessert experience that’s hard to beat.
Creative Ways to Present
Thinking beyond simple wrapping? Arrange your caramels in decorative boxes lined with tissue paper or place them in small glass jars tied with a pretty ribbon. These thoughtful presentations make your Homemade Chocolate Caramels Recipe perfect for gifting during holidays or special occasions.
Make Ahead and Storage
Storing Leftovers
Keep your caramels fresh at room temperature in an airtight container. Wrapped individually in wax paper, they remain soft and chewy for up to two weeks, making them a convenient treat to enjoy over time without losing their delightful texture.
Freezing
If you want to make these caramels in advance or save extras for later, freezing is a great option. Wrap each caramel tightly in wax paper then place them in a freezer-friendly container. They will keep well for several months, and you can thaw individual pieces at room temperature before serving.
Reheating
While these caramels are best enjoyed at room temperature, if you prefer them softer, gently warm them in your hands or microwave for just a few seconds. Avoid over-warming, which may cause them to lose their ideal texture and become too sticky.
FAQs
What is the best chocolate to use for this recipe?
Semisweet chocolate is recommended for a balanced sweetness and depth of flavor, but if you want a richer chocolate taste, bittersweet chocolate works beautifully. Avoid milk chocolate as it changes the caramel’s consistency and flavor profile.
Can I make this recipe without a candy thermometer?
While it’s possible, a candy thermometer ensures accuracy, which is critical for achieving the perfect chewy texture. Without one, it can be tricky to judge the exact temperature and risk undercooked or overly hard caramels.
Why did my caramels turn out grainy?
Graininess usually happens if the sugar crystallizes during cooking. Using corn syrup helps prevent this, but stirring too much or not properly managing the heat can cause crystals. Clean the pan sides before cooking to avoid accidental crystallization.
How long do Homemade Chocolate Caramels Recipe last?
Stored properly in an airtight container at room temperature, they remain fresh for up to two weeks. For longer storage, freezing is recommended, which preserves their flavor and texture for several months.
Can I substitute the corn syrup with something else?
Corn syrup prevents crystallization and ensures a smooth texture. Substituting with honey or maple syrup may alter the flavor and texture, so it’s best to stick with the classic corn syrup for consistent results.
Final Thoughts
There is something truly magical about making your own sweets, and this Homemade Chocolate Caramels Recipe brings that magic right to your kitchen. These caramels are not just treats—they’re moments of joy crafted with love and simple ingredients. I wholeheartedly encourage you to try this recipe and watch how it becomes an irresistible favorite in your home, perfect for sharing or savoring all by yourself.
Print
Homemade Chocolate Caramels Recipe
- Prep Time: 10 minutes
- Cook Time: 30 minutes
- Total Time: 40 minutes (plus 4 hours cooling time)
- Yield: About 64 caramels (1-inch pieces)
- Category: Candy
- Method: Stovetop
- Cuisine: American
- Diet: Vegetarian
Description
Deliciously soft homemade chocolate caramels that combine the rich flavors of creamy caramel and semisweet chocolate. Perfect for gifting or enjoying as a sweet treat, these caramels have a smooth texture and a hint of flaky sea salt to balance the sweetness.
Ingredients
Caramel Base
- 1 cup granulated sugar
- 1 cup light corn syrup
- 1 cup heavy cream (divided)
- 1/2 cup unsalted butter (cut into pieces)
- 1/4 teaspoon salt
Flavoring & Topping
- 1 teaspoon vanilla extract
- 4 ounces semisweet chocolate (chopped)
- Flaky sea salt for topping (optional)
Instructions
- Prepare the Pan: Line an 8×8-inch baking pan with parchment paper and lightly grease it to prevent sticking.
- Combine Ingredients: In a heavy-bottomed saucepan, mix the sugar, corn syrup, and half of the heavy cream over medium heat. Stir constantly until the mixture begins to boil to dissolve the sugar properly.
- Add Remaining Ingredients: Slowly add the remaining half of the heavy cream, the butter pieces, and salt. Stir to combine thoroughly and evenly.
- Cook the Caramel: Continue cooking the mixture without stirring until it reaches 245°F (firm ball stage) on a candy thermometer, which is crucial for achieving the right caramel firmness.
- Add Vanilla and Chocolate: Remove the saucepan from heat, stir in the vanilla extract and chopped semisweet chocolate until the mixture becomes completely smooth and glossy.
- Pour and Cool: Pour the hot caramel into the prepared pan and spread it out evenly. Let it cool at room temperature for at least 4 hours or until firm enough to cut.
- Cut and Serve: Once set, cut the caramel into approximately 1-inch squares. Optionally, sprinkle flaky sea salt on top of each piece for added flavor.
- Store Properly: Wrap individual caramels in wax paper and store them in an airtight container at room temperature for up to two weeks.
Notes
- Use a reliable candy thermometer to ensure the caramel reaches the correct temperature for perfect texture.
- Store caramels in an airtight container at room temperature for up to two weeks to maintain freshness.
- For a richer chocolate flavor, substitute semisweet chocolate with bittersweet chocolate.


