
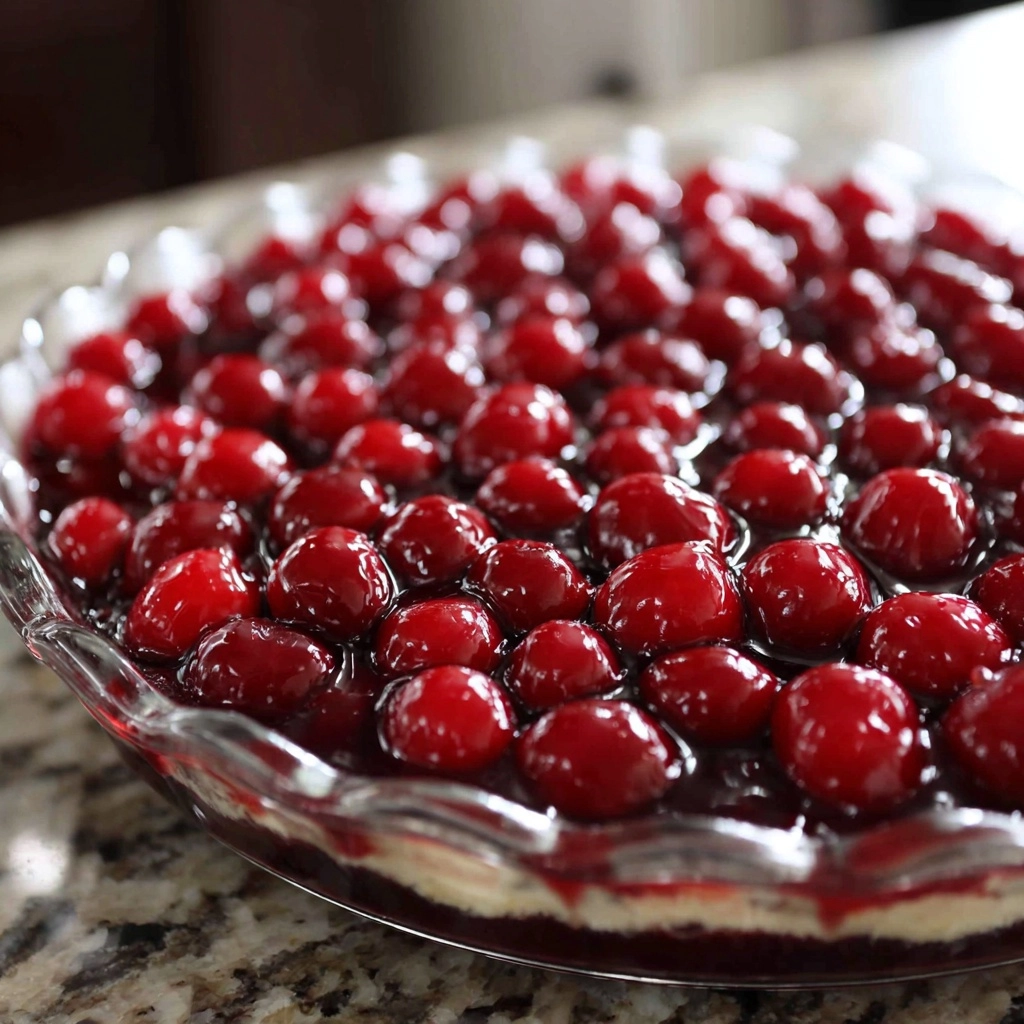
If you’ve ever dreamed of capturing the vibrant taste of cherries all year round, this Homemade Cherry Pie Filling Recipe is your new best friend. It’s a luscious, perfectly balanced blend of sweet and tart that will elevate any dessert from ordinary to show-stopping. Whether tucked inside a flaky crust or spooned generously over ice cream, this filling bursts with fresh cherry flavor and a silky texture that feels like summer in every bite. Plus, making it yourself means you control every ingredient, ensuring a fresh and wholesome treat that’s simply irresistible.
Ingredients You’ll Need
These straightforward ingredients are the heart and soul of your cherry filling. Each one plays its role in building the perfect texture, flavor, and color, allowing that glorious cherry essence to shine through.
- 4 cups pitted cherries (fresh or frozen): The star of the show, these give the filling its bright flavor and natural sweetness.
- ¾ cup granulated sugar: Sweetens the cherries while helping to create that classic pie filling consistency.
- ¼ cup cornstarch: The magic thickener that transforms juicy cherries into a luscious, syrupy filling.
- 1 tablespoon lemon juice: Adds a fresh tang that balances sweetness and enhances the cherry’s natural brightness.
- ⅛ teaspoon almond extract (optional): A subtle nutty note that complements the cherries beautifully if you choose to add it.
- ¼ teaspoon ground cinnamon (optional): A little warmth and depth to spice up the flavor profile delicately.
- ¼ cup water (or cherry juice if using frozen cherries): Helps the cornstarch dissolve smoothly and keeps the filling juicy.
- Pinch of salt: Elevates all the flavors, making the cherries taste even sweeter.
How to Make Homemade Cherry Pie Filling Recipe
Step 1: Combine the Dry Ingredients
Start by whisking together the granulated sugar, cornstarch, salt, and water in a medium saucepan. This ensures the cornstarch dissolves fully before adding the cherries, helping prevent lumps and giving you that silky filling texture everyone loves.
Step 2: Add Cherries and Lemon Juice
Next, stir in the pitted cherries and fresh lemon juice. The lemon juice brightens the cherries’ flavor and balances the sweetness, which is key for a filling that isn’t overly sugary but perfectly vibrant.
Step 3: Cook Until Thickened
Place the saucepan over medium heat and cook, stirring constantly. After about 8 to 10 minutes, the mixture will bubble and thicken nicely. If you’re using frozen cherries, give it a few extra minutes to reduce any excess liquid and concentrate the flavors.
Step 4: Add Optional Flavors and Cool
Remove the pan from the heat and stir in the almond extract and ground cinnamon, if you’re using them. These little touches add complexity that makes the filling taste truly homemade. Let the filling cool to room temperature before using it for the best consistency.
How to Serve Homemade Cherry Pie Filling Recipe
Garnishes
To make your cherry pie filling really pop, consider topping with a dollop of freshly whipped cream or a sprinkle of toasted sliced almonds. These add a delightful creaminess and crunch contrast that will keep everyone coming back for more.
Side Dishes
This filling is more versatile than you might think — try serving it alongside vanilla ice cream or creamy cheesecake for a classic combo. It also pairs wonderfully with breakfast dishes like pancakes and waffles for a fruity morning twist.
Creative Ways to Present
Beyond pies and tarts, use this Homemade Cherry Pie Filling Recipe as a filling for crepes, swirl it into yogurt bowls, or spoon it over pound cake or even oatmeal. Its rich, fruity goodness works beautifully in both desserts and breakfast treats.
Make Ahead and Storage
Storing Leftovers
If you make extra, simply transfer the cooled filling to an airtight container and keep it in the refrigerator for up to 5 days. This makes it convenient to enjoy throughout the week or incorporate into other recipes.
Freezing
Want to extend the magic? Freeze any leftovers in a freezer-safe container for up to 3 months. When you’re ready to use it, thaw the filling slowly in the fridge overnight to preserve the texture and flavor perfectly.
Reheating
Reheat gently on the stovetop over low heat, stirring occasionally until warmed through. If it seems a bit thick after thawing, simply add a splash of water or cherry juice to restore that perfect saucy consistency.
FAQs
Can I use frozen cherries for the Homemade Cherry Pie Filling Recipe?
Absolutely! Frozen cherries work wonderfully and are often more convenient year-round. Just remember to cook the filling a bit longer to evaporate extra liquid and achieve that thick, luscious texture.
Is almond extract necessary for this recipe?
No, it’s entirely optional. Almond extract adds a lovely depth of flavor that complements cherries beautifully, but the filling will still be delicious and classic without it.
Can I make this recipe sugar-free?
You can experiment with sugar substitutes, but keep in mind that sugar contributes to both sweetness and texture. If you go sugar-free, you may need to adjust the recipe and expect a slightly different consistency and taste.
How long does the Homemade Cherry Pie Filling Recipe keep in the fridge?
Stored properly in an airtight container, it will stay fresh for up to 5 days. Beyond that, the texture and flavor may start to degrade.
Can I use this filling for other desserts besides pie?
Definitely! This filling is super versatile—try it in tarts, as a topping on ice cream, in crepes, or even mixed into yogurt. It’s a fantastic way to add cherry flavor to many sweet treats.
Final Thoughts
There’s something truly special about making your own Homemade Cherry Pie Filling Recipe from scratch. It’s fresh, flavorful, and customizable, plus it fills your kitchen with the wonderful scent of cherries and spices. Whether you’re baking a classic pie or exploring creative uses, this recipe is a dazzling way to celebrate cherries any time of year. I can’t wait for you to try it and make it your own!
Print
Homemade Cherry Pie Filling Recipe
- Prep Time: 5 minutes
- Cook Time: 10 minutes
- Total Time: 15 minutes
- Yield: About 3 cups
- Category: Dessert
- Method: Stovetop
- Cuisine: American
- Diet: Vegan, Gluten Free
Description
This Homemade Cherry Pie Filling recipe offers a deliciously sweet and thick cherry topping perfect for pies, tarts, or desserts. Made with fresh or frozen cherries, sugar, and a hint of lemon juice and optional spices, this filling is easy to prepare on the stovetop and can be stored for later use.
Ingredients
Filling Ingredients
- 4 cups pitted cherries (fresh or frozen)
- ¾ cup granulated sugar
- ¼ cup cornstarch
- 1 tablespoon lemon juice
- ⅛ teaspoon almond extract (optional)
- ¼ teaspoon ground cinnamon (optional)
- ¼ cup water (or cherry juice if using frozen cherries)
- Pinch of salt
Instructions
- Prepare the mixture: In a medium saucepan, combine the sugar, cornstarch, salt, and water. Whisk together until the mixture is smooth and free of lumps.
- Add cherries and lemon: Stir in the pitted cherries and lemon juice into the saucepan mixture.
- Cook filling: Place the saucepan over medium heat and cook the mixture, stirring constantly to prevent sticking or burning, until it begins to bubble and thicken, about 8 to 10 minutes. If using frozen cherries, continue cooking a few minutes longer to allow excess liquid to evaporate and the filling to thicken properly.
- Finish and cool: Once thickened and the cherries are tender, remove the saucepan from heat. Stir in the almond extract and ground cinnamon if using. Allow the filling to cool to room temperature before use.
- Use or store: Use the cherry pie filling immediately in your favorite pie, tart, or dessert recipe, or transfer it to an airtight container and refrigerate for up to 5 days. The filling can also be frozen for up to 3 months; thaw in the refrigerator before using.
Notes
- This recipe yields enough filling to fill one 9-inch pie.
- For a smoother texture, gently mash some cherries while cooking.
- Filling can be frozen for up to 3 months; thaw in the fridge before using.


