“`html
If you’re on the hunt for a truly irresistible, crunchy, nutty, and chocolatey delight this season, look no further than this Homemade Butterfingers: A Spooky Sweet Treat for Halloween Recipe. It’s everything you love about classic Butterfingers candy bars, but made right at home with simple ingredients and a delightfully crispy texture that will have everyone coming back for another bite. Perfectly sweet with just the right hint of molasses and maple syrup, this treat is ideal for Halloween celebrations or anytime you want a nostalgic, crunchy snack with a homemade touch.

Ingredients You’ll Need
Getting this Homemade Butterfingers: A Spooky Sweet Treat for Halloween Recipe right depends on a handful of simple but essential ingredients. Each one is handpicked to bring texture, flavor, and a touch of nostalgia to this candy bar. From the crisp corn flakes to the rich peanut butter and melty chocolate, these ingredients work in harmony to create something magical.
- 2 cups corn flakes (or corn chex cereal): The key for that irresistible crunch and light texture that mimics the original Butterfinger.
- 3/4 cup peanut butter: Adds creamy richness and that beloved nutty flavor; opt for a smooth variety for easy mixing.
- 1/4 cup pure maple syrup: Natural sweetness that deepens the flavor and ensures the bars stick together perfectly.
- 1 tsp blackstrap molasses (or regular molasses): Brings a subtle molasses undertone and enhances the candy’s caramel-like depth.
- Pinch of salt (more if your peanut butter isn’t salted): Balances the sweetness and amplifies all the flavors wonderfully.
- 1 cup dark chocolate chips: For coating the bars and adding a luscious, bittersweet finish.
- 2 tsp butter: Helps melt the chocolate smoothly and gives it a shiny, creamy texture for dipping.
How to Make Homemade Butterfingers: A Spooky Sweet Treat for Halloween Recipe
Step 1: Crush the Corn Flakes
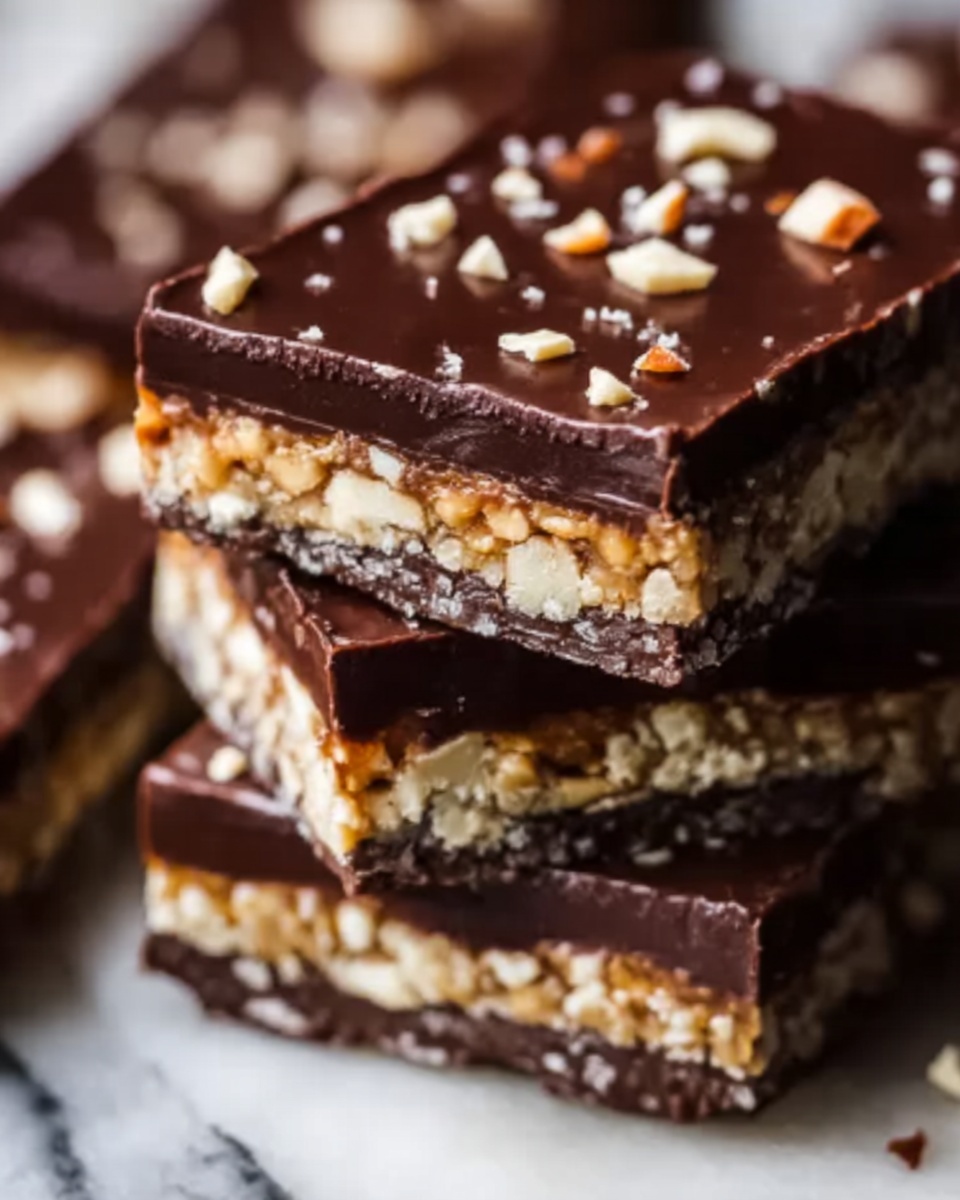
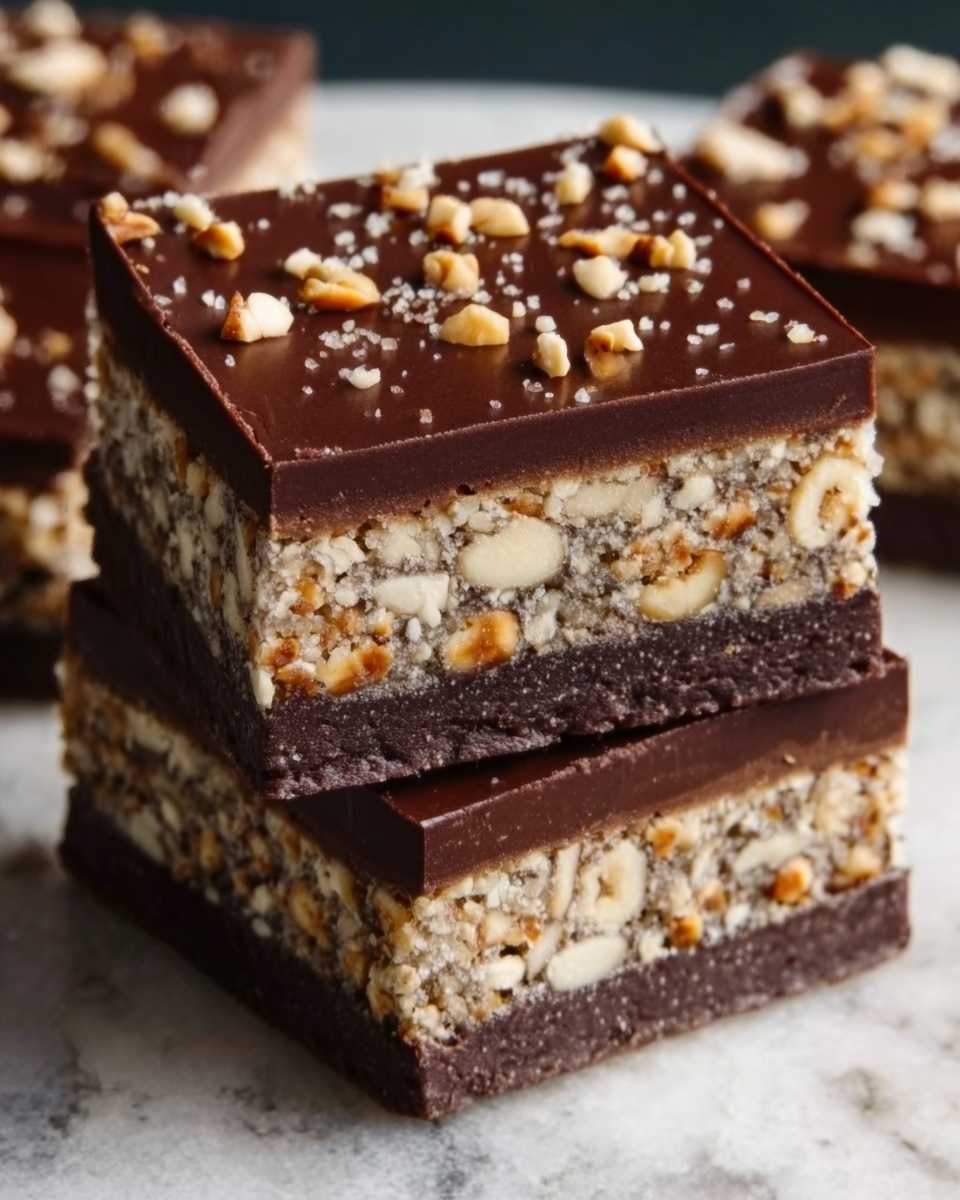
Start by placing your corn flakes into a ziplock bag or a large bowl and gently crush them to create small, crunchy pieces. The goal is to maintain some texture, so avoid pulverizing them into dust. This crispiness is essential—it gives the finished bars that classic Butterfinger crunch that everyone adores.
Step 2: Make the Peanut Butter Mixture
In a small pot set to medium-low heat, combine the peanut butter, pure maple syrup, and molasses. Stir continuously until the mixture becomes smooth and fully melded, being careful not to let it burn. This melting process allows the flavors to blend together into a sticky, luscious base. Don’t forget to add a pinch of salt here to lift all those flavors—add a little more if your peanut butter isn’t salted already.
Step 3: Combine Mixtures
Pour the gooey peanut butter mixture over your crushed corn flakes in a large mixing bowl. Stir everything together until all the flakes are evenly coated in the nutty syrup. This is where your bars start to take shape with a perfect balance of crunch meeting sweetness.
Step 4: Prepare for Freezing
Line a loaf pan with parchment paper and press the mixture firmly into it, making sure it’s evenly packed to avoid crumbling later. Then, pop it into the freezer for 45 to 60 minutes, or even overnight if you want to prepare ahead. Chilling solidifies the bars, making them easier to handle for the final steps.
Step 5: Melt the Chocolate
While your bars chill, melt the dark chocolate chips with butter in a microwave-safe bowl. Heat in 30-second bursts, stirring in between to ensure the chocolate smooths out without burning. This silky chocolate will form the perfect coating for your crunchy bars.
Step 6: Dip and Set
Once the bars are firm, lift them out of the pan and slice into individual portions. Dip each bar into the melted chocolate, making sure every bit is covered in a luscious, dark coating. Place the dipped bars on parchment paper and refrigerate them until the chocolate hardens, which usually takes about 30 to 60 minutes. Then, your spooky sweet treat is ready to enjoy!
How to Serve Homemade Butterfingers: A Spooky Sweet Treat for Halloween Recipe
Garnishes
For an extra festive flair, try sprinkling a little sea salt or crushed Halloween-themed candy on top of the chocolate while it’s still wet. Finely chopped roasted peanuts or a tiny drizzle of white chocolate can also elevate the look and add subtle flavor contrast for your guests to appreciate.
Side Dishes
Pair your Homemade Butterfingers: A Spooky Sweet Treat for Halloween Recipe with a cold glass of milk or a warm cup of coffee to balance the intense sweetness and bring out the rich peanut butter notes. If you’re hosting a party, consider setting out some fresh fruit slices like apple or pear to cleanse the palate between bites.
Creative Ways to Present
Presentation makes all the difference! Serve the bars on a vintage-style platter lined with autumn leaves or inside small treat bags with Halloween stickers for a charming take-home gift. For a party touch, stick mini flags or spooky picks into each bar to help guests grab their favorite spooky sweet treat with ease.
Make Ahead and Storage
Storing Leftovers
Keep any leftover Homemade Butterfingers: A Spooky Sweet Treat for Halloween Recipe bars in an airtight container in the refrigerator for up to one week. This keeps them fresh and maintains both their crunchy texture and chocolate coating without sweating or melting.
Freezing
If you want to enjoy these treats later, freeze the bars wrapped individually in parchment paper and stored in a sealed freezer bag. They’ll keep nicely for up to two months and make for an easy grab-and-go snack whenever you need a peanut butter-chocolate fix.
Reheating
There’s no need to reheat these bars; they’re best enjoyed chilled or at room temperature so you get the full crunch and snap from the chocolate coating. If you prefer them slightly softer, just leave them out for 10-15 minutes before serving.
FAQs
Can I use crunchy peanut butter instead of smooth?
Absolutely! Crunchy peanut butter will add an extra layer of texture to your Homemade Butterfingers: A Spooky Sweet Treat for Halloween Recipe, making each bite even more interesting. Just be sure to mix thoroughly so it combines well with the syrup mixture.
What if I don’t have molasses on hand?
If molasses isn’t available, you can substitute it with a bit of dark brown sugar or even honey. The flavor profile might shift slightly, but it will still be delicious and maintain that subtle caramel note that’s key to this recipe.
Can I use milk chocolate instead of dark chocolate?
Yes! Milk chocolate will give your bars a sweeter and creamier coating. Dark chocolate adds a slight bitterness that balances the peanut butter’s sweetness, but using milk chocolate is just as tasty if that’s your preference.
How do I prevent the chocolate from melting too quickly once served?
Serving your Homemade Butterfingers: A Spooky Sweet Treat for Halloween Recipe bars chilled helps keep the chocolate firm. Keep them refrigerated until just before serving to prevent them from melting, especially in warm environments.
Is there a way to make this recipe nut-free?
This recipe relies heavily on peanut butter for its flavor and texture, so nut-free substitutions are tricky. However, you could try sunflower seed butter or soy nut butter, though results may vary and the classic Butterfinger taste won’t be exactly the same.
Final Thoughts
I can’t recommend this Homemade Butterfingers: A Spooky Sweet Treat for Halloween Recipe enough if you’re looking for a nostalgic, crunchy, and utterly addictive candy bar you can create right in your own kitchen. It’s simple, fun to make, and perfect for sharing at Halloween gatherings or anytime you want a special, homemade treat with a little spooky spirit. So gather your ingredients, invite your favorite people, and dive into making these addictively good bars—you’re going to love every bite!
“`
Print
Homemade Butterfingers: A Spooky Sweet Treat for Halloween Recipe
- Prep Time: 15 minutes
- Cook Time: 10 minutes
- Total Time: 75 minutes
- Yield: 12 bars
- Category: Candy
- Method: No-Cook
- Cuisine: American
Description
This recipe for Homemade Butterfingers recreates the classic crunchy, peanut buttery candy bar at home, perfect as a spooky sweet treat for Halloween. Combining crushed corn flakes with a smooth peanut butter and molasses mixture, these bars are then coated in rich dark chocolate for a deliciously addictive snack. Easy to prepare with simple ingredients and no baking required, these bars are a fun and festive treat for parties or everyday indulgence.
Ingredients
Dry Ingredients
- 2 cups corn flakes (or corn chex cereal)
- Pinch of salt (more if your peanut butter isn’t salted)
Wet Ingredients
- 3/4 cup peanut butter
- 1/4 cup pure maple syrup
- 1 tsp blackstrap molasses (or regular molasses)
Chocolate Coating
- 1 cup dark chocolate chips
- 2 tsp butter
Instructions
- Crush Corn Flakes: Add corn flakes to a ziplock bag or bowl and crush them until you get fine, little pieces. Avoid turning them into powder as you want to maintain some texture and crunch in the bars.
- Make Peanut Butter Mixture: In a small pot over medium-low heat, combine peanut butter, maple syrup, and molasses. Stir gently until melted and combined into a smooth mixture, being careful not to burn it. Add a pinch of salt (or more if peanut butter is unsalted) and stir again. Alternatively, this mixture can be warmed in the microwave in 20-30 second increments.
- Combine Mixtures: In a large bowl, add the crushed corn flakes. Pour the warm peanut butter mixture over them and stir thoroughly until the flakes are evenly coated.
- Prepare for Freezing: Transfer the combined mixture into a parchment-lined loaf pan and press down firmly and evenly to pack it. Place the pan in the freezer for 45-60 minutes or overnight to set the bars.
- Melt Chocolate: When the bars are nearly chilled, melt the dark chocolate chips and butter together in a microwave-safe bowl. Heat in 30-second increments, stirring after each to prevent burning, until smooth.
- Dip and Set: Remove the set bars from the pan and slice into individual bars. Dip each bar into the melted chocolate coating, then place on a parchment-lined pan or plate. Refrigerate until the chocolate is fully set, about 30-60 minutes. Enjoy your homemade Butterfinger bars!
Notes
- You can use corn chex cereal as an alternative to corn flakes.
- If your peanut butter is unsalted, add a little extra salt to balance the sweetness.
- If you prefer a sweeter chocolate coating, use semi-sweet chocolate chips instead of dark.
- Store the finished bars in the refrigerator to keep the chocolate coating firm.
- For a nut-free version, substitute the peanut butter with sunflower seed butter.


