
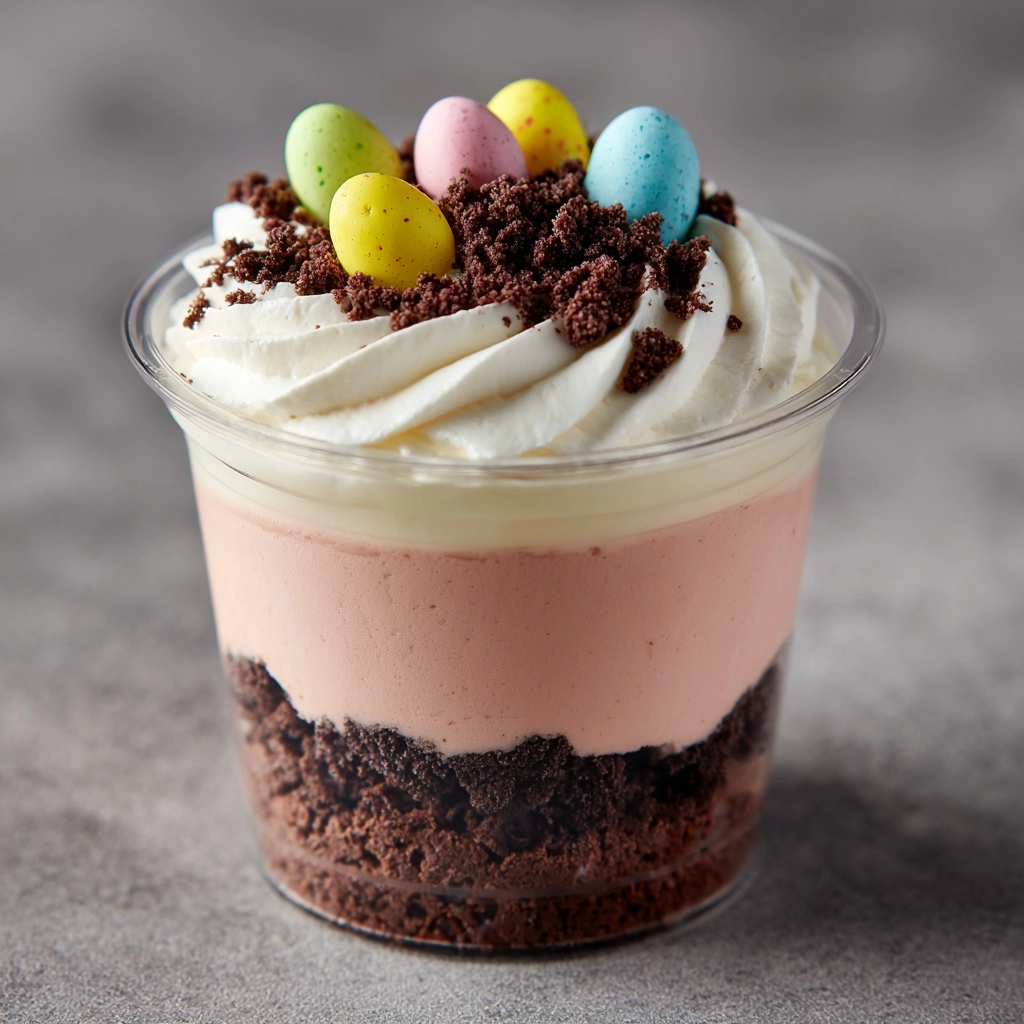
If you’re on the hunt for a fun, festive, and absolutely irresistible treat this spring, you’ve got to try this Easter Dirt Cups Recipe. It’s one of those delightful no-bake desserts that feel like a party in every bite, combining creamy chocolate pudding with crumbly “dirt” cookies and topped off with vibrant pastel candies and adorable marshmallow Peeps. The layers come together perfectly, creating a rich texture and whimsical look that’s sure to bring smiles at any Easter gathering or spring celebration. Trust me, these dirt cups are as charming as they are delicious—and they’re super quick to whip up!

Ingredients You’ll Need
Let’s keep it simple but tasty with ingredients that each play a crucial role in making the Easter Dirt Cups Recipe shine. From the silky pudding base to the crunchy cookie crumbs and those fun, colorful toppers, each component adds a little magic to your dessert.
- Instant chocolate pudding mix: This forms the rich, chocolatey foundation that brings creaminess and bold flavor.
- Cold milk: Essential for thickening and setting the pudding just right; cold milk helps achieve the perfect texture.
- Whipped topping (such as Cool Whip): Lightens the pudding for a fluffy, cloud-like mouthfeel that’s pure indulgence.
- Chocolate sandwich cookies (like Oreos): Crumbled finely, these create the iconic “dirt” layer adding crunch and chocolatey goodness.
- Pastel-colored candy eggs or jelly beans: The perfect pop of color and sweetness that screams springtime fun.
- Marshmallow Peeps (chicks or bunnies): Adorable Easter mascots that make each cup even more festive and inviting.
- Green-tinted shredded coconut (optional): Adds a realistic grass effect plus a subtle coconut flavor and texture.
- Small clear plastic cups or jars: Great for showcasing the layered goodness and easy individual servings.
How to Make Easter Dirt Cups Recipe
Step 1: Prepare the Chocolate Pudding
Start by whisking the instant chocolate pudding mix with cold milk for a full 2 minutes—that extra whisking time really thickens the pudding beautifully. Then, let the mixture sit for 5 minutes to set fully. This gives the pudding a rich, creamy texture that holds up well through layering.
Step 2: Fold in the Whipped Topping
Gently fold your cool whipped topping into the pudding until everything’s smooth and combined. This step adds that dreamy, airy consistency that balances the dense chocolate flavor perfectly, making every spoonful light and luscious.
Step 3: Crush the Chocolate Cookies
Now, grab your chocolate sandwich cookies and crush them into fine crumbs using a food processor or blender. These crumbs mimic “dirt” in both taste and appearance—chocolatey crunch with a hint of sweetness. If you don’t have a processor, placing cookies in a sealed bag and giving them a good whack with a rolling pin works, too!
Step 4: Layer the Dirt Cups
In each clear cup or jar, start with a layer of cookie crumbs at the bottom, then dollop a layer of pudding mixture on top. Repeat the layering so you end with a final sprinkle of cookie crumbs on the top. This stacked look is not only pretty but ensures every bite has the perfect balance of creamy and crunchy.
Step 5: Add Grass and Springtime Decor
If you’re using green-tinted shredded coconut, sprinkle a little on top to mimic fresh spring grass. Finally, crown each cup with your pastel candy eggs and one charming marshmallow Peep. This finishing touch brings that unmistakable Easter spirit right to your table!
Step 6: Chill Before Serving
Refrigerate your Easter Dirt Cups for at least 30 minutes so they can chill and flavors meld. Trust me, this makes the pudding extra refreshing and the cookie crumbs soften just enough to be melt-in-your-mouth delicious.
How to Serve Easter Dirt Cups Recipe
Garnishes
Feel free to get creative with your garnishes! Besides the candy eggs and Peeps, you can sprinkle edible flowers, chocolate rocks, or even add gummy worms for an extra playful “garden” vibe. A tiny drizzle of chocolate syrup or a few fresh mint leaves make a lovely visual and flavor contrast.
Side Dishes
These dirt cups are rich and sweet, so pairing them with light, fresh sides is lovely. Think fruit salad, lemon bars, or simple vanilla wafers. If you’re serving a brunch or family meal, a refreshing spring green salad or fruit platter balances the dessert’s decadence perfectly.
Creative Ways to Present
Using clear plastic cups or small mason jars really shows off the charming layers beautifully. For a party, place each dirt cup inside a small flower pot or decorate the serving tray with edible grass and flowers for a fun visual twist. Adults and kids alike will love the playful, garden-inspired presentation!
Make Ahead and Storage
Storing Leftovers
If you have leftovers, cover the dirt cups tightly with plastic wrap or transfer to airtight containers and refrigerate. They’ll stay delicious for up to 2 days—perfect if you want to prepare them a day ahead for a stress-free celebration.
Freezing
Freezing isn’t ideal for this dessert since the creamy pudding and whipped topping can separate and change texture. It’s best enjoyed fresh or refrigerated, keeping that perfect, smooth consistency.
Reheating
No need to reheat! Easter Dirt Cups Recipe is meant to be served cold and chilled. Just take them out of the fridge a few minutes before serving if you want them a little less cold, but otherwise, they’re perfect as-is.
FAQs
Can I make Easter Dirt Cups Recipe vegan?
Absolutely! Use a dairy-free chocolate pudding mix or make your own vegan pudding, swap in coconut or almond milk, and replace the whipped topping with a plant-based alternative. Just double-check candy eggs and Peeps to ensure they’re vegan-friendly.
What if I don’t have a food processor to crush the cookies?
No worries—place the cookies in a sturdy zip-top bag and gently crush with a rolling pin or the bottom of a heavy glass. It might take a little extra effort, but you’ll still get great “dirt” crumbs for layering.
Can I use homemade pudding instead of instant?
Yes, homemade chocolate pudding works beautifully; it usually has a richer flavor and creamier texture. Just make sure to chill it before folding in the whipped topping and assembling your dirt cups.
Is it okay to prepare these more than one day in advance?
For best texture and freshness, making the dirt cups a day ahead is perfect. Preparing them more than 24 hours in advance may cause the cookie crumbs to become too soft and lose their crunch.
Can I customize the candy toppings?
Definitely! Feel free to swap out the pastel eggs for mini chocolate eggs, jelly beans, or gummy worms. Seasonal decorations like small edible flowers or colored sugar crystals can also add flair to your Easter Dirt Cups Recipe.
Final Thoughts
I truly hope you give this Easter Dirt Cups Recipe a whirl—it’s such a joyful dessert that brings smiles with its creamy texture, chocolaty “dirt,” and festive Easter spirit. Whether you’re making it for kids, family, or friends, it’s a total crowd-pleaser that’s super easy and no-bake. Once you taste it, I bet it will become a cherished part of your springtime celebrations, just like it is in my kitchen!
Print
Easter Dirt Cups Recipe
- Prep Time: 20 minutes
- Cook Time: 0 minutes
- Total Time: 20 minutes
- Yield: 6 servings
- Category: Dessert
- Method: No-Cook
- Cuisine: American
- Diet: Vegetarian
Description
Easter Dirt Cups are a fun and festive no-bake dessert perfect for spring celebrations. Layers of creamy chocolate pudding, crushed chocolate sandwich cookies that resemble dirt, and colorful candy decorations create a delightful treat that’s as playful as it is delicious. This easy recipe requires minimal prep and no cooking, making it ideal for families and kids to enjoy making together.
Ingredients
Pudding Mixture
- 1 (3.9 oz) box instant chocolate pudding mix
- 2 cups cold milk
- 1 (8 oz) container whipped topping (such as Cool Whip)
Dirt Layer
- 1 (14 oz) package chocolate sandwich cookies (like Oreos)
Toppings and Decorations
- Pastel-colored candy eggs or jelly beans
- Marshmallow Peeps (chicks or bunnies)
- Green-tinted shredded coconut (optional)
- Small clear plastic cups or jars for serving
Instructions
- Prepare Pudding Mixture: In a medium mixing bowl, whisk together the instant chocolate pudding mix and cold milk vigorously for about 2 minutes until the mixture thickens. Let it sit for 5 minutes to fully set and develop its creamy texture.
- Combine Whipped Topping: Gently fold the whipped topping into the thickened pudding mixture until smooth and evenly combined. This adds a light and fluffy texture to the pudding layer.
- Crush Cookies: Using a food processor or blender, pulse the chocolate sandwich cookies until they become fine crumbs resembling dirt. If you don’t have a processor, place cookies in a zip-top bag and crush them with a rolling pin.
- Assemble Dirt Cups: Spoon a layer of the crushed cookie crumbs into the bottom of each serving cup or jar. Add a layer of the pudding mixture over the cookie crumbs. Repeat the layering process, finishing with a top layer of cookie crumbs to resemble dirt.
- Add Decorative Touches: If using, sprinkle green-tinted shredded coconut over the top to simulate grass. Then place pastel-colored candy eggs or jelly beans, and a marshmallow Peep (chick or bunny) on each cup for a festive Easter look.
- Chill Before Serving: Refrigerate the assembled dirt cups for at least 30 minutes to allow flavors to meld and the pudding to set further. Serve chilled for the best taste and texture.
Notes
- To tint shredded coconut green, place it in a zip-top bag with a few drops of green food coloring and shake until evenly colored.
- For variations, try decorating with chocolate rocks, edible flowers, or gummy worms for a fun twist.
- These cups can be made a few hours ahead to save time but are best enjoyed the day they are prepared.


