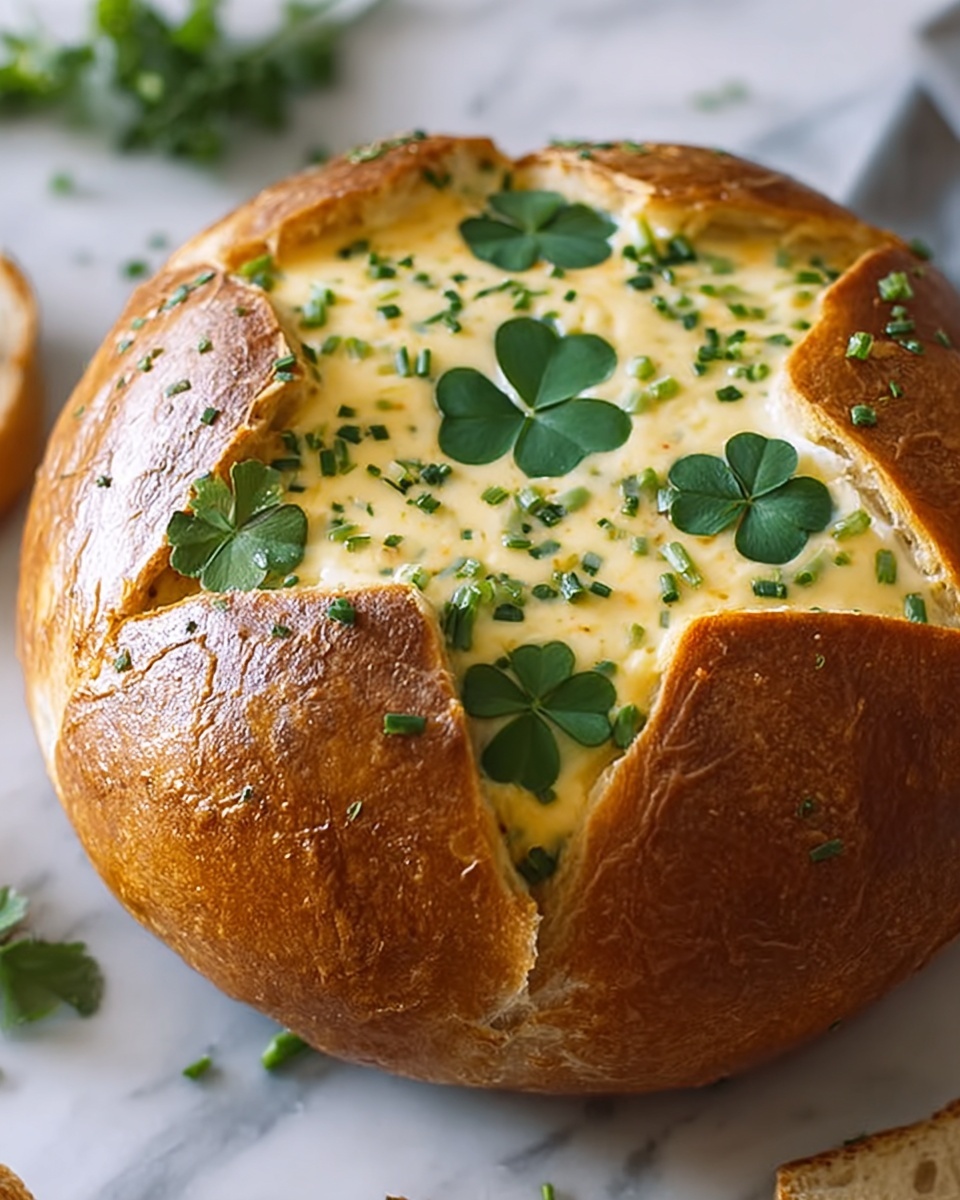
If you’re searching for a fun and delightful twist on your everyday bread, then you absolutely have to try this Clover-Shaped Bread Bowl Recipe. It’s charming, inviting, and so versatile, perfect for scooping up soups, dips, or even stuffing with your favorite fillings. Crafted with simple ingredients that come together to create a wonderfully soft, golden crust and airy crumb, this bread bowl turns any meal into a cozy celebration. Plus, the clover shape adds an extra touch of whimsy that will impress guests and brighten your table effortlessly.

Ingredients You’ll Need
The beauty of this Clover-Shaped Bread Bowl Recipe lies in its simplicity, using pantry staples that blend perfectly for texture, flavor, and color. Each ingredient plays a critical role, from the yeast that makes the dough rise beautifully to the olive oil that lends a subtle richness and tenderness.
- 2 cups warm water (110°F): Warmth activates the yeast and starts the fermentation process.
- 2 1/4 teaspoons active dry yeast (1 packet): Essential for making the dough rise and yield that soft, airy texture.
- 1 tablespoon sugar: Feeds the yeast for a nice rise while adding subtle sweetness to balance the bread’s flavor.
- 3 tablespoons olive oil: Adds moistness and a gentle richness, helping the bread keep its tender crumb.
- 1 teaspoon salt: Enhances all the flavors and tightens the gluten structure.
- 4 cups all-purpose flour (plus extra for dusting): The backbone of the dough, providing structure and chewiness.
- 1 tablespoon melted butter (for brushing): Creates a glossy, golden crust and adds a lovely buttery aroma.
How to Make Clover-Shaped Bread Bowl Recipe
Step 1: Activate the Yeast
Start by pouring the warm water into a large bowl and sprinkle the active dry yeast on top. Add the sugar and gently stir to combine. Let it sit for about 5 minutes until the mixture becomes frothy, signaling the yeast is alive and ready to work its magic.
Step 2: Mix the Dough
Once the yeast is activated, add the olive oil, salt, and about three cups of the flour to the bowl. Stir with a wooden spoon or dough hook until combined, then gradually add the remaining flour until the dough pulls away from the sides and is just slightly sticky but manageable.
Step 3: Knead the Dough
Turn the dough out onto a floured surface and knead it for about 8 to 10 minutes. You’ll want a smooth, elastic consistency that springs back when pressed. This kneading develops the gluten, giving the bread structure and chewiness that’s essential for the Clover-Shaped Bread Bowl Recipe.
Step 4: First Rise
Lightly oil a large bowl and place your dough inside, turning it once to coat all sides. Cover the bowl with a damp towel or plastic wrap and let the dough rise in a warm spot for about an hour or until it has doubled in size. This rest period is vital for developing flavor and texture.
Step 5: Shape the Clover
After the dough has risen, punch it down gently and divide it into six equal portions. Shape each into a round ball. Arrange the balls close together on a baking sheet lined with parchment paper in a clover shape, gently touching but not merging completely, so they will bake into that perfect clover form.
Step 6: Second Rise and Prep
Cover the clover-shaped dough loosely and let it rise again for 20 to 30 minutes until puffed. Preheat your oven to 375°F while the dough is resting. Before baking, brush the dough balls generously with melted butter to create a beautiful golden crust as they bake.
Step 7: Bake to Perfection
Bake in your preheated oven for 25 minutes or until the bread is golden brown and sounds hollow when tapped on the bottom. Let the bread cool slightly before cutting into it, ensuring the structure stays intact for your bread bowl creation.
How to Serve Clover-Shaped Bread Bowl Recipe

Garnishes
To make your clover-shaped bread bowl even more eye-catching, sprinkle the top with a touch of coarse sea salt or cracked black pepper right after brushing with butter. You can also add chopped fresh herbs like rosemary or thyme for a fragrant and colorful finishing touch that complements savory fillings beautifully.
Side Dishes
This bread bowl is a fantastic companion to hearty soups such as creamy tomato basil, classic clam chowder, or spicy chili. Its soft interior and crusty exterior soak up juices perfectly, so pair it with a crisp green salad or roasted veggies for a well-rounded, comforting meal.
Creative Ways to Present
Try turning your Clover-Shaped Bread Bowl Recipe into a centerpiece by filling each leaf with different dips or spreads like spinach-artichoke dip, hummus, or pimento cheese. This not only looks stunning but also makes it a crowd-pleaser at any gathering, inviting everyone to dig in and enjoy a variety of flavors.
Make Ahead and Storage
Storing Leftovers
If you have any leftover clover-shaped bread, store it loosely wrapped in a paper bag or bread box at room temperature for up to two days. This helps maintain the crust’s crispness while keeping the inside soft. Avoid plastic bags, which can make the crust soggy.
Freezing
You can freeze your bread bowl whole or sliced. Wrap it tightly in plastic wrap and then a layer of aluminum foil to prevent freezer burn. When frozen properly, it will keep for up to three months, giving you a quick and delightful bread bowl whenever you want.
Reheating
To bring your bread bowl back to life, thaw it at room temperature. Reheat briefly in an oven preheated to 350°F for about 10 minutes to restore freshness and crisp crust—perfect for serving with warm soups or dips.
FAQs
Can I make the Clover-Shaped Bread Bowl Recipe gluten-free?
Gluten-free bread dough behaves differently, so this recipe would require specific gluten-free flour blends and binding agents. It’s possible but may not hold the clover shape as nicely — experimenting with gluten-free baking mixes might help.
How long does this bread bowl stay fresh?
Freshly baked, your clover-shaped bread bowl will stay delicious for about two days at room temperature if stored properly. For longer storage, freezing is your best bet.
What types of fillings work best with this bread bowl?
Hearty, creamy soups like broccoli cheddar, seafood chowders, or chili are ideal. The bread bowl holds up well without getting soggy quickly, making it perfect for soak-worthy fillings.
Can I use a bread machine to make the dough?
Absolutely! You can use a bread machine to mix and knead the dough. Just select the dough cycle, then shape and bake it as described in the recipe.
Is it necessary to brush the bread with butter?
Brushing with melted butter isn’t required, but it enhances crust color, gives a lovely shine, and adds subtle flavor, making your clover-shaped bread bowl extra special.
Final Thoughts
There’s something so heartwarming about pulling this Clover-Shaped Bread Bowl Recipe out of the oven and sharing it with loved ones. The charm of its shape combined with the soft, comforting texture makes it a true crowd-pleaser. Whether you’re hosting a cozy dinner or simply craving fresh homemade bread, give this recipe a go—you’ll be amazed at how quickly it becomes a favorite in your kitchen.
Print
Clover-Shaped Bread Bowl Recipe
- Prep Time: 20 minutes
- Cook Time: 25 minutes
- Total Time: 1 hour 45 minutes
- Yield: 6 servings
- Category: Bread
- Method: Baking
- Cuisine: American
Description
This delightful Clover-Shaped Bread Bowl is a charming and versatile bread perfect for entertaining or serving with soups and dips. Its unique clover shape adds a festive touch, while the soft, fluffy interior and golden crust make it an irresistible centerpiece for any meal.
Ingredients
Dough Ingredients
- 2 cups warm water (110°F)
- 2 1/4 teaspoons active dry yeast (1 packet)
- 1 tablespoon sugar
- 3 tablespoons olive oil
- 1 teaspoon salt
- 4 cups all-purpose flour (plus extra for dusting)
Finishing
- 1 tablespoon melted butter (for brushing)
Instructions
- Activate the Yeast: In a large mixing bowl, combine the warm water, active dry yeast, and sugar. Stir gently and let it sit for about 5 to 10 minutes until the mixture becomes frothy, indicating the yeast is active.
- Prepare the Dough: Add the olive oil, salt, and 3 cups of the flour to the yeast mixture. Stir well to combine. Gradually add the remaining 1 cup of flour, mixing until a soft dough forms.
- Knead the Dough: Turn the dough out onto a floured surface and knead for about 8 to 10 minutes until the dough is smooth and elastic. Add flour as needed to prevent sticking, but avoid adding too much to keep the dough soft.
- First Rise: Place the kneaded dough in a lightly oiled bowl, cover it with a clean kitchen towel, and let it rise in a warm place for about 1 hour or until it has doubled in size.
- Shape the Clover: Punch down the dough to release the air. Divide the dough into six equal pieces. Roll each piece into a ball, then shape them into clover leaves by joining the six balls close together, slightly pressing them so they stick, forming a clover shape with a small gap in the center.
- Second Rise: Transfer the shaped dough onto a baking sheet lined with parchment paper. Cover it loosely and let it rise for another 20 to 30 minutes until puffy.
- Preheat the Oven: Preheat your oven to 375°F (190°C) during the second rise.
- Bake the Bread: Brush the entire surface of the dough with melted butter. Bake in the preheated oven for 20 to 25 minutes until the bread is golden brown and sounds hollow when tapped.
- Cool and Serve: Remove the bread from the oven and allow it to cool slightly before serving. The clover-shaped bread bowl is perfect for filling with soups, dips, or salads.
Notes
- Make sure the water temperature is around 110°F to properly activate the yeast; too hot or cold can kill the yeast.
- Allow the dough to rise in a warm, draft-free area for best results.
- The bread is best enjoyed fresh but can be stored in an airtight container for up to 2 days.
- Feel free to customize by adding garlic or herbs to the dough for extra flavor.


