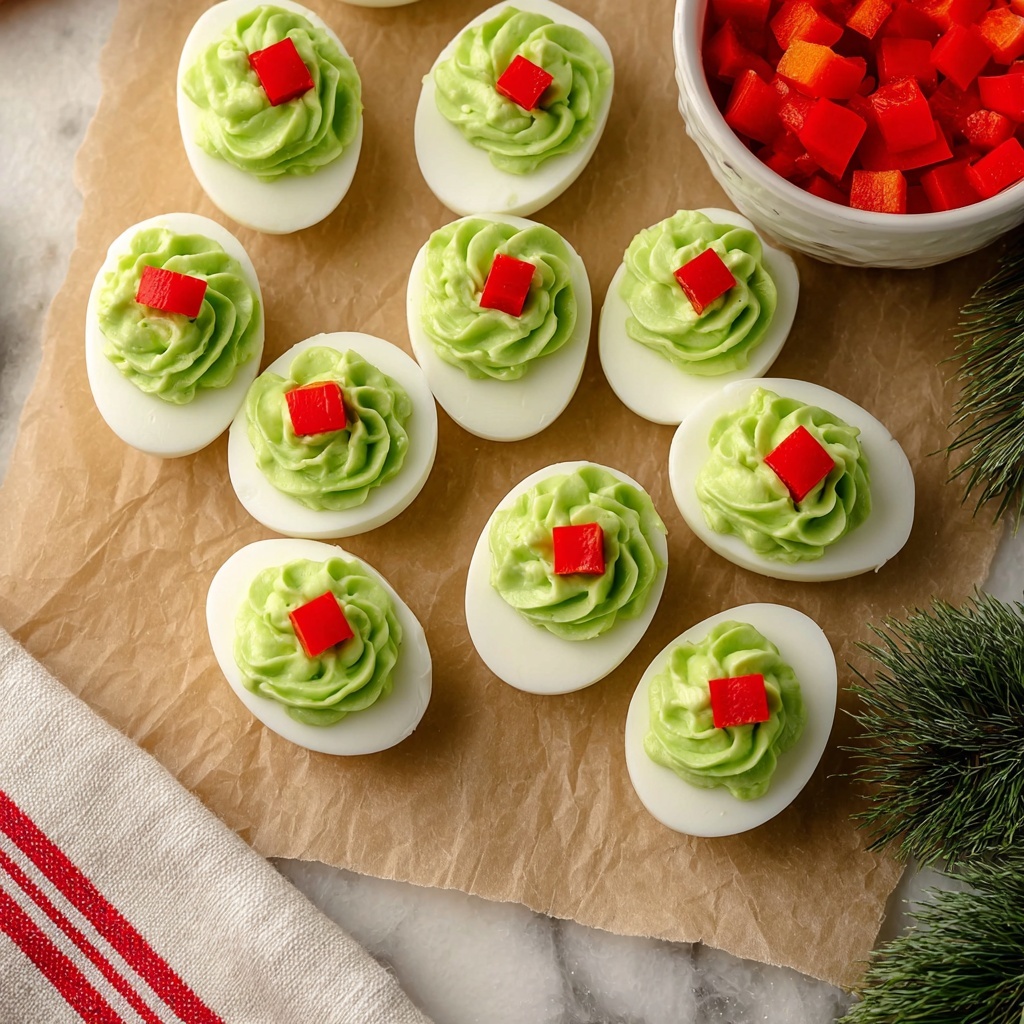
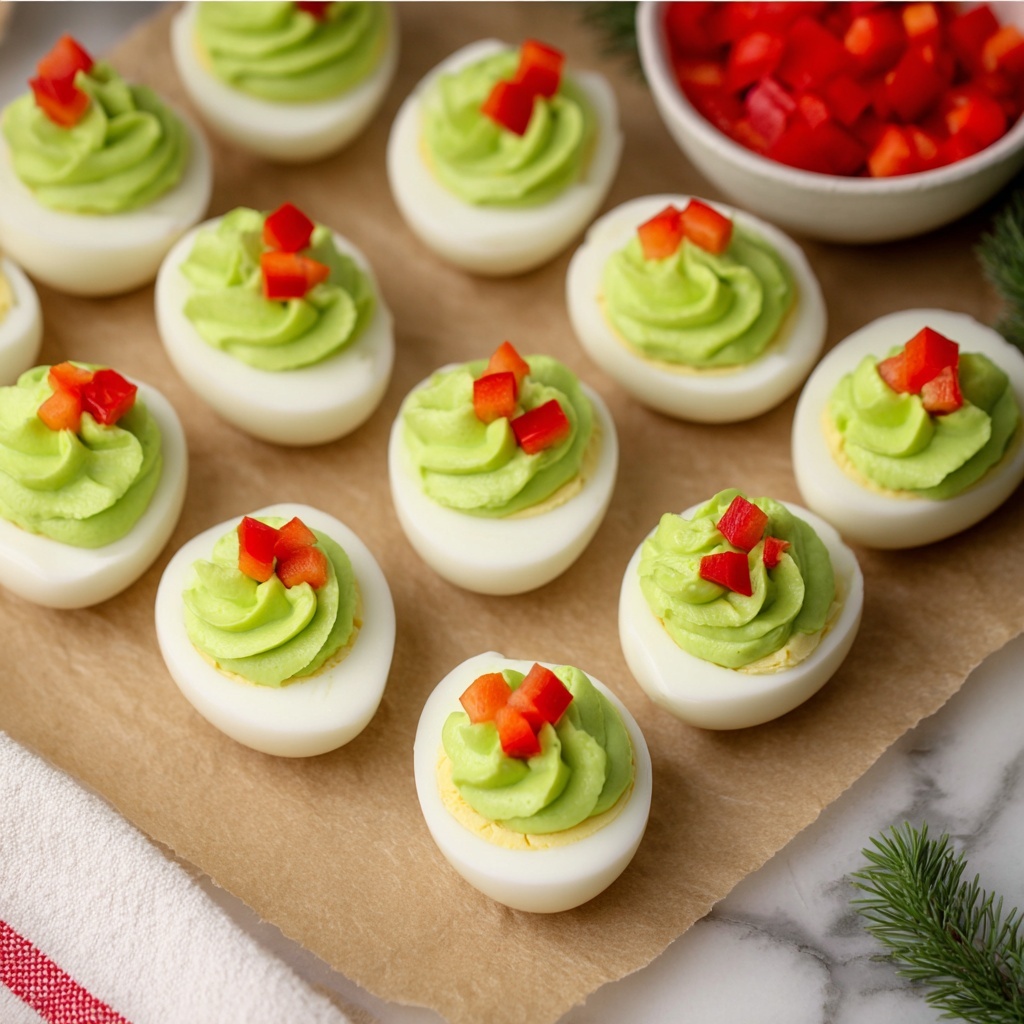
If you want a festive appetizer that is as delightful to look at as it is to eat, the Christmas Wreath Deviled Eggs Recipe is exactly what you need this holiday season. This charming twist on classic deviled eggs brings together fluffy green filling and bright red pepper accents to mimic a holiday wreath, making it a joyful centerpiece for any Christmas gathering. Not only are these bites incredibly tasty, but they also add a splash of color and cheer to your party table, inviting everyone to dig in and celebrate together.
Ingredients You’ll Need
As with many beloved dishes, this Christmas Wreath Deviled Eggs Recipe keeps things simple with a handful of ingredients that each play a crucial role in delivering flavor, texture, and visual appeal. Every component works in harmony to create that perfect creamy filling and vibrant holiday colors.
- 6 hard boiled eggs: The foundation of the dish, providing a smooth, protein-packed base that’s both filling and mild in flavor.
- 3 tablespoons mayonnaise: Adds richness and creaminess to the filling, making it irresistibly smooth.
- 1 teaspoon mustard: Gives a subtle tang and depth to the filling, balancing the richness.
- ¼ red pepper, diced: Adds a bright pop of red color and a mild crunch that resembles festive bows.
- Salt and pepper, to taste: Essential seasonings that enhance all the other flavors.
- Bright green food coloring: The magic ingredient that transforms the yolk mixture into a vibrant wreath green, perfect for the season.
How to Make Christmas Wreath Deviled Eggs Recipe
Step 1: Prepare the Eggs
Start by peeling the hard-boiled eggs carefully so the whites remain smooth and intact. Cut each egg in half lengthwise, giving you perfect little white cups ready to hold the delicious filling.
Step 2: Create the Yolky Filling
Scoop out the egg yolks into a mixing bowl and add mayonnaise, mustard, salt, and pepper. Mix everything together until it’s smooth and well-blended, ensuring each bite is silky with just the right tang.
Step 3: Add Festive Color
Drop in a few drops of bright green food coloring and whip the mixture with a fork. This step is not just about color; whipping until lump-free gives a lovely fluffy texture that’s easier to pipe neatly into the egg whites.
Step 4: Assemble the Wreaths
Transfer the bright green filling to a piping bag equipped with a star tip for that pretty, piped effect. Pipe the mixture into the hollow of each egg white half, then top each with three small pieces of red pepper to form the iconic Christmas wreath bow.
How to Serve Christmas Wreath Deviled Eggs Recipe

Garnishes
While the red pepper bows are classic, you can amp up the fun by adding a little fresh rosemary sprig to mimic tiny wreath leaves or a sprinkle of smoked paprika for subtle warmth and contrast.
Side Dishes
These deviled eggs pair wonderfully with other holiday appetizers, such as cranberry salsa crostini or a cheese board with nuts and olives. Their light, creamy texture complements heavier dishes and adds variety to your festive spread.
Creative Ways to Present
For maximum holiday cheer, arrange your Christmas Wreath Deviled Eggs Recipe in a circular pattern on a platter, maybe nestled on a bed of curly kale or parsley to enhance the greenery effect. Adding a few decorative ornaments or twinkle lights nearby will really elevate your presentation.
Make Ahead and Storage
Storing Leftovers
If you have any leftovers, keep them covered tightly in the refrigerator. Since these eggs contain mayonnaise and fresh ingredients, they will stay fresh for up to two days—perfect for keeping the holiday celebrations rolling.
Freezing
Freezing deviled eggs is not recommended because the texture of the egg whites and the creamy filling can become watery and unpleasant once thawed. It’s best to enjoy them fresh or within a couple of days stored properly in the fridge.
Reheating
Deviled eggs are best served cold or at room temperature. If you’ve stored them chilled, let them sit out for about 10–15 minutes before serving to bring out their full flavor and creamy texture without needing any reheating.
FAQs
Can I use something other than mayonnaise in this recipe?
Absolutely! Greek yogurt can be a lighter, tangier substitute, or you can mix half mayo and half sour cream for a creamy but less rich filling. Just adjust the seasoning to taste.
How do I boil eggs perfectly for deviled eggs?
Place eggs in a single layer in a pot, cover with water, bring to a boil, then remove from heat and cover. Let them sit for 10–12 minutes, then transfer to ice water to stop cooking and make peeling easier.
Can I prepare the filling ahead of time?
Yes, you can prepare the yolk mixture a day in advance and refrigerate it. Just add the food coloring and mix right before piping so the green color stays fresh and vibrant.
Is there a way to make these deviled eggs dairy-free?
Definitely! Skip the mayonnaise and use avocado or a vegan mayo alternative to keep the creamy texture without dairy. The eggs and peppers will still shine.
What other colors can I use for the filling?
You can experiment with natural food colorings such as beet juice for a pink filling or turmeric for a golden hue. However, the green color is what makes this particular Christmas Wreath Deviled Eggs Recipe truly festive.
Final Thoughts
This Christmas Wreath Deviled Eggs Recipe is more than just an appetizer; it’s a festive tradition waiting to happen. Its cheerful colors, delicious flavors, and simple preparation make it a perfect addition to your holiday celebrations. Give it a try and watch your family and friends light up as they enjoy these charming, tasty bites that truly capture the spirit of the season.
Print
Christmas Wreath Deviled Eggs Recipe
- Prep Time: 15 minutes
- Cook Time: 0 minutes
- Total Time: 15 minutes
- Yield: 12 servings
- Category: Appetizer
- Method: No-Cook
- Cuisine: American
- Diet: Low Fat
Description
Festive Christmas Deviled Eggs that bring a vibrant twist to a classic appetizer. These deviled eggs feature a creamy, tangy green yolk filling, beautifully piped into egg white halves and decorated with red pepper bows to resemble holiday wreaths. Perfect for holiday parties and gatherings to add color and cheer to your appetizer spread.
Ingredients
Eggs
- 6 hard boiled eggs, cut in half lengthwise
Filling
- 3 tablespoons mayonnaise
- 1 teaspoon mustard
- Salt and pepper, to taste
- Bright green food coloring, a few drops
Garnish
- ¼ red pepper, diced
Instructions
- Prepare the eggs: Peel the hard-boiled eggs carefully and slice each egg in half lengthwise, creating egg white halves with intact edges.
- Make the yolk mixture: Scoop out the yolks into a mixing bowl. Add the mayonnaise, mustard, salt, and pepper to the yolks. Mix thoroughly until the ingredients are fully combined and smooth.
- Color and pipe the filling: Add a few drops of bright green food coloring to the yolk mixture. Whip the mixture with a fork until smooth and evenly colored. Transfer the mixture into a piping bag fitted with a star tip for decorative filling.
- Assemble the deviled eggs: Pipe the green yolk mixture neatly into the center of each egg white half. Garnish each egg with three small diced pieces of red pepper arranged like bows, creating a festive wreath effect.
Notes
- Use fresh eggs for best peeling results when boiling.
- Adjust the amount of mustard and mayonnaise to taste for desired tanginess and creaminess.
- Food coloring intensity can be increased or decreased based on preference.
- For a different presentation, try piping different festive shapes with the filling.
- These deviled eggs should be kept refrigerated and consumed within 2 days for optimal freshness.

