
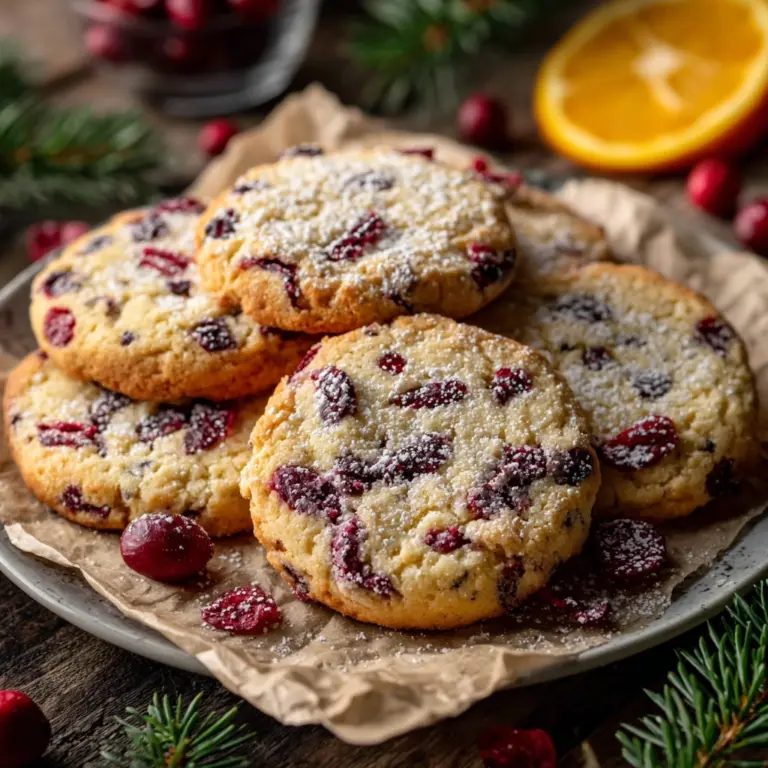
If you love festive baking that brims with charm and sweetness, this Christmas Light Cookies Recipe is your new holiday best friend. These delightful sugar cookies are topped with smooth royal icing and decorated to look like cheerful strands of twinkling Christmas lights. Every bite offers that perfect balance of buttery cookie and sweet, silky frosting with a playful pop of colorful M&M “bulbs.” Whether you’re baking for a cozy family gathering or gifting neighbors, this recipe brings undeniable joy and bright holiday spirit to your kitchen.

Ingredients You’ll Need
Getting started with this Christmas Light Cookies Recipe is easy because the ingredients are straightforward yet essential. Each component plays a special role—from creating a tender cookie base to achieving that flawless royal icing shine and adding the vibrant candy colors that make these cookies truly festive.
- Your favorite sugar cookie dough: Homemade or store-bought, use a dough that bakes up soft and sturdy to hold the icing beautifully.
- 4 cups powdered sugar: The base for the royal icing, providing sweetness and structure.
- 3 tablespoons meringue powder: Helps stabilize the icing and gives it that perfect glossy finish.
- 8-10 tablespoons warm water: Used to achieve the right consistency for flooding the cookies.
- Black writing icing: Ideal for drawing the “wires” of the Christmas lights, adding detail and contrast.
- M&M candies: Cut in half to serve as the colorful “light bulbs” decorating each cookie.
How to Make Christmas Light Cookies Recipe
Step 1: Prepare the Sugar Cookies
Begin by preparing your sugar cookie dough according to your preferred recipe or package instructions. Once baked, cool the cookies completely—this step is crucial so the icing doesn’t melt or slide off. Patience now leads to beautifully decorated cookies later!
Step 2: Mix the Royal Icing
In a large bowl, combine powdered sugar, meringue powder, and 8 tablespoons of warm water. Beat with a hand mixer for one to two minutes until smooth. If the icing feels too thick for flooding, gradually add more water, one tablespoon at a time, until it’s soft enough to flow but still holds its shape well. This perfect consistency ensures a smooth, glossy surface on each cookie.
Step 3: Prepare Your Piping Bag
Transfer the royal icing to a piping bag and carefully snip off just the very tip. This tiny opening gives you control when outlining and flooding the cookies, making the decorating process neat and enjoyable.
Step 4: Outline and Flood the Cookies
Start by piping a circle around the edge of each cookie to create a dam. Then fill in the inside with the same royal icing flood. If you spot any gaps or uneven spots, gently nudge the icing with a toothpick to smooth it out. This technique creates that flawless, glass-like finish that’s both professional and incredibly satisfying.
Step 5: Let the Icing Set
Allow your flooded cookies to sit undisturbed until the icing hardens completely. This sets the stage for smooth decorating in the next step and prevents colors from running together.
Step 6: Draw the Christmas Light Strands
Using black writing icing, draw the delicate “wires” of the Christmas light strand across each cookie. You can create loops, zigzags, or any pattern you like—it’s your festive masterpiece coming to life!
Step 7: Add the M&M Light Bulbs
Take a half cup of M&M candies and cut them in half carefully. Press each half, cut side down, onto the royal icing where you want the lights to shine. These little bulbs bring color and a fun, interactive texture to the cookies that everyone will adore.
How to Serve Christmas Light Cookies Recipe

Garnishes
While the M&M halves provide vibrant “light bulbs,” you can also sprinkle a tiny pinch of edible glitter or pearl dust to give an extra sparkle to your cookies. A small dot of white icing on each “bulb” can simulate a gleam of light, making them irresistibly lifelike.
Side Dishes
Serve your Christmas Light Cookies alongside a warm mug of spiced hot cocoa or peppermint tea to complement their sweet vanilla flavor. They also pair beautifully with creamy eggnog or a classic glass of cold milk for an old-fashioned holiday treat.
Creative Ways to Present
Arrange the cookies on a festive platter lined with fresh pine sprigs or tinsel garlands to enhance the holiday mood. Wrapping a few in clear cellophane bags tied with red and green ribbons makes an adorable homemade gift. For a fun party game, hide one “special” cookie in the batch and let guests find the “light that shines the brightest.”
Make Ahead and Storage
Storing Leftovers
Once fully decorated and dry, store your Christmas Light Cookies in an airtight container at room temperature. They will stay fresh and chewy for up to one week, perfect for nibbling throughout the holiday season.
Freezing
You can freeze these cookies after they have completely dried. Place them carefully in a single layer on a baking sheet and freeze until solid, then stack with parchment paper between layers in an airtight container or freezer bag. They’ll keep beautifully for up to two months.
Reheating
Since these cookies are best enjoyed at room temperature, simply remove frozen cookies from the freezer and let them thaw in the container before serving. Avoid microwaving, which might soften the royal icing and alter the texture.
FAQs
Can I use a different cookie dough for the Christmas Light Cookies Recipe?
Absolutely! While this recipe works wonders with traditional sugar cookie dough, you can experiment with gingerbread or shortbread dough. Just ensure the dough holds its shape well and cools completely before decorating.
What if I don’t have meringue powder?
If meringue powder isn’t available, you can substitute with fresh egg whites, but be cautious with safety and freshness. Alternatively, many stores sell meringue powder in the baking aisle year-round for royal icing enthusiasts.
How do I get the royal icing consistency just right?
The key to perfect royal icing is balancing the water and powdered sugar. Start with less water and add more gradually. The finished icing should hold its shape slightly but still flow smoothly when you flood the cookies.
Can I decorate these cookies with other candies?
Definitely! Small candies that hold their shape, like mini chocolate chips or colored sugar pearls, can replace M&M halves. Just choose candies that won’t melt or lose color on the icing.
How long does royal icing take to fully dry?
Drying times vary with humidity but plan on at least 4-6 hours or overnight for best results. Letting the icing harden fully ensures your decorations stay intact during handling and gifting.
Final Thoughts
Baking this Christmas Light Cookies Recipe is more than just making cookies; it’s about capturing the warmth, joy, and sparkle of the holiday season on a small, delicious canvas. From mixing the royal icing to placing those colorful M&M bulbs, every step brings smiles and sweet memories. So grab your apron, gather your ingredients, and let the magic of these charming cookies light up your holiday celebrations!
Print
Christmas Light Cookies Recipe
- Prep Time: 25 minutes
- Cook Time: 0 minutes
- Total Time: 25 minutes
- Yield: 16 cookies
- Category: Dessert
- Method: No-Cook
- Cuisine: American
Description
These festive Christmas Light Cookies are a delightful holiday treat featuring classic sugar cookies decorated with smooth royal icing and colorful M&M candies to resemble Christmas lights. Perfect for holiday parties or gifting, these cookies bring a cheerful and creative twist to traditional sugar cookies with a fun and easy decorating process.
Ingredients
Cookie Dough
- Your favorite sugar cookie dough (store bought or homemade)
Royal Icing
- 4 cups powdered sugar
- 3 tablespoons meringue powder
- 8–10 tablespoons warm water
Decorations
- Black writing icing
- 1/2 cup M&M candies (cut in half)
Instructions
- Prepare Cookies: Prepare the sugar cookie dough according to the package or homemade recipe instructions. Bake as directed and allow the cookies to cool completely before decorating.
- Make Royal Icing: In a large mixing bowl, combine the powdered sugar, meringue powder, and start with 8 tablespoons of warm water. Beat with a hand mixer for 1-2 minutes until smooth. If the icing is too thick, add additional water one tablespoon at a time until the icing is soft but not runny, allowing it to flow smoothly while retaining shape.
- Fill Piping Bag: Transfer the royal icing into a piping bag and snip off just the very tip for precise application.
- Create Icing Border and Flood: Pipe a circle of icing around each cookie, then flood the inside of the circle with more icing, being careful not to overfill. Use a toothpick to spread icing gently to fill in any blank spots if necessary, achieving a smooth, even surface. Allow the base icing to fully set before proceeding.
- Draw Light Strand: Using the black writing icing, draw a strand of Christmas lights across the iced cookie in any pattern you prefer.
- Add M&M Light Bulbs: Cut about 1/2 cup of M&M candies in half and carefully place each candy half, cut side down, onto the black icing strand to mimic Christmas light bulbs.
Notes
- Ensure the cookies are completely cooled to prevent the royal icing from melting or sliding.
- Adjust royal icing consistency carefully; too runny may cause the icing not to hold shape, too thick will be hard to spread.
- Let icing dry completely for several hours or overnight to avoid smudging decorations.
- Use toothpicks for detailed spreading and adjustments of icing for a professional finish.
- These cookies can be stored in an airtight container at room temperature for up to 5 days.
