
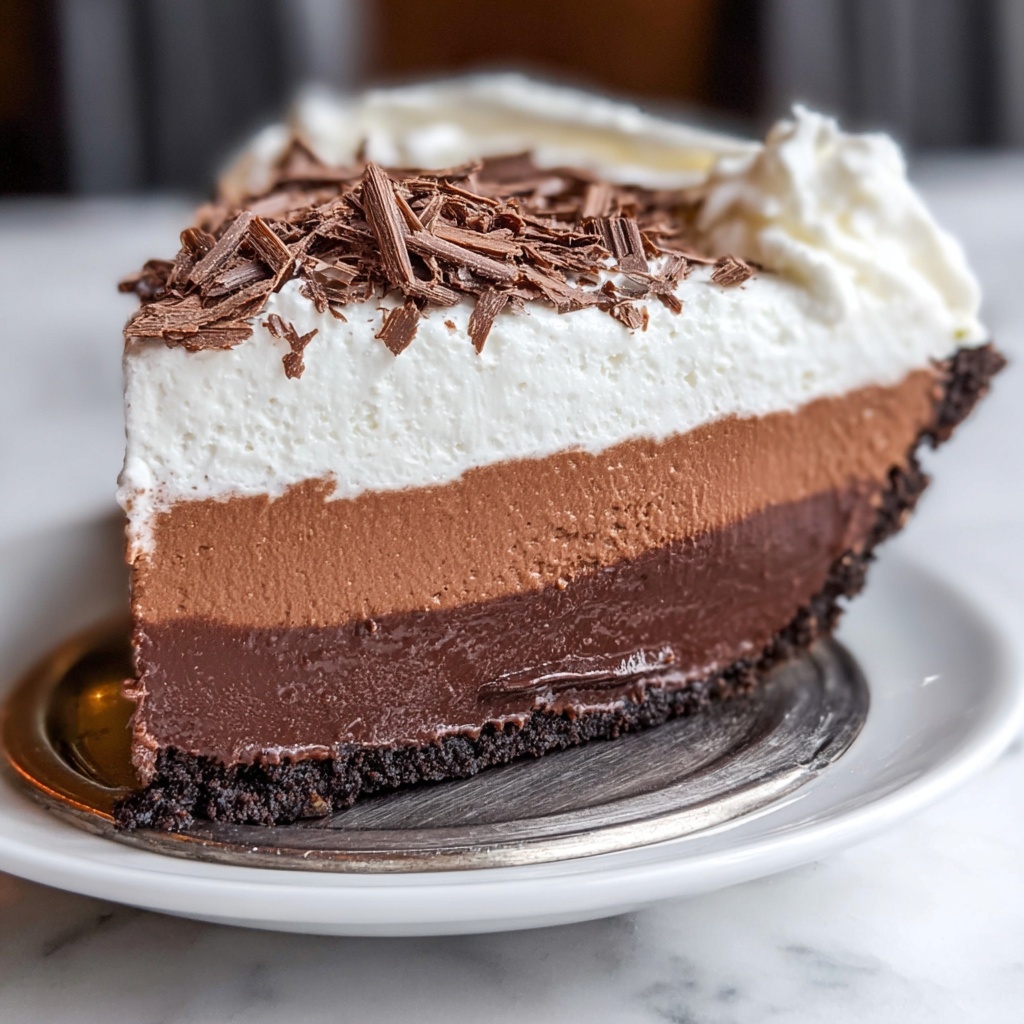
If you have a sweet tooth and a love for silky, luscious desserts, this Chocolate Mousse Pie with Whipped Cream and Chocolate Shavings Recipe is a dream come true. Imagine biting into a rich, velvety chocolate mousse layered inside a crisp Oreo crust, topped with fluffy whipped cream and delicate chocolate shavings that melt in your mouth—this pie promises to delight every chocolate lover. It’s an elegant yet approachable dessert that transforms humble ingredients into something truly special and memorable.
Ingredients You’ll Need
Gathering the right ingredients is the first step to making this indulgent pie a reality. Each item plays a crucial role, whether it’s creating the silky chocolate base, the airy mousse, or the crunchy crust that ties it all together.
- Salted butter: Adds richness and helps melt the chocolate smoothly.
- Semi-sweet chocolate chips: Provides a balanced, sweet chocolate flavor without overwhelming bitterness.
- Bittersweet chocolate chips: Introduces depth and complexity to the mousse’s taste.
- Mini marshmallows: Create a creamy texture and sweet softness as they melt into the chocolate mix.
- Whole milk: Smooths out the chocolate mixture, making it luscious and not too thick.
- Vanilla extract: Enhances all the chocolate flavors with a subtle aromatic touch.
- Heavy whipping cream (two quantities): Whipped separately to create both the fluffy mousse base and the topping that crowns the pie.
- Oreo pie crust: Adds a crunchy, chocolatey foundation that perfectly complements the mousse filling.
- Granulated sugar: Sweetens the whipped cream topping just enough for balance without overpowering.
- Chocolate shavings: Provide an elegant and textured garnish to finish off this beautiful dessert.
How to Make Chocolate Mousse Pie with Whipped Cream and Chocolate Shavings Recipe
Step 1: Melt the Chocolate Base
Start by slowly melting butter, whole milk, semi-sweet and bittersweet chocolate chips together with mini marshmallows in a saucepan over low heat. Stir continuously until everything is melted into a smooth, creamy mixture. Don’t forget to add vanilla extract after removing it from the heat; this step is the key to infusing the chocolate with warmth and flavor.
Step 2: Cool the Chocolate Mixture
Allow your luscious chocolate mixture to sit at room temperature for about one hour. This cooling time helps the base set slightly and brings the temperature down so it can be gently folded with whipped cream later without melting it.
Step 3: Whip the Heavy Cream for Mousse
While the chocolate mixture cools, whip 1 3/4 cups of heavy whipping cream until stiff peaks form. The cream should hold its shape but still be soft enough to fold smoothly into the chocolate. This whipped cream is what will give the mousse its light, airy texture and mouthwatering fluffiness.
Step 4: Combine Whipped Cream and Chocolate
Gently fold the whipped cream into the cooled chocolate mixture using a spatula. Be patient and tender as you fold, ensuring that the mousse stays aerated and fluffy rather than dense. This step is where the magic happens, turning a rich chocolate blend into a cloud-like indulgence.
Step 5: Fill the Oreo Pie Crust
Pour your silky mousse into the prepared Oreo pie crust and use a spatula to spread it evenly. The crisp crust provides a delightful contrast in texture that makes every bite exciting.
Step 6: Chill to Set
Pop the pie into the refrigerator for at least three hours. This chilling time allows the mousse to firm up beautifully, making it easier to slice and ensuring every serving holds its shape perfectly.
Step 7: Prepare Whipped Cream Topping
Once the mousse has set, whip together 1 cup of heavy cream and granulated sugar until stiff peaks form. This sweet whipped cream topping adds a cloud-like softness that balances the dense chocolate below.
Step 8: Garnish with Whipped Cream and Chocolate Shavings
Spread the freshly whipped cream generously over the chilled pie, then sprinkle chocolate shavings on top. These shavings not only add a beautiful decorative touch but also give an extra punch of chocolate flavor and a hint of texture that’s simply irresistible.
How to Serve Chocolate Mousse Pie with Whipped Cream and Chocolate Shavings Recipe

Garnishes
Adding chocolate shavings is a classic and elegant choice, but feel free to experiment with fresh berries, a dusting of cocoa powder, or even crushed nuts to add an extra layer of texture and flavor to your serving presentation.
Side Dishes
This pie pairs wonderfully with fresh fruit salad, a scoop of vanilla ice cream, or a simple espresso shot. Each side complements the intense chocolate flavors and adds a refreshing or contrasting taste to your dessert experience.
Creative Ways to Present
For a visually stunning display, try serving the pie in individual glass cups layered with mousse, whipped cream, and chocolate shavings. Or, decorate the top with edible flowers or a drizzle of caramel for an extra-special treat that will wow your guests.
Make Ahead and Storage
Storing Leftovers
Keep any leftover pie covered tightly with plastic wrap or in an airtight container in the refrigerator. It will stay fresh for up to 3 days, making it easy to enjoy day after day without losing its creamy texture or flavor.
Freezing
If you want to store the pie for longer, freeze it without the whipped cream topping. Wrap it securely in plastic wrap and foil, then thaw overnight in the refrigerator before adding fresh whipped cream and chocolate shavings when ready to serve.
Reheating
This dessert is best enjoyed cold, so reheating is not recommended. Instead, just allow frozen portions to thaw thoroughly to preserve the mousse’s perfect texture.
FAQs
Can I use a regular pie crust instead of an Oreo pie crust?
Absolutely! While the Oreo crust adds a delicious chocolate crunch that complements the mousse, a traditional graham cracker or pastry crust would work well too, just keep in mind it will change the flavor profile slightly.
Is it necessary to use two types of chocolate chips?
Using both semi-sweet and bittersweet chocolates balances sweetness and adds depth to the mousse, but you can experiment with just one type if you prefer a simpler flavor or have limited ingredients.
Can I make this pie vegan or dairy-free?
This classic recipe relies on dairy products for its creamy texture, but you could try substituting coconut cream and a dairy-free cookie crust. Just keep in mind that texture and taste will differ from the original.
How long does it take to make this pie from start to finish?
The active preparation time is about 15 minutes, but including chilling, the full process takes around three hours and 15 minutes to ensure the mousse sets perfectly.
What is the best way to achieve stiff peaks when whipping cream?
Use cold heavy cream and a chilled bowl, whip at medium-high speed, and watch closely so you don’t overwhip. Stiff peaks hold their shape firmly when you lift the whisk but still look smooth and creamy.
Final Thoughts
This Chocolate Mousse Pie with Whipped Cream and Chocolate Shavings Recipe is a celebration of chocolate in its most irresistible form. Whether for a special occasion or a comforting treat, it brings joy and elegance without complicated steps. I hope you give this beautiful dessert a try and discover how easy it is to delight yourself and those you love with a slice of silky chocolate heaven.
Print
Chocolate Mousse Pie with Whipped Cream and Chocolate Shavings Recipe
- Prep Time: 20 minutes
- Cook Time: 15 minutes
- Total Time: 3 hours 35 minutes
- Yield: 10 servings
- Category: Dessert
- Method: Stovetop
- Cuisine: American
Description
This rich and airy Chocolate Mousse Pie features a luscious blend of semi-sweet and bittersweet chocolate, mini marshmallows melted into a creamy base, folded with whipped cream, all nestled in a crunchy Oreo pie crust. Topped with a sweetened whipped cream layer and chocolate shavings, it’s a perfect indulgent dessert that sets beautifully after chilling.
Ingredients
Chocolate Base
- 2 Tbsp salted butter, diced
- 1 cup semi-sweet chocolate chips
- 1/2 cup bittersweet chocolate chips
- 2 cups mini marshmallows
- 1/3 cup whole milk
- 1 tsp vanilla extract
Mousse
- 1 3/4 cups heavy whipping cream
Pie Crust
- 1 Oreo pie crust
Whipped Cream Topping
- 1 cup (235ml) heavy cream
- 2 Tbsp (25g) granulated sugar
Garnish
- Chocolate shavings, for garnish
Instructions
- Melt the Chocolate Base: In a large saucepan over low heat, combine the diced butter, whole milk, semi-sweet chocolate chips, bittersweet chocolate chips, and mini marshmallows. Stir continuously until the marshmallows have fully melted and the mixture is smooth and creamy. Remove from heat, stir in the vanilla extract, then let the mixture cool at room temperature for 1 hour.
- Prepare the Whipped Cream: Pour 1 3/4 cups of heavy whipping cream into a large mixing bowl. Use an electric mixer to whip the cream until stiff peaks form, making sure not to overwhip to maintain smoothness.
- Fold Cream into Chocolate: Gently fold the whipped cream into the cooled chocolate mixture with a spatula, combining until the mixture is light, fluffy, and uniform in color. Avoid overmixing to keep the mousse airy.
- Fill the Pie Crust: Pour the prepared chocolate mousse into the Oreo pie crust. Smooth the surface evenly with a spatula.
- Chill the Pie: Transfer the pie to the refrigerator and chill for at least 3 hours to allow the mousse to set firmly.
- Make Whipped Cream Topping: In a clean bowl, combine 1 cup of heavy cream with the granulated sugar. Whip until stiff peaks form, ensuring the mixture is smooth and holds its shape well.
- Garnish and Serve: Spread the sweetened whipped cream topping evenly over the chilled mousse pie. Generously sprinkle with chocolate shavings. Refrigerate until ready to serve, then slice and enjoy.
Notes
- Be sure to let the chocolate base cool completely before folding in whipped cream to prevent it from melting.
- Use an electric mixer for best results when whipping cream to achieve the perfect stiff peaks.
- The Oreo crust adds a delicious chocolatey crunch but can be substituted with any chocolate cookie crust if preferred.
- Chilling time is important to ensure the mousse sets properly – don’t rush this step.
- For a stronger chocolate flavor, increase the bittersweet chocolate chips slightly.
- Store leftovers covered in the refrigerator and consume within 3 days for best freshness.


