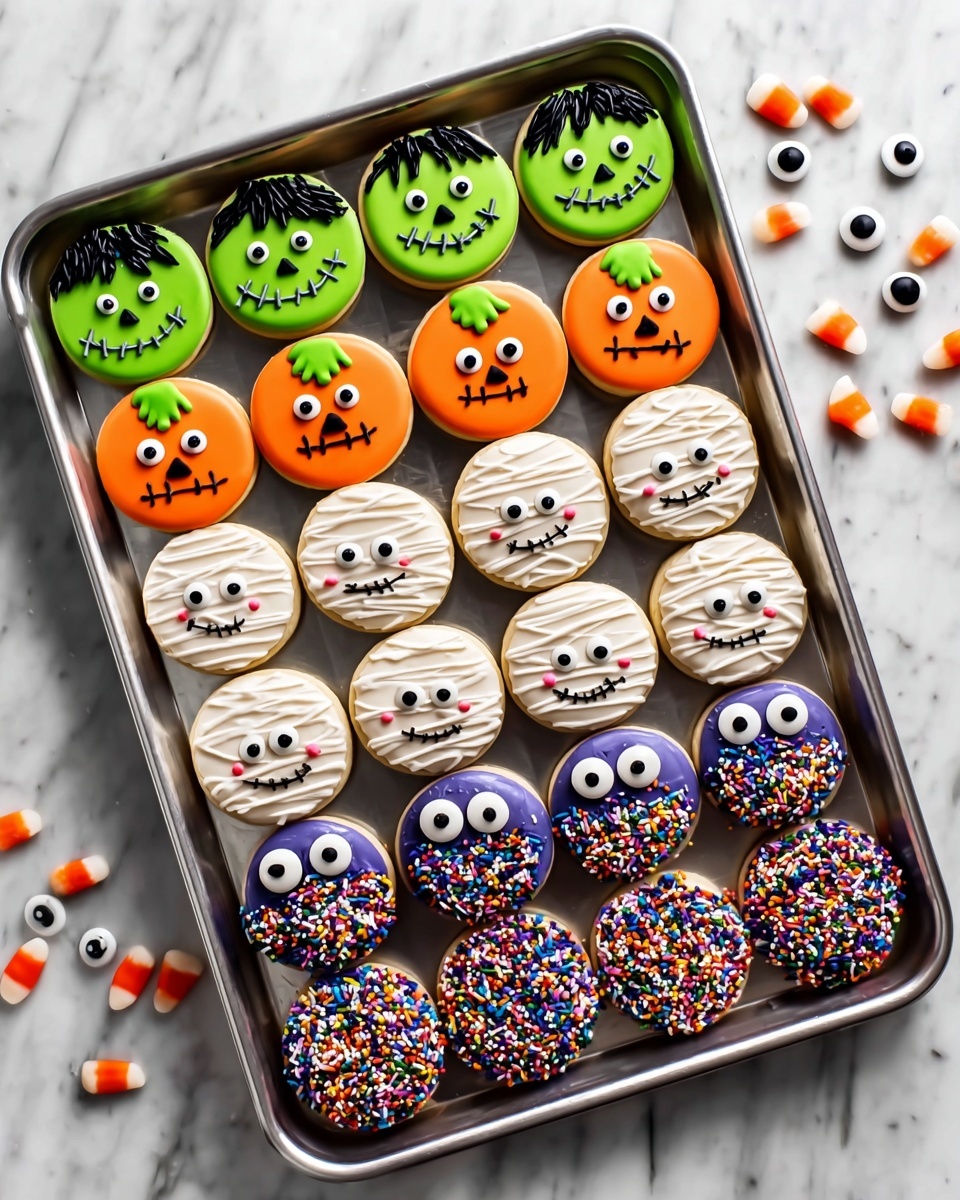
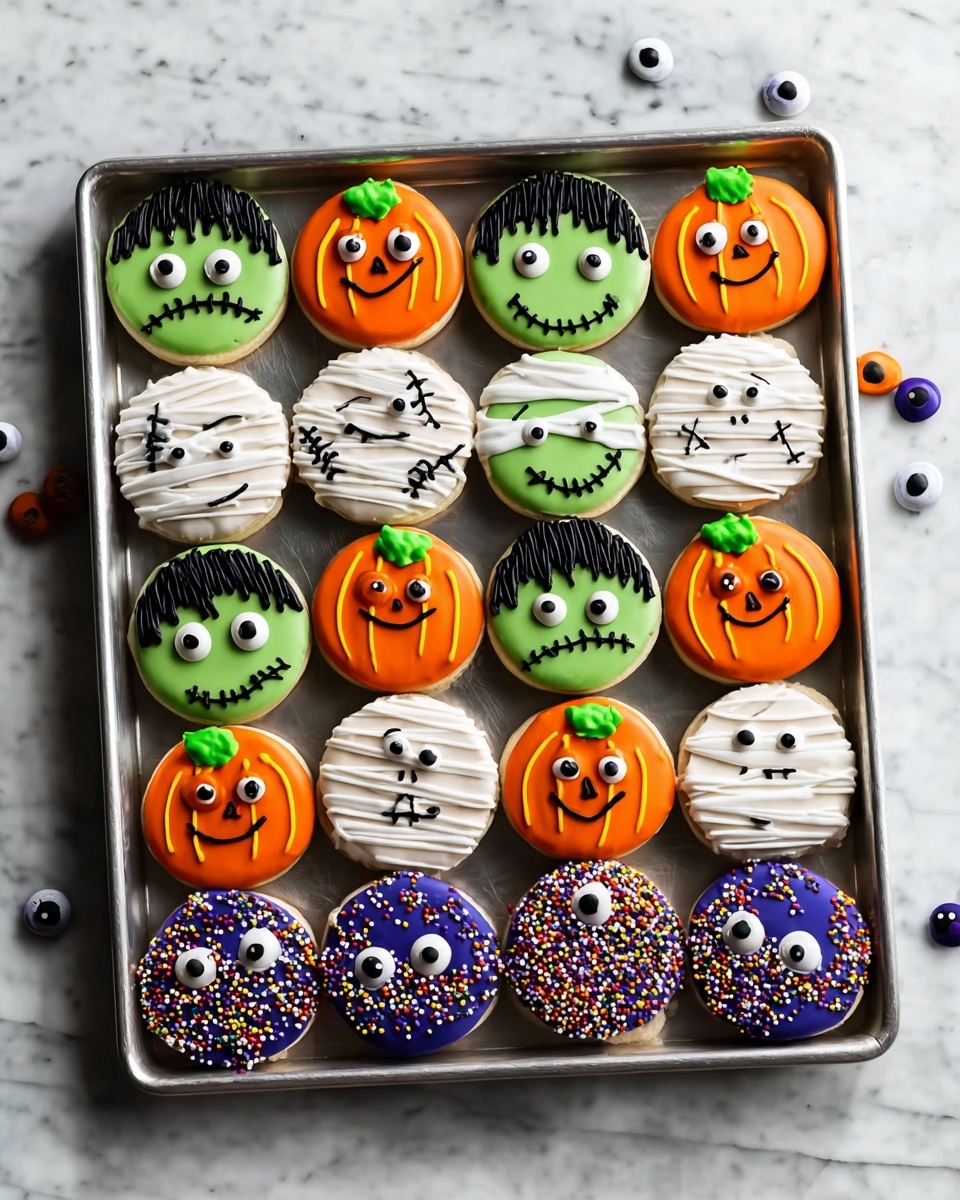
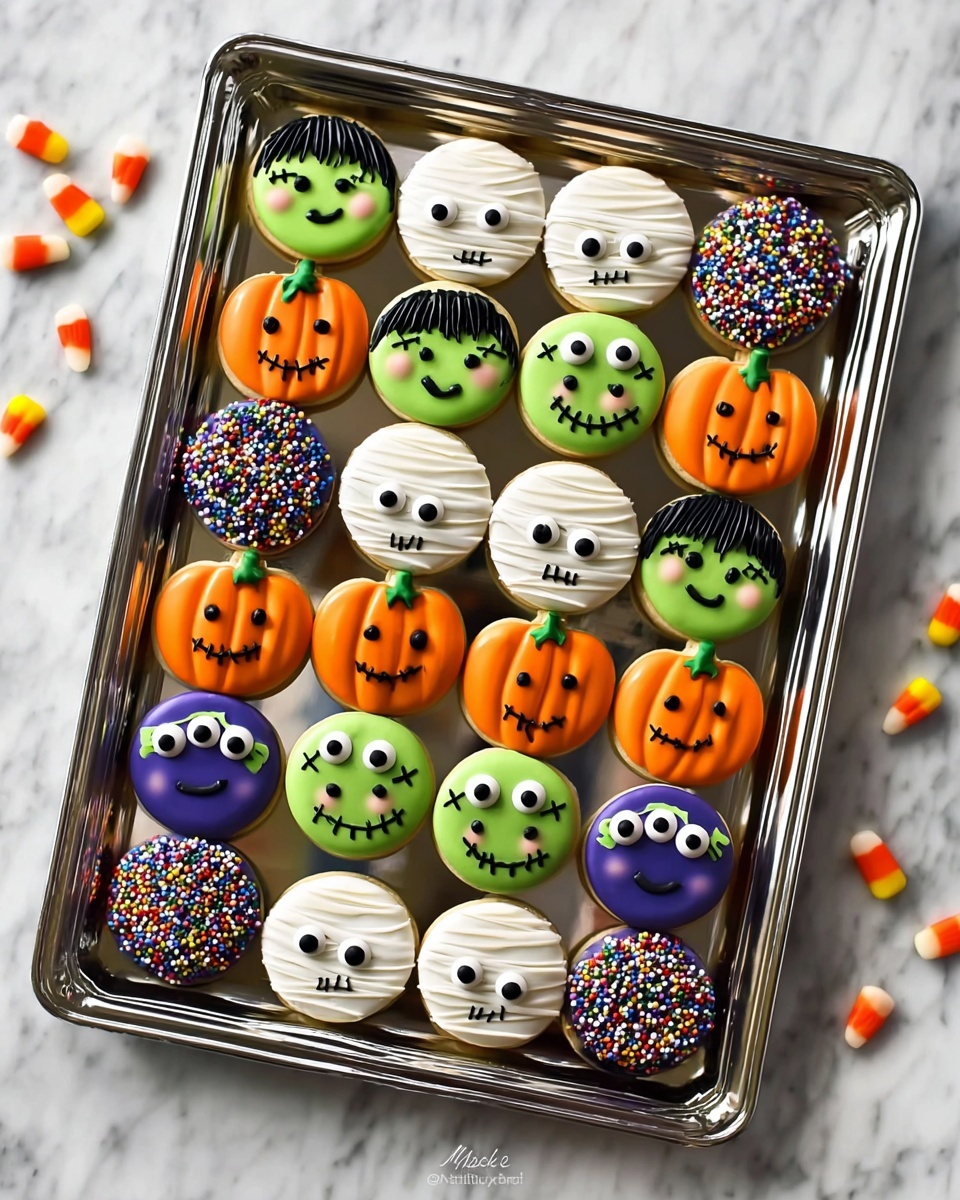
If you’re looking to add a spooky yet irresistibly sweet twist to your Halloween treats, this Chocolate Covered Halloween Oreos Recipe is an absolute game-changer. Imagine classic chocolate sandwich cookies dipped in vibrant candy melts of white, green, purple, and orange, each decorated with creepy sprinkles and candy eyeballs that bring the festive spirit to life. It’s a fun, colorful, and surprisingly simple way to impress trick-or-treaters or party guests with a Halloween dessert that tastes as good as it looks.
Ingredients You’ll Need
The magic of these Chocolate Covered Halloween Oreos lies in their straightforward ingredients. Each one plays a crucial role in creating that perfect blend of taste, texture, and eye-catching color that screams Halloween fun.
- 40 chocolate sandwich cookies (Oreos): The perfect base with their creamy filling and chocolatey crunch.
- 6 ounces white candy melts: Smooth and sweet, great for a classic ghostly look or a blank canvas.
- 6 ounces green candy melts: Adds that eerie, haunted vibe with a vibrant color.
- 6 ounces purple candy melts: Perfect for a rich, mystical feel that complements Halloween themes.
- 6 ounces orange candy melts: The quintessential Halloween shade to bring warmth and festivity.
- 2 ounces black candy melts: For spooky detailing like spider webs and creepy faces.
- Halloween sprinkles: Adds texture and that extra festive flair every kid and adult will love.
- Candy eyeball decorations: The ultimate fun element that gives your Oreos a scary, playful personality.
How to Make Chocolate Covered Halloween Oreos Recipe
Step 1: Prep Your Cookie Sheet
Start by lining a cookie sheet with wax paper or a silicone baking mat. This simple prep step prevents your perfectly coated Oreos from sticking and saves you from a sticky mess later on.
Step 2: Melt One Color of Candy Melts
Choose your first candy melt color and melt it gently in a microwave-safe bowl at 50% power. Take your time, stirring every 30 seconds until the candy is silky smooth. Overheating can ruin the texture, so patience is key here.
Step 3: Coat the Oreos
Using a spoon, carefully drop one Oreo into the melted candy. Flip it upside down to cover every inch. Then lift it out with a fork, letting the excess drip off to avoid messy drips and pools.
Step 4: Decorate While the Coating is Wet
Place the coated Oreo on your prepared sheet and immediately garnish it with Halloween sprinkles or candy eyeballs. The wet coating ensures your decorations stick firmly in place for maximum effect.
Step 5: Repeat with Other Colors
Keep melting, dipping, and decorating Oreos with the other candy melt colors. This variety not only looks fantastic but also brings a playful depth to your assortment of Halloween treats.
Step 6: Add Spooky Details with Black Candy Melts
Once all Oreos have set, melt the black candy melts to pipe on spooky designs using a small piping bag tip. Think spider webs, creepy faces, or jagged lines – the sky’s the limit on the fun details here.
Step 7: Let Set and Store
After decorating, allow the cookies to fully set on the baking mat or wax paper. Then store your batch in an airtight container to keep them fresh and crispy until you’re ready to share the Halloween magic.
How to Serve Chocolate Covered Halloween Oreos Recipe
Garnishes
Adding extra garnishes like edible glitter, shredded coconut dyed black or green, or mini chocolate chips can elevate the festive feel. These little touches make the cookies stand out and invite everyone to enjoy a bite of Halloween fun.
Side Dishes
Pair these Oreos with warm apple cider or a creamy pumpkin spice latte for a full, cozy fall experience. Fresh fruit or small bowls of candy corn can also complement the sweetness and add variety to your Halloween spread.
Creative Ways to Present
Display your chocolate covered Halloween Oreos on tiered cake stands, inside mason jars with ribbon ties, or on decorative Halloween trays with fake cobwebs beneath. Presentation can turn a simple treat into a jaw-dropping party centerpiece everyone will talk about.
Make Ahead and Storage
Storing Leftovers
Keep any leftover Chocolate Covered Halloween Oreos in an airtight container at room temperature. They stay fresh for up to two weeks, maintaining that wonderful crispness and rich chocolate flavor you love.
Freezing
If you want to prepare these Oreos in advance, you can freeze them. Place them in a single layer on a tray to harden, then transfer to an airtight container or freezer bag. When you’re ready, thaw them at room temperature—perfectly preserved for your next Halloween bash.
Reheating
No need to reheat these cookies—they’re best enjoyed cold or at room temperature. Warming them could cause the candy coating to lose its delightful crunch and smooth finish.
FAQs
Can I use regular chocolate instead of candy melts?
While you can use regular chocolate, candy melts are specially designed to melt smoothly and harden with a shiny finish, making them perfect for dipping and decorating Oreo cookies.
What if I don’t have all the candy melt colors?
No worries! You can use whatever colors you have or even mix colors to create new shades. Just be sure to melt them separately to avoid unwanted blending.
How do I prevent the coating from cracking?
Let the candy melts cool slightly before dipping but still keep them fluid. Also, store the finished Oreos at room temperature rather than in the fridge to prevent cracks from temperature changes.
Can I make these without decorating sprinkles?
Absolutely! The sprinkles add fun and texture, but the colorful candy coating alone makes these Oreos festive and delicious.
Is it okay to dip Oreos if they’re frozen?
It’s best to dip Oreos at room temperature. Frozen cookies can cause the coating to seize or crack because of excess moisture and cold temperature differences.
Final Thoughts
This Chocolate Covered Halloween Oreos Recipe is one of my favorite ways to bring fun, flavor, and festive spirit to any Halloween celebration. It’s easy enough to whip up with kids or friends, yet impressive enough to wow guests. Give it a try, and you’ll see how these delightful treats quickly become your Halloween season go-to—and maybe create some sweet, spooky memories too.
Print
Chocolate Covered Halloween Oreos Recipe
- Prep Time: 30 minutes
- Cook Time: 0 minutes
- Total Time: 30 minutes
- Yield: 40 cookies
- Category: Dessert
- Method: No-Cook
- Cuisine: American
Description
These Chocolate Covered Halloween Oreos are spooky, colorful treats perfect for Halloween celebrations. Featuring classic Oreo cookies dipped in vibrant candy melts of white, green, purple, orange, and black, each cookie is decorated with festive sprinkles and candy eyeballs. The recipe is fun, easy to make, and results in visually striking confections that are great for parties or gifting.
Ingredients
Cookies
- 40 chocolate sandwich cookies (Oreos)
Candy Melts
- 6 ounces white candy melts
- 6 ounces green candy melts
- 6 ounces purple candy melts
- 6 ounces orange candy melts
- 2 ounces black candy melts
Decorations
- Halloween sprinkles
- Candy eyeball decorations
Instructions
- Prepare the workspace: Line a cookie sheet with wax paper or use a smooth reusable silicone baking mat. This prevents the dipped Oreos from sticking and makes cleaning up easier.
- Melt candy melts: Place one color of candy melts in a microwave-safe glass bowl. Heat at 50% power, stirring every 30 seconds until fully melted and smooth. Take care to avoid overheating, which can cause the candy to seize.
- Dip the Oreos: Using a spoon, carefully submerge one Oreo into the melted candy. Turn it upside down inside the bowl to coat all sides evenly. Lift the cookie with a fork and gently shake off excess coating to prevent drips.
- Place and decorate: Set the coated Oreo on the prepared sheet. Immediately adorn it with Halloween sprinkles or candy eyeball decorations while the coating is still wet to ensure they stick well.
- Repeat for all colors: Repeat the melting, dipping, and decorating steps with all remaining candy melt colors until all Oreos are coated and decorated as desired.
- Add black detailing: After the coatings harden, melt the black candy melts. Using a piping bag fitted with a small tip, pipe spooky designs like spider webs or faces on the cookies for a festive touch.
- Store the cookies: Once completely set, store the chocolate covered Halloween Oreos in an airtight container at room temperature. They will stay fresh and crisp for up to two weeks.
Notes
- Ensure candy melts do not overheat to prevent seizing; melt slowly at medium-low power.
- Use a silicone baking mat for easy cleanup and to prevent sticking.
- Decorate quickly after dipping so decorations adhere before the coating hardens.
- Black candy melt piping adds a professional and spooky decoration finish.
- Store cookies at room temperature, avoid refrigeration to maintain coating texture.


