
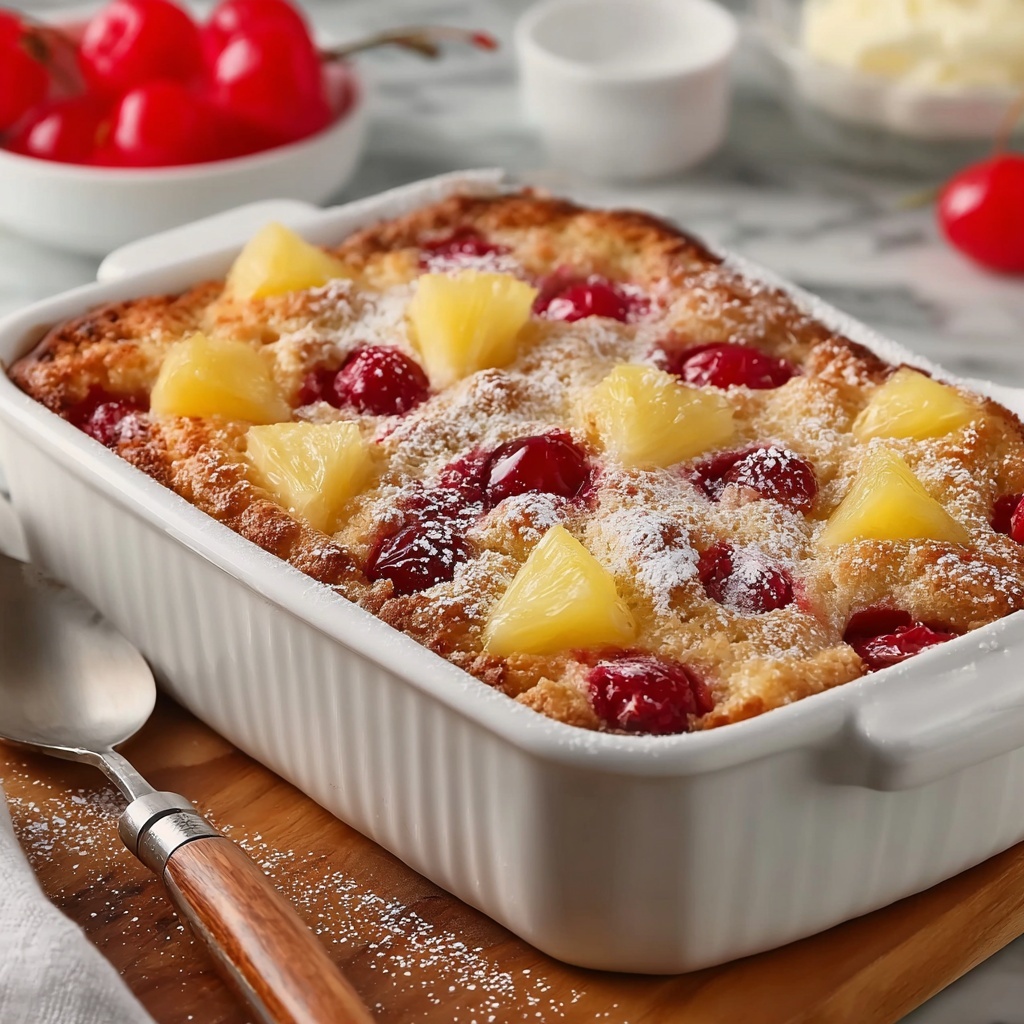
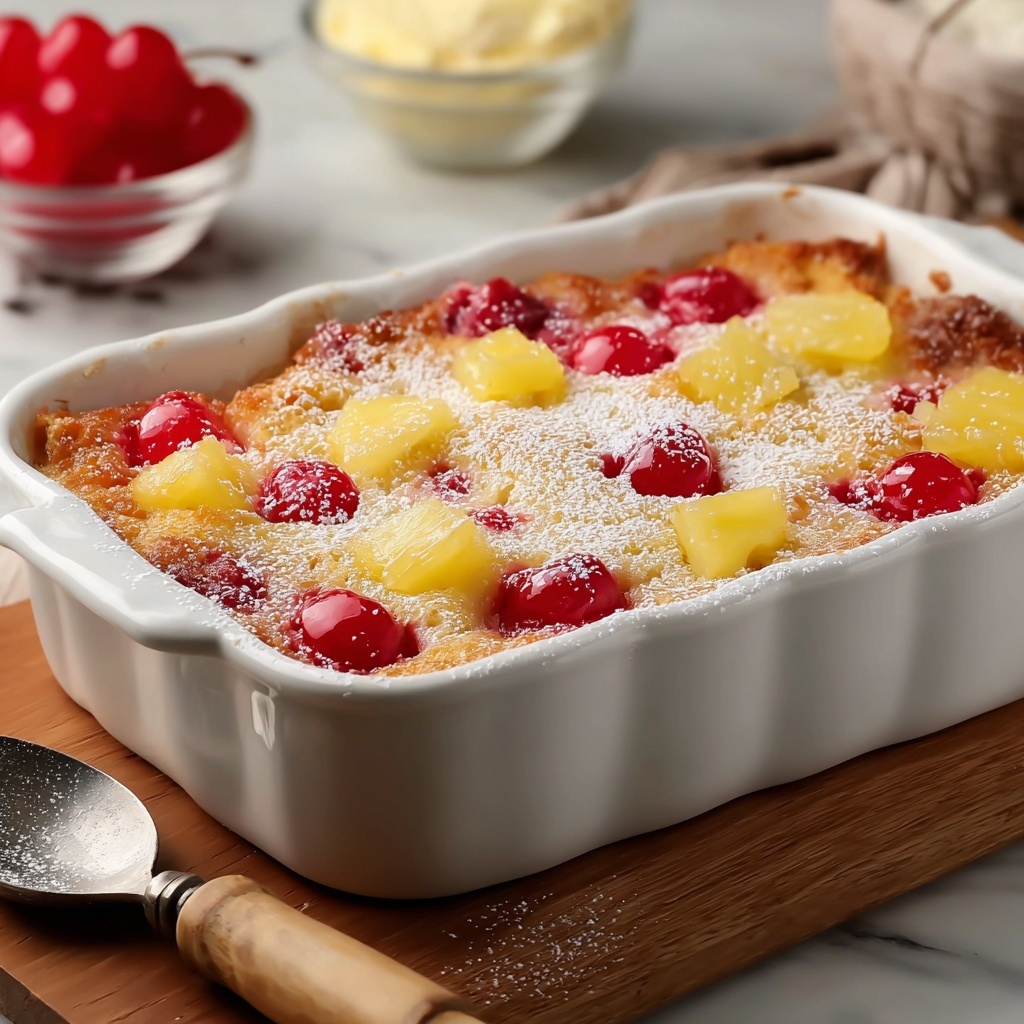
If you’re craving a dessert that’s bursting with vibrant fruit flavors and requires almost no fuss, the Cherry Pineapple Dump Cake Recipe is your new best friend. This heavenly, sweet treat layers luscious cherry pie filling and juicy crushed pineapple under a golden blanket of buttery cake mix, creating an irresistible contrast of textures and colors. Whether you’re a seasoned baker or just looking for a quick dessert fix, this dump cake delivers smiles with every bite, making it perfect for family dinners, potlucks, or simply treating yourself.
Ingredients You’ll Need
Gathering these simple yet essential ingredients is all it takes. Each component plays a starring role: juicy fruit fillings provide natural sweetness and color, the cake mix offers a tender and crumbly topping, and butter adds richness and that perfect golden crust.
- Cherry pie filling: The heart of the dish, this sweet and slightly tart filling delivers that classic cherry flavor and a beautiful deep red hue.
- Crushed pineapple (with juice): Adds tropical brightness and moisture, perfectly complementing the cherries with its natural sweetness.
- Yellow cake mix: Creates a cakey, golden crust that soaks up the fruit juices, giving each bite a perfect balance of softness and crisp.
- Unsalted butter: Thinly sliced on top, it melts into the cake mix to form that rich, buttery crispness everyone loves.
- Chopped nuts (optional): Offers a satisfying crunch and a hint of earthiness, but feel free to skip if you prefer a smoother texture.
How to Make Cherry Pineapple Dump Cake Recipe
Step 1: Preheat and Prepare Your Dish
Start by heating your oven to 350°F (175°C) and lightly greasing a 9×13-inch baking dish. This ensures your cake doesn’t stick and makes cleanup a breeze — a small step that pays off wonderfully at the end.
Step 2: Layer the Cherry Pie Filling
Spread the entire can of cherry pie filling evenly across the bottom of your baking dish. This juicy layer is what gives the cake its signature fruity sweetness and vivid color, so make sure it’s evenly distributed to get that perfect flavor in every bite.
Step 3: Add Crushed Pineapple
Next, pour the crushed pineapple, including all the juice, over the cherry layer. This combination of cherries and pineapple is a match made in dessert heaven, offering a lovely balance of tart and tropical flavors that make the cake shine.
Step 4: Sprinkle the Cake Mix
Evenly sprinkle the dry yellow cake mix right over the fruit layers. No stirring required! The cake mix rests on top and will bake into a deliciously crisp crust that contrasts the soft fruit beneath.
Step 5: Top with Butter Slices and Nuts
Arrange thin slices of unsalted butter evenly across the surface of the cake mix — these little pats of butter melt as it bakes, creating an irresistible golden crust. If you’re adding chopped nuts, sprinkle them on now for that lovely extra crunch and texture.
Step 6: Bake to Perfection
Bake the dump cake for 50 to 60 minutes until the top is a beautiful golden brown and the fruit filling is bubbling happily around the edges. This signals that the magic has happened and your dessert is ready to wow anyone lucky enough to get a slice.
Step 7: Cool Slightly and Serve Warm
Allow the cake to cool for a bit, just enough so it sets slightly but is still warm and inviting. This is when the flavors are at their best, and serving it with a scoop of vanilla ice cream or a dollop of whipped cream takes it to another delicious level.
How to Serve Cherry Pineapple Dump Cake Recipe
Garnishes
Keep it simple and delicious with a scoop of creamy vanilla ice cream or fresh whipped cream melting into the warm cake. For an extra touch, sprinkle a few fresh cherries or a small handful of toasted nuts on top to add a bit of color and crunch.
Side Dishes
This dump cake shines beautifully on its own, but pairing it with light sides like a fresh green salad or a citrusy fruit salad can balance the richness if you’re serving it after a hearty meal. Coffee or a fragrant tea also complement the sweet, fruity flavors perfectly.
Creative Ways to Present
For a fun twist, try serving individual portions in ramekins or mini cast-iron skillets so everyone gets their own personal warm and bubbly dessert. You can also layer it with whipped cream and fruits in clear glasses for a festive trifle-style presentation that’s sure to impress.
Make Ahead and Storage
Storing Leftovers
After enjoying your Cherry Pineapple Dump Cake Recipe, store any leftovers in an airtight container in the refrigerator for up to 4 days. The flavors meld even more with time, making your cake tastes just as lovely refrigerated and reheated.
Freezing
If you want to save some for later, freezing is a great option. Wrap the cooled cake tightly in plastic wrap and aluminum foil, or use a freezer-safe container. It can freeze well for up to 2 months, ready to brighten up your day whenever you crave something sweet.
Reheating
To revive the magic of your dump cake, warm individual portions in the microwave for about 30 seconds, or reheat the entire dish in the oven at 350°F (175°C) for 15–20 minutes until heated through. Don’t forget to add that scoop of ice cream or whipped cream when serving again!
FAQs
Can I use fresh fruit instead of canned cherry pie filling and pineapple?
While fresh fruit can be delicious, the canned fillings provide the right amount of sweetness and syrupy consistency that make the dump cake work perfectly. Fresh fruit may require added sugar or thickener to achieve the same effect.
Is it possible to make this recipe gluten-free?
Absolutely! Choose a gluten-free yellow cake mix and ensure your pie filling and other ingredients are gluten-free certified. This way, you can enjoy the Cherry Pineapple Dump Cake Recipe without worry.
Can I substitute the nuts or leave them out?
Yes, the chopped nuts are completely optional. You can omit them for a smoother texture or try different nuts like pecans or walnuts to add your preferred crunch and flavor.
How do I know when the dump cake is done baking?
The signs to look for are a golden-brown top and bubbling fruit filling at the edges. If the cake looks set and the fruit is bubbling, your dump cake is ready to come out of the oven!
What’s the best way to serve leftover cherry pineapple dump cake?
Leftovers are wonderful warmed up, especially with a scoop of ice cream or a little whipped cream. You can also enjoy it cold straight from the fridge for a slightly different but still tasty experience.
Final Thoughts
There’s something beautifully comforting about the simplicity and flavor of the Cherry Pineapple Dump Cake Recipe. It’s quick to throw together, bursting with delightful fruit flavors, and crowned with a buttery crust that feels like a warm hug in dessert form. So go ahead, give it a try—your family and friends will thank you for bringing this sweet, joyful treat to the table!
Print
Cherry Pineapple Dump Cake Recipe
- Prep Time: 10 minutes
- Cook Time: 50 minutes
- Total Time: 1 hour
- Yield: 12 servings
- Category: Dessert
- Method: Baking
- Cuisine: American
Description
This Cherry Pineapple Dump Cake is a simple and delightful dessert that layers cherry pie filling and crushed pineapple under a blanket of yellow cake mix and butter. It’s easy to prepare, requires minimal ingredients, and results in a sweet, bubbly treat with a golden crust—perfect for any occasion.
Ingredients
Fruit Layer
- 1 can (21 oz) cherry pie filling
- 1 can (20 oz) crushed pineapple (with juice)
Cake Layer
- 1 box (15.25 oz) yellow cake mix
- 1/2 cup (1 stick) unsalted butter, thinly sliced
- 1/2 cup chopped nuts (optional)
Instructions
- Preheat Oven: Preheat your oven to 350°F (175°C) to ensure it reaches the right temperature while you prepare the ingredients.
- Prepare Baking Dish: Lightly grease a 9×13-inch baking dish to prevent sticking and to make for easier cleanup.
- Add Cherry Filling: Spread the entire can of cherry pie filling evenly across the bottom of the prepared baking dish to form the first fruit layer.
- Add Pineapple Layer: Evenly spread the crushed pineapple, including its juice, over the cherry pie filling, creating a juicy and sweet second fruit layer.
- Sprinkle Cake Mix: Evenly sprinkle the dry yellow cake mix over the fruit layers, covering them completely; do not mix.
- Add Butter: Arrange thin slices of unsalted butter evenly across the surface of the cake mix. This will melt during baking and create a golden, crisp topping.
- Add Nuts (Optional): Sprinkle the chopped nuts evenly over the top if using, for added texture and flavor.
- Bake: Place the dish in the preheated oven and bake for 50 to 60 minutes, or until the top is golden brown and the fruit filling is bubbling around the edges.
- Cool and Serve: Allow the cake to cool slightly before serving. It’s delicious warm, especially topped with vanilla ice cream or whipped cream.
Notes
- Do not stir the layers after assembling; the cake mix will form a crust as it bakes.
- You can substitute yellow cake mix with white or even spice cake mix for a different flavor.
- Chopped nuts are optional but add a lovely crunch.
- Serve warm with vanilla ice cream or whipped cream for an extra indulgence.
- Store leftovers covered in the refrigerator for up to 3 days. Reheat gently before serving.

