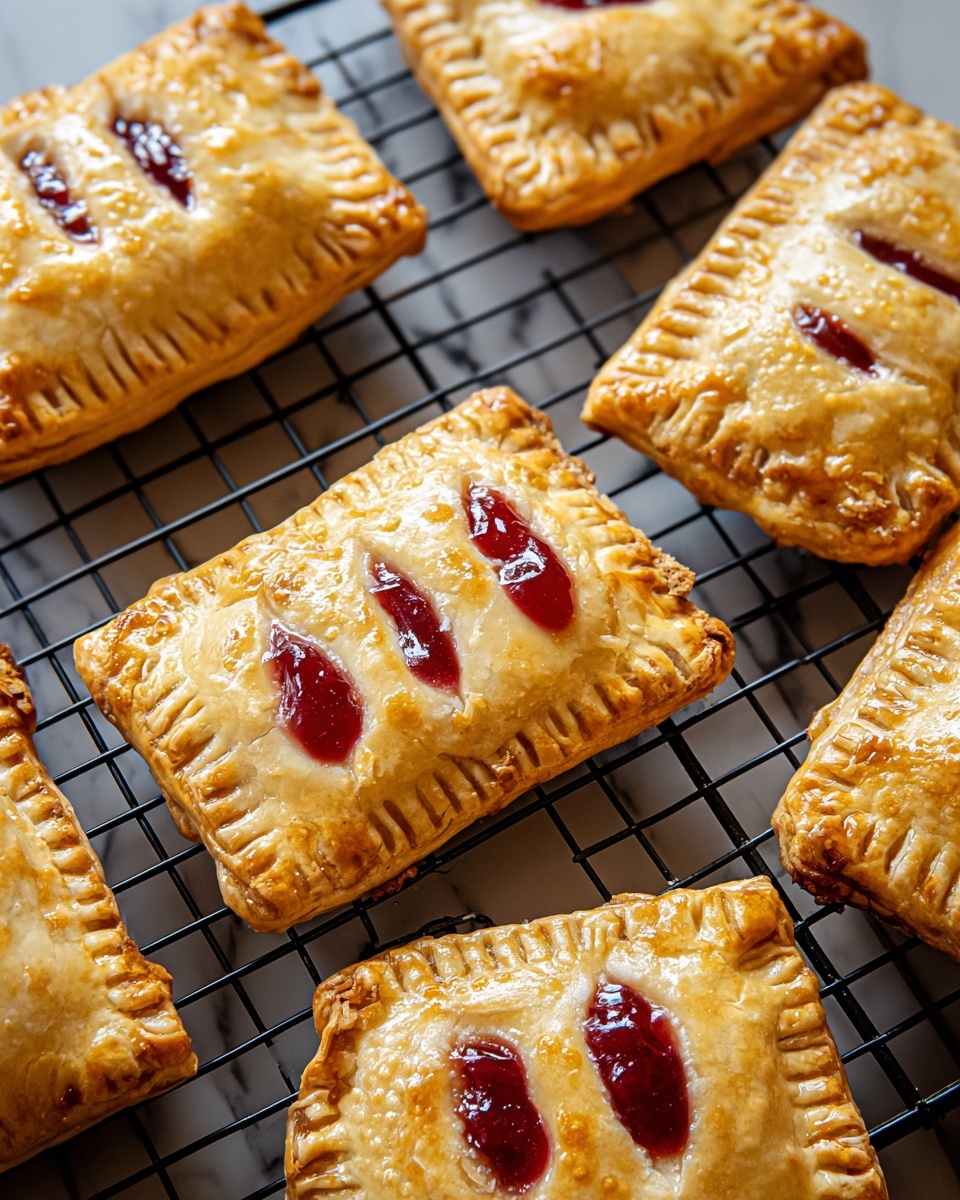
If you’re searching for a delightful treat that combines the nostalgic charm of homemade pie with the convenience of a handheld snack, this Cherry Hand Pies Recipe is exactly what you need. Imagine flaky, golden crusts enveloping a luscious, sweet-tart cherry filling that bursts with flavor in every bite. These hand pies are easy to make, irresistibly portable, and perfect for sharing or indulging all by yourself. Whether you’re hosting a picnic, looking for a quick after-dinner dessert, or craving a sweet snack, these cherry hand pies bring joy and comfort with every mouthful.
Ingredients You’ll Need
Each ingredient in this Cherry Hand Pies Recipe plays an important role in creating the perfect balance of texture and flavor. From the buttery pie crust providing crispness to the cherry filling delivering sweet tang, every component is simple but crucial to your pie’s success.
- Refrigerated pie crusts or homemade: Your flaky, buttery base that holds it all together and gives you that dream texture.
- Cherry pie filling: The star of the show, offering vibrant color and juicy sweetness with every bite.
- Cornstarch (optional): Adds thickness to the filling so it doesn’t run too much when baked, keeping your pies neat and tasty.
- Egg (beaten): The secret to that golden, shiny crust that also helps seal the edges perfectly.
- Water: Used both to seal the dough edges and to whisk with the egg for a smooth egg wash.
- Granulated sugar: Sprinkled on top for a touch of sparkle and subtle crunch once baked.
- Cinnamon (optional): Adds a warm spice note that complements the cherry filling beautifully.
How to Make Cherry Hand Pies Recipe
Step 1: Prepare Your Oven and Dough
Start by preheating your oven to 400°F and lining a baking sheet with parchment paper—this prevents sticking and makes cleanup a breeze. Roll out your pie crusts lightly on a floured surface and cut them into 4-inch squares or circles. I like using a cookie cutter to get uniform shapes, but a sharp knife works just fine. This step sets the canvas for your delicious filling and guarantees those cute little pies will have perfectly even edges.
Step 2: Mix Your Cherry Filling
In a small bowl, stir your cherry pie filling gently. If you want the filling thicker and less likely to ooze out during baking, add about one tablespoon of cornstarch and mix well. This small tweak helps keep every bite neat without sacrificing the juicy, fruity goodness that makes these hand pies so irresistible.
Step 3: Assemble the Pies
Spoon about 1½ tablespoons of the cherry filling into the center of each dough piece, leaving about a half-inch border around the edges. Next, brush that border lightly with water—it acts as glue to help seal the pies. If you’re using two dough pieces, place another piece on top; if your dough is rolled thin enough, folding the dough over to form half-moons works beautifully too. Press the edges firmly with a fork to seal the pies completely, ensuring no precious filling escapes during baking. Don’t forget to cut a few small slits on top—this lets steam escape and prevents sogginess.
Step 4: Add the Finishing Touches
Whisk together your beaten egg and water to create an egg wash. Gently brush this over each pie for that classic golden shine and crisp finish. Sprinkle the tops with granulated sugar, and if you like a little spice, a dash of cinnamon adds a warm, aromatic layer of flavor that takes your hand pies up a notch.
Step 5: Bake to Perfection
Place your pies on the prepared baking sheet and pop them into your preheated oven. Bake for 18 to 22 minutes, or until the crust turns beautifully golden brown and crisp. Once out of the oven, allow them to cool slightly—just enough to handle—then enjoy the warm, gooey cherry goodness inside!
How to Serve Cherry Hand Pies Recipe
Garnishes
Simple garnishes can elevate your Cherry Hand Pies Recipe into an eye-catching dessert. A light dusting of powdered sugar or a drizzle of a quick glaze made with powdered sugar and milk adds a lovely touch of sweetness and a pretty finish. If you want to get fancy, a small dollop of whipped cream or a scoop of vanilla ice cream served alongside makes a dreamy pairing.
Side Dishes
These hand pies are wonderful all on their own, but pairing them with fresh fruit salad or a crisp green salad can balance the sweetness with fresh, bright notes. A side of creamy yogurt or mascarpone cheese also complements the cherry filling beautifully for an indulgent dessert experience.
Creative Ways to Present
For parties or picnics, arrange your cherry hand pies on a rustic wooden board or a decorative platter. Sprinkle fresh cherries or mint leaves around them for a burst of color and aroma. You can even serve them individually wrapped in parchment and tied with twine for a charming, gift-like presentation that guests will adore.
Make Ahead and Storage
Storing Leftovers
Keep any leftover cherry hand pies in an airtight container at room temperature for up to two days. This helps maintain their crisp crust without drying them out. If you want to keep them longer, refrigeration is an option but may soften the crust slightly.
Freezing
These hand pies freeze wonderfully! To freeze, bake as usual, let cool completely, then wrap each pie individually with plastic wrap and place them in a freezer-safe bag. They’ll keep well for up to two months, ready for whenever a sweet craving strikes.
Reheating
To reheat frozen or refrigerated pies, pop them in a 350°F oven for 10 to 15 minutes, or until warmed through and crisp again. Avoid microwaving if you want to preserve that delightful flaky texture.
FAQs
Can I use fresh cherries instead of canned pie filling?
Absolutely! Using fresh cherries will give a more natural flavor and texture, but you’ll want to cook them slightly with sugar and cornstarch to create a filling that holds together well inside the pies.
Is it possible to make these hand pies gluten-free?
Yes, by using a gluten-free pie crust, you can easily adapt this Cherry Hand Pies Recipe. Just ensure your pie crust is sturdy enough to hold the filling so the pies don’t fall apart.
What other fruit fillings work well for hand pies?
Besides cherry, flavors like apple, blueberry, peach, or mixed berry make excellent fillings. Feel free to experiment and find your favorite!
How do I prevent the filling from leaking during baking?
Using cornstarch to thicken the filling and making sure to seal the edges firmly with water and a fork press are key steps. Also, cutting slits on top allows steam to escape and helps prevent leaks.
Can I prepare the pies ahead of time before baking?
Definitely. You can assemble the pies, keep them covered in the refrigerator for a few hours, then bake when you’re ready. This makes them a fantastic make-ahead dessert option.
Final Thoughts
There is something truly special about homemade Cherry Hand Pies Recipe that brings comfort and happiness with each bite. They are simple enough for a quick weekday treat but festive enough for sharing at celebrations. I hope you enjoy making and savoring these little parcels of joy as much as I do. Go ahead, give this recipe a try—you’ll be so glad you did!
Print
Cherry Hand Pies Recipe
- Prep Time: 15 minutes
- Cook Time: 20 minutes
- Total Time: 35 minutes
- Yield: 8 hand pies
- Category: Dessert
- Method: Baking
- Cuisine: American
- Diet: Vegetarian
Description
These Cherry Hand Pies are a delightful and portable dessert featuring flaky pie crust filled with sweet cherry pie filling. Perfect for a quick treat or a charming addition to any gathering, they bake to golden perfection and can be easily customized with different fruit fillings or a simple glaze.
Ingredients
Pie Crust
- 2 refrigerated pie crusts (or homemade)
Filling
- 1½ cups cherry pie filling
- 1 tablespoon cornstarch (optional, for thicker filling)
Topping and Finishing
- 1 egg (beaten, for egg wash)
- 1 tablespoon water
- 2 tablespoons granulated sugar (for sprinkling)
- ½ teaspoon cinnamon (optional, for topping)
Instructions
- Preheat the oven: Preheat your oven to 400°F (200°C) and line a baking sheet with parchment paper to prevent sticking and make cleanup easier.
- Prepare the pie crust: Roll out the pie crusts on a lightly floured surface. Using a 4-inch cookie cutter or knife, cut the dough into squares or circles depending on your preference.
- Prepare the filling: If desired, mix the cherry pie filling with 1 tablespoon of cornstarch in a small bowl to thicken the filling and prevent sogginess during baking.
- Assemble the pies: Spoon about 1½ tablespoons of the cherry filling onto the center of each dough piece, leaving a small border around the edges. Brush the edges lightly with water to help seal.
- Seal the pies: Place another piece of dough on top or fold over to create half-moon shapes. Press the edges together firmly with a fork to seal completely. Cut small slits on the top of each pie to allow steam to escape during baking.
- Apply the egg wash: In a small bowl, whisk together the beaten egg and water. Brush this mixture over the tops of the pies to help them brown beautifully.
- Add finishing touches: Sprinkle the tops with granulated sugar and cinnamon if using for added flavor and texture.
- Bake: Arrange the hand pies on the prepared baking sheet and bake in the preheated oven for 18–22 minutes, or until the crust is golden brown and crisp.
- Cool and serve: Let the hand pies cool slightly before serving. They are delicious warm and pair well with vanilla ice cream or a light glaze if desired.
Notes
- For a simple glaze, mix ½ cup powdered sugar with 1–2 tablespoons milk and drizzle over cooled pies.
- You can substitute other fruit fillings like apple, blueberry, or peach for variety.
- These hand pies are delicious served warm with vanilla ice cream.


