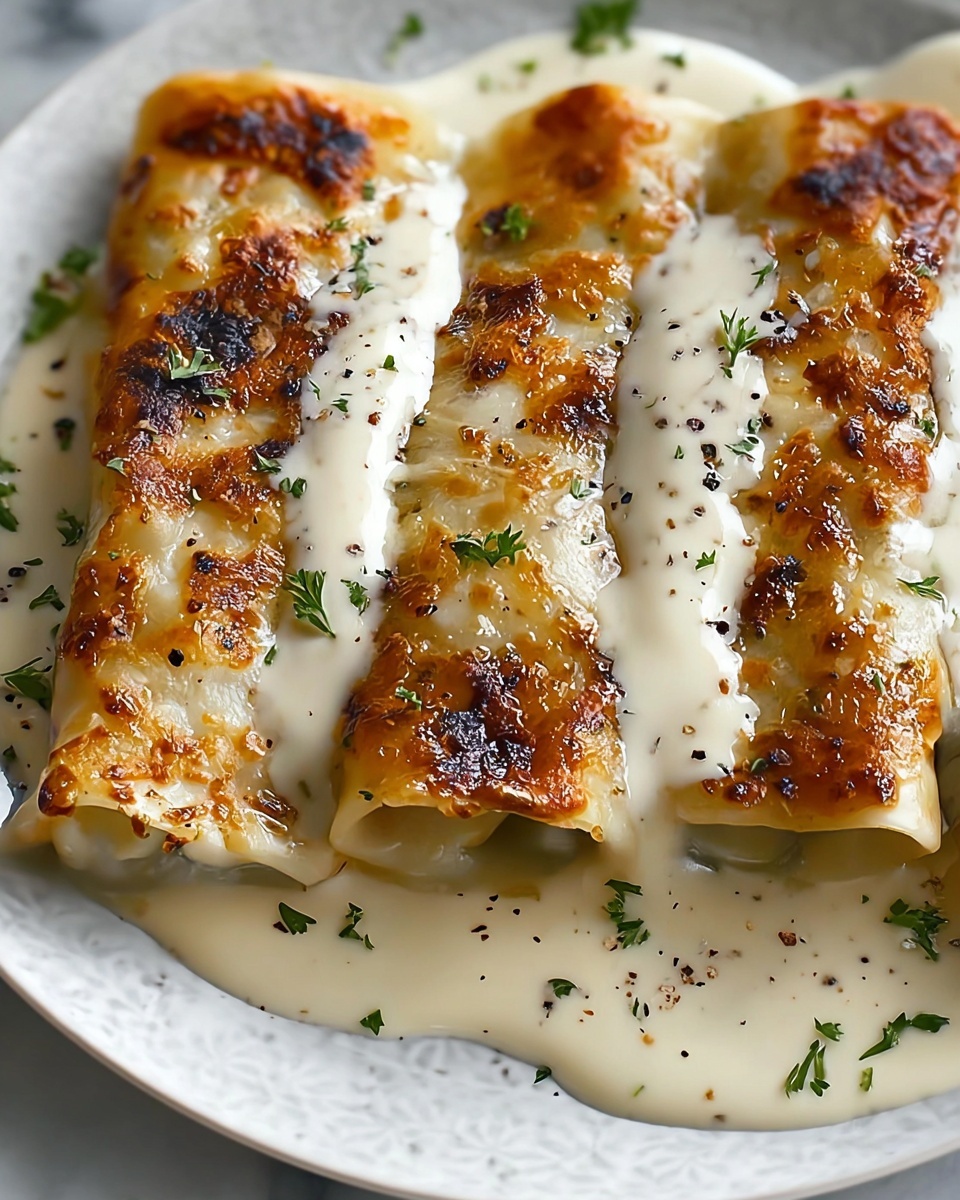
If you are hunting for a comfort meal that is both quick and irresistibly delicious, then this Cheesy Garlic Chicken Wraps Recipe is about to become your new favorite. Imagine tender, shredded chicken blended with a trio of melty cheeses and a hint of garlic, all wrapped snugly inside a warm tortilla that crisps up beautifully in the oven. It’s gooey, savory, and perfect for a satisfying lunch or dinner that feels like a warm, cheesy hug every single time.

Ingredients You’ll Need
These ingredients are straightforward, yet each one plays a crucial role in building the flavors and textures that make this Cheesy Garlic Chicken Wraps Recipe shine. You’ll find that combining simple staples like shredded chicken and three kinds of cheese creates a mouthwatering blend that’s bursting with flavor. The tortillas act as the perfect vessel, bringing it all together in a convenient handheld meal.
- 2 cups cooked chicken breast: Using rotisserie chicken speeds up prep and adds great flavor.
- 1 cup shredded mozzarella cheese: Offers the classic gooey, stretchy cheese pull everyone loves.
- ½ cup shredded cheddar cheese: Adds sharpness and depth to the filling.
- ¼ cup grated Parmesan cheese: Brings an umami kick and a salty finish.
- 4 large flour tortillas: The perfect size to hold the filling and crisp nicely when baked.
- Garlic powder (optional): A little sprinkle enhances the garlic flavor without overpowering.
How to Make Cheesy Garlic Chicken Wraps Recipe
Step 1: Preheat Your Oven
Start by setting your oven to 375°F (190°C), so it’s ready to give your wraps a perfectly golden and melty finish. This temperature ensures the cheese melts evenly while crisping the tortillas just right.
Step 2: Combine the Filling Ingredients
In a mixing bowl, toss together the shredded chicken, mozzarella, cheddar, and Parmesan cheeses. If you love garlic, sprinkle in a bit of garlic powder here to intensify the flavor. This step is where the magic happens — blending creamy cheeses with tender chicken creates that irresistible filling.
Step 3: Fill the Tortillas
Lay your tortillas flat on a clean surface. Divide the cheesy chicken mixture evenly among them, spreading it gently but thoroughly. Make sure every wrap gets enough filling for a hearty bite.
Step 4: Roll Up the Wraps
Roll each tortilla tightly, tucking in the sides as you go to keep all that cheesy goodness sealed inside. This tight roll helps the wraps hold their shape and prevents the filling from spilling during baking.
Step 5: Bake Until Golden and Melty
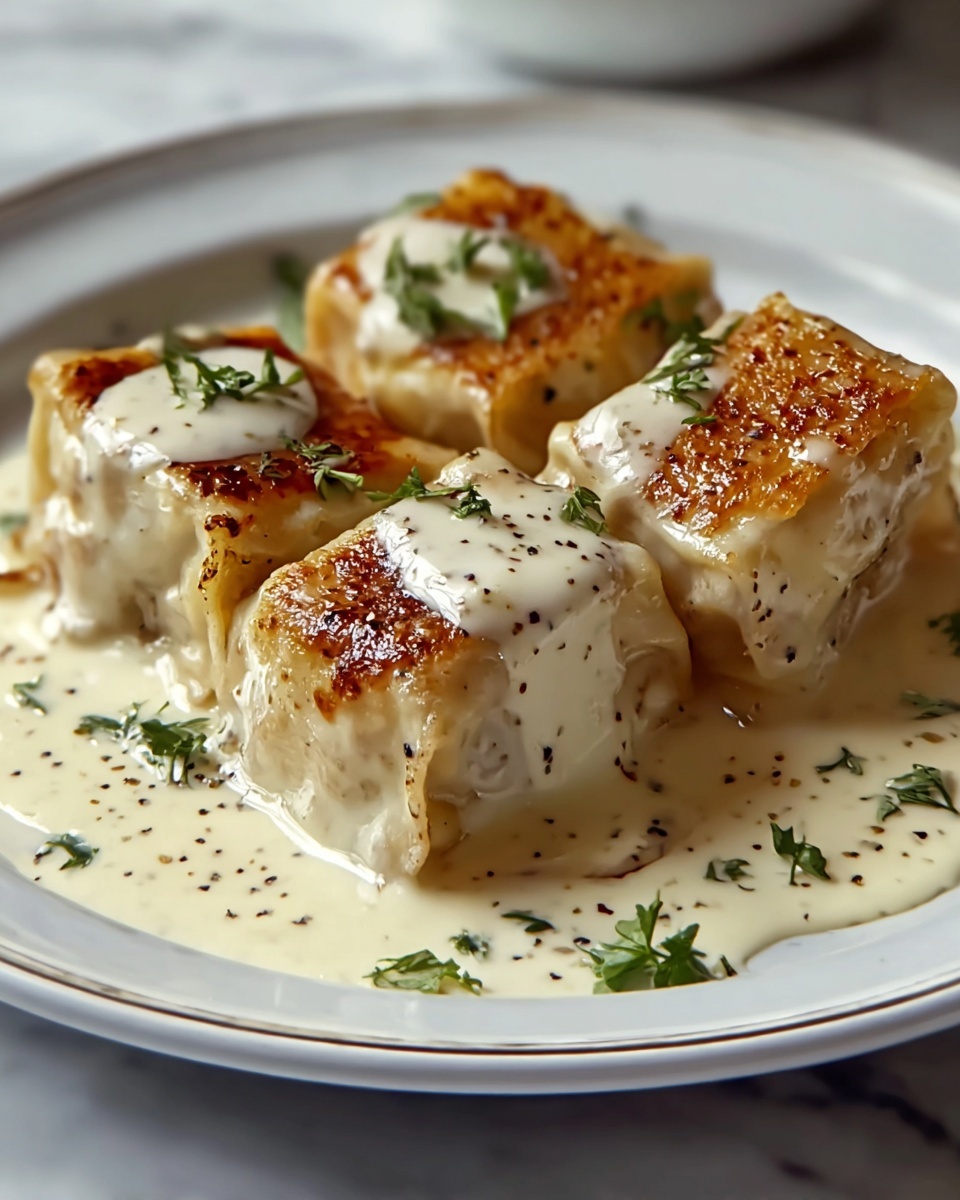
Place your wraps on a baking sheet and pop them into the preheated oven. Bake for about 10 to 12 minutes, or until the tortillas are golden brown and the cheese inside is bubbling and melted. This crisp outside with a gooey inside is what makes this Cheesy Garlic Chicken Wraps Recipe such a win.
Step 6: Serve Warm with Dipping Sauce
Once out of the oven, these wraps are best enjoyed warm. Pair them with your favorite dips like ranch, marinara, or a zesty chipotle mayo for an extra flavor boost that keeps every bite exciting.
How to Serve Cheesy Garlic Chicken Wraps Recipe
Garnishes
Adding a sprinkling of fresh chopped parsley or a handful of sliced green onions on top adds a pop of color and freshness that beautifully complements the rich, cheesy filling. A drizzle of garlic butter or a bit of hot sauce can also elevate the flavors even more.
Side Dishes
These wraps pair wonderfully with simple sides like a crisp garden salad, crunchy carrot sticks, or even a vibrant tomato salsa. The fresh, light sides balance out the richness of the wraps perfectly, creating a well-rounded meal.
Creative Ways to Present
Slice the wraps diagonally for a classic presentation that shows off the melty cheese, or cut them into bite-sized pinwheels for a party appetizer. Wrapping them individually in parchment paper also makes for easy, mess-free eating whether at home or on the go.
Make Ahead and Storage
Storing Leftovers
If you have leftovers, wrap them tightly in foil or store them in an airtight container in the fridge. They’ll stay delicious for up to 3 days, making them a fantastic quick lunch or snack option.
Freezing
You can freeze these wraps for longer storage by wrapping each one individually in plastic wrap and placing them in a freezer-safe bag. When well wrapped, they keep well for up to 2 months without losing much of their cheesy goodness.
Reheating
To reheat, pop the wraps in the oven at 350°F (175°C) until warmed through and crisp again, about 10 minutes. Avoid microwaving if you want to keep the tortilla crispy and the cheese perfectly gooey.
FAQs
Can I use other types of cheese for this recipe?
Absolutely! Feel free to experiment with cheeses like Monterey Jack, pepper jack for a spicy kick, or even smoked gouda for a deeper flavor. Just keep the cheese quantity balanced so it melts well without overpowering the chicken.
Is rotisserie chicken the best choice for this recipe?
Rotisserie chicken is a fantastic shortcut because it’s already cooked and flavorful, but you can certainly use homemade grilled or baked chicken breasts instead. Just be sure to shred or dice it finely so the filling is well-distributed.
Can I make this recipe vegetarian?
Yes! Simply swap the chicken for sautéed mushrooms, roasted vegetables, or a plant-based chicken substitute. The blend of cheeses and garlic will still bring plenty of flavor to the wrap.
How spicy is the Cheesy Garlic Chicken Wraps Recipe?
This recipe isn’t spicy by default, but you can easily add heat by incorporating diced jalapeños, a dash of cayenne pepper in the mix, or serving with a spicy salsa or hot sauce on the side.
What dipping sauces pair well with these wraps?
Ranch, chipotle mayo, marinara sauce, or even a creamy avocado dip work wonderfully. Choosing a sauce with a bit of acidity or creaminess helps balance the rich, cheesy filling perfectly.
Final Thoughts
I hope you’re as excited as I am to try this Cheesy Garlic Chicken Wraps Recipe. It’s a simple, crowd-pleasing dish that comes together quickly but tastes like you spent hours mastering it. Once you make these wraps, they’ll become your go-to comfort meal for busy days or anytime you want something warm, cheesy, and utterly delicious. Give it a shot and watch everyone keep coming back for more!
Print
Cheesy Garlic Chicken Wraps Recipe
- Prep Time: 5 minutes
- Cook Time: 10-12 minutes
- Total Time: 15-17 minutes
- Yield: 4 servings
- Category: Wraps
- Method: Baking
- Cuisine: American
Description
These Cheesy Garlic Chicken Wraps are a quick and delicious meal perfect for lunch or dinner. Made with shredded rotisserie chicken combined with a blend of mozzarella, cheddar, and Parmesan cheeses, these wraps are baked to golden perfection. Enjoy the melty, savory flavors wrapped in soft flour tortillas for a comforting and satisfying dish.
Ingredients
Chicken Mixture
- 2 cups cooked chicken breast, shredded or diced (rotisserie chicken works great!)
- 1 cup shredded mozzarella cheese
- ½ cup shredded cheddar cheese
- ¼ cup grated Parmesan cheese
- Garlic powder, a sprinkle (optional)
Wraps
- 4 large flour tortillas
Instructions
- Preheat Oven: Preheat your oven to 375°F (190°C) to prepare for baking the wraps.
- Mix Ingredients: In a bowl, combine the shredded chicken, mozzarella, cheddar, Parmesan cheeses, and sprinkle garlic powder if desired to create the cheesy chicken filling.
- Prepare Tortillas: Lay the flour tortillas flat on a clean surface and evenly divide the cheesy chicken mixture among them.
- Roll Wraps: Roll each tortilla tightly to enclose the filling, making sure the edges are sealed to prevent the filling from leaking out during baking.
- Bake: Place the wraps on a baking sheet and bake in the preheated oven for 10-12 minutes, or until the tortillas are golden brown and the cheese inside has melted completely.
- Serve: Remove from the oven and serve the wraps warm, optionally with your favorite dipping sauce for added flavor.
Notes
- Use rotisserie chicken for convenience and added flavor.
- Garlic powder is optional but adds a nice depth of flavor.
- Feel free to substitute flour tortillas with whole wheat or gluten-free tortillas if preferred.
- Serve with ranch, marinara, or a spicy dipping sauce for variety.
- The wraps can be prepared ahead of time and baked just before serving.
