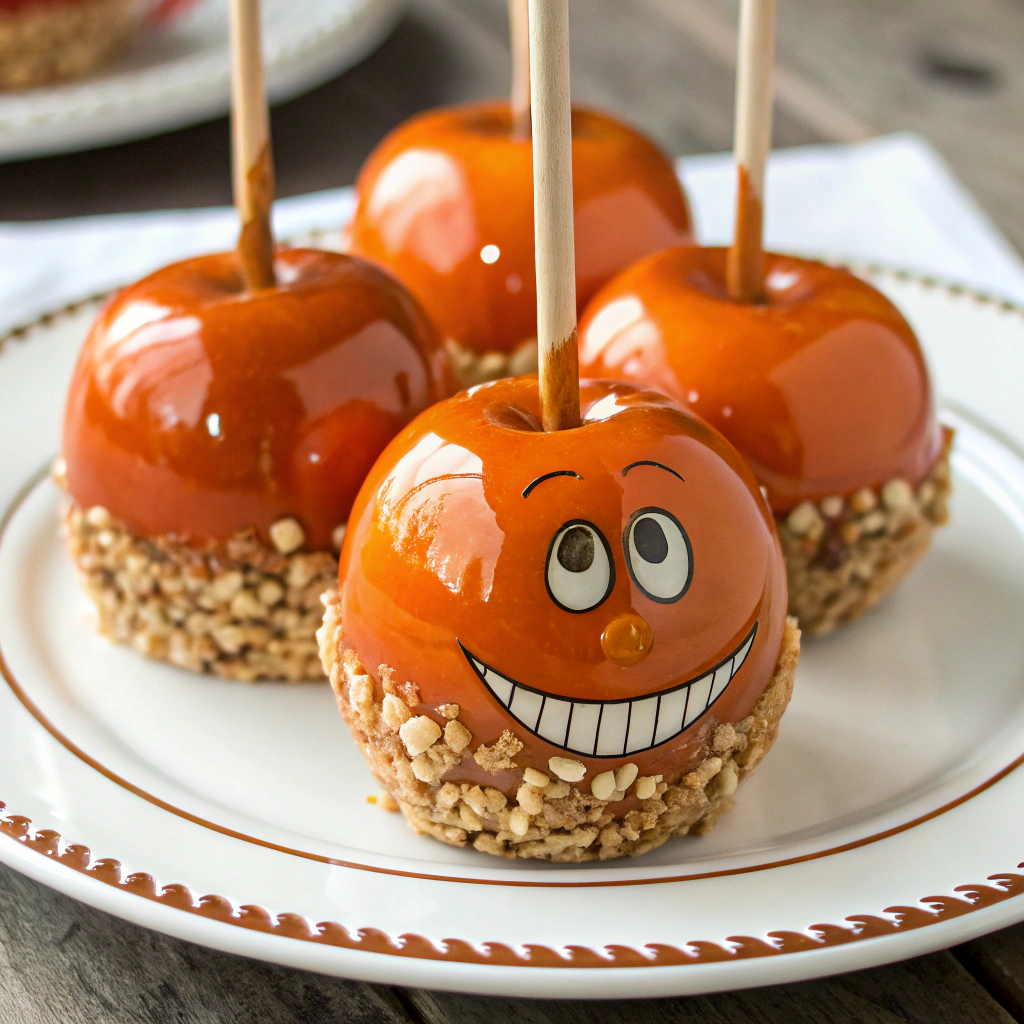
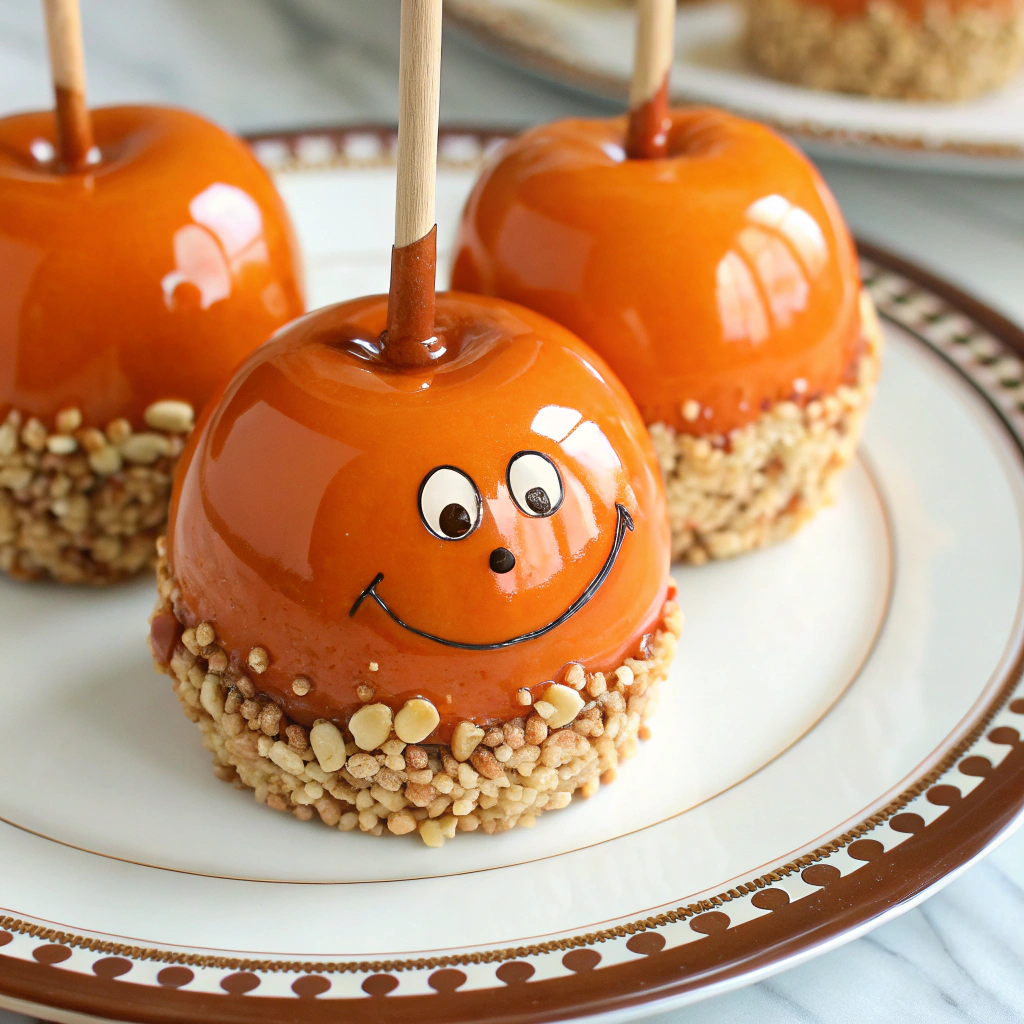
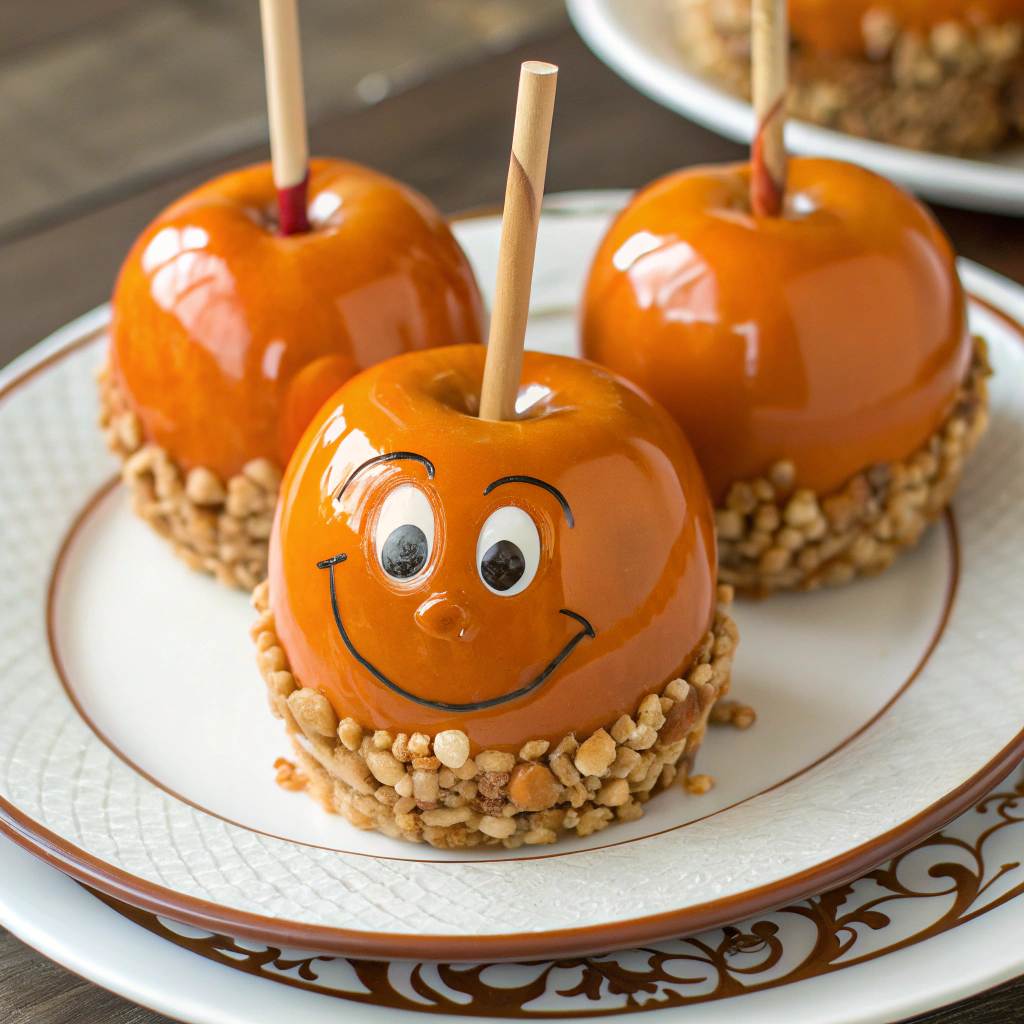
If you’re dreaming of a classic treat that perfectly captures all the fun and festive spirit of fall, you’re in for a real delight with this Candied Apples for Halloween Recipe. These aren’t just any candied apples—they boast a shiny, crackling candy shell with a beautiful orange tint that makes them perfect for Halloween celebrations. Each bite delivers the satisfying crunch of firm apples wrapped in a sweet, buttery glaze that’s just the right balance of crispy and sticky. Whether you’re sharing them with trick-or-treaters, gifting at a party, or enjoying a nostalgic snack night, this recipe brings warmth, color, and a dash of magic to the season.
Ingredients You’ll Need
Gathering these simple yet essential ingredients is the first step toward creating memorable Candied Apples for Halloween Recipe. Each component plays a crucial role; the apples provide that juicy crunch, sugar and corn syrup melt into a perfect glossy coat, and vanilla along with optional food coloring add depth and festive flair.
- 6 small apples (Granny Smith or any firm variety): Choose firm apples so they hold up beautifully under the candy coating.
- 6 wooden sticks or skewers: These make dipping and serving easier while giving a perfect handle for munching.
- 2 cups granulated sugar: The key to that irresistible sweet candy shell everyone loves.
- 1/2 cup light corn syrup: Helps prevent crystallization and keeps the candy coating smooth and shiny.
- 3/4 cup water: Dissolves the sugar and creates the perfect consistency for the candy syrup.
- 1/2 teaspoon vanilla extract: Adds a subtle warmth and depth right at the end of the cooking process.
- Orange food coloring (optional): A few drops make the candy coating visually pop with that classic Halloween orange glow.
- 1/2 cup chopped nuts (optional, for topping): Adds a delightful crunch and extra flavor contrast to your candied apples.
How to Make Candied Apples for Halloween Recipe
Step 1: Prepare the Apples
Start by washing your apples thoroughly to remove any residue since you’ll be enjoying them with the skin on. Dry them completely—any water left can interfere with the candy coating. Remove the stems and carefully push a wooden stick halfway through the top of each apple. This not only makes dipping and eating easier but also ensures they hold steady while you work. Set these aside on a parchment paper-lined baking sheet, ready for that glossy candy shell.
Step 2: Make the Candy Syrup
In a medium saucepan, combine your sugar, corn syrup, and water. Stir gently over medium heat until the sugar fully dissolves—this ensures a smooth base for your candy. Crank the heat to medium-high and let the mixture reach a rolling boil. Resist stirring at this stage to avoid crystallization. This step is where patience pays off; the perfect candy coating depends on your syrup reaching exactly the right temperature.
Step 3: Monitor the Temperature
Using a candy thermometer, watch the syrup closely and cook until it hits 300°F (150°C), known as the hard crack stage. This precise temperature is what gives you that iconic, hard, shiny candy shell that cracks delightfully with each bite. Once it reaches this point, remove the pan immediately from the heat to prevent burning or overcooking.
Step 4: Flavor and Color the Candy
Now it’s time to stir in your vanilla extract for a smooth, mellow flavor boost. If you want to channel those spooky Halloween vibes, add a few drops of orange food coloring to transform the syrup into a vibrant, festive candy. Be careful during this step—your mixture will bubble vigorously, so stir gently but quickly to incorporate without splashing.
Step 5: Dip Your Apples
Working swiftly, tilt the saucepan a bit and dip each apple into the hot candy mixture, turning it to ensure a full, even coat. The syrup should cling beautifully, enveloping the apple in a glassy, crackling shell. Lift the apple and let excess candy drip back into the pan before placing it again on your parchment paper. For extra texture and flavor, sprinkle chopped nuts on the still-wet coating to add a nutty crunch as it sets.
Step 6: Let Them Harden
Allow the candied apples to rest at room temperature for about 30 minutes. This gives the candy coating time to harden completely, achieving that perfect crunch. Patience here is key because biting into warm candy won’t give you the crisp texture that makes this recipe so special.
Step 7: Optional Spooky Faces
Want your Candied Apples for Halloween Recipe to truly stand out? Before dipping, carefully use a sharp paring knife to carve creepy faces or fun designs into the apples. When coated, these designs peek through the glossy shell, creating an eye-catching Halloween treat that’s as adorable as it is delicious.
How to Serve Candied Apples for Halloween Recipe
Garnishes
Enhance the appearance and flavor of your candied apples by adding garnishes like chopped nuts, crushed candy corn, or sprinkles right after dipping. These add delightful texture and provide a pop of colorful fun that kids and adults alike will adore. A dusting of edible glitter or a drizzle of white chocolate can make them look like professional Halloween party centerpieces.
Side Dishes
While candied apples are a treat on their own, you can serve them alongside complementary fall favorites to round out your snack spread. Spiced nuts, pumpkin muffins, or cinnamon sticks make excellent pairings that elevate the whole experience. For a savory contrast, a cheese board with mild cheddar or gouda works surprisingly well to balance the sweetness.
Creative Ways to Present
Presentation can turn a simple treat into a festive highlight. Arrange your candied apples in a decorative basket lined with orange and black tissue paper, or place them upright in a foam block covered with faux spider webs. Wrapping each apple in cellophane tied with a ribbon gives a polished gift-ready look perfect for parties or giving away to trick-or-treaters.
Make Ahead and Storage
Storing Leftovers
If you happen to have leftovers—and we hope you do—they store best at room temperature on a wax paper-lined tray. Cover them loosely with plastic wrap to avoid condensation, which can soften the candy shell. Stored this way, they remain fresh and delicious for up to 2 days.
Freezing
Freezing candied apples is not recommended because the candy coating can become sticky or cloudy upon thawing, and apple texture may suffer. For the best experience, enjoy these treats fresh within a couple of days.
Reheating
Reheating isn’t necessary or advised since it will melt the candy coating and ruin the texture. If you want a warm apple treat, consider warming an apple without the candy and serving it with caramel sauce as a distinct dessert option.
FAQs
Can I use different types of apples for this recipe?
Absolutely! While Granny Smith apples are popular for their tartness and firm texture, any firm apple variety like Fuji, Honeycrisp, or Gala will work well. Just ensure they’re fresh and crisp so they hold up under the hot candy syrup.
Why didn’t my candy coating harden properly?
If your candy coating stayed sticky or soft, it’s likely the syrup didn’t reach the hard crack temperature of 300°F. Using a reliable candy thermometer and patience is critical. Also, avoid stirring once the syrup starts boiling to prevent sugar crystallization.
Can I make the candy coating in advance?
The candy coating should be made fresh and used immediately to ensure it stays hot enough to coat the apples perfectly. It hardens quickly as it cools, so timing is essential for a smooth dip and beautiful finish.
How do I prevent the candy from sticking to the parchment paper?
Parchment paper or a non-stick silicone baking mat works best. Avoid wax paper, as it can cause sticking. Also, letting the apples set completely at room temperature helps the candy shell release easily when you need to move or serve them.
Can I skip the nuts or other toppings?
Definitely! The nuts and toppings are optional and purely for extra texture and flavor. The classic candied apple is delicious on its own with just the shiny candy coating showcasing the crisp apple underneath.
Final Thoughts
This Candied Apples for Halloween Recipe is truly a celebration of seasonal flavors and festive fun, perfect for creating special memories with family and friends. It’s a joyful experience from start to finish—from bubbling sugar syrup to that first satisfying crack of a beautifully coated apple. Don’t hesitate to try your hand at this recipe and bring some sweetness and sparkle to your Halloween festivities. You’re going to love the smiles and excitement it brings!
Print
Candied Apples for Halloween Recipe
- Prep Time: 20 minutes
- Cook Time: 15 minutes
- Total Time: 35 minutes
- Yield: 6 candied apples
- Category: Dessert
- Method: Stovetop
- Cuisine: American
Description
This classic Halloween treat features crisp apples coated in a glossy, hard candy shell with a festive orange tint and optional nut topping. Perfect for parties or a spooky snack, these candied apples are both visually striking and deliciously sweet with a satisfying crunch.
Ingredients
Apples
- 6 small apples (Granny Smith or any firm variety)
- 6 wooden sticks or skewers
Candy Coating
- 2 cups granulated sugar
- 1/2 cup light corn syrup
- 3/4 cup water
- 1/2 teaspoon vanilla extract
- Orange food coloring (optional)
Toppings (Optional)
- 1/2 cup chopped nuts
Instructions
- Prepare the Apples: Wash and thoroughly dry the apples to ensure the candy coating adheres properly. Remove the stems and insert wooden sticks into the tops of the apples, pushing them about halfway through. Arrange the apples on a parchment-lined baking sheet to catch drips and make handling easier.
- Make the Candy Syrup: In a medium saucepan, combine the granulated sugar, light corn syrup, and water. Stir over medium heat until the sugar completely dissolves, then increase the heat to medium-high and bring the mixture to a boil. Do not stir once boiling begins to avoid crystallization.
- Cook to Hard Crack Stage: Attach a candy thermometer to the saucepan and let the syrup reach 300°F (150°C), which is the hard crack stage for candy. This process should take about 10-15 minutes. Remove the pan from heat immediately once the temperature is reached to prevent burning.
- Add Flavor and Color: Quickly stir in the vanilla extract and, if using, add a few drops of orange food coloring to achieve a festive Halloween color. Be cautious as the mixture may bubble up during this step.
- Dip the Apples: Immediately tilt the saucepan to one side and dip each apple into the hot candy mixture, turning it to coat evenly. Allow any excess syrup to drip off before placing the apple back onto the parchment-lined sheet. If desired, sprinkle chopped nuts onto the coating before it hardens to add texture and flavor.
- Set the Coating: Let the dipped apples sit at room temperature for about 30 minutes until the candy coating hardens completely and becomes crisp.
- Optional Halloween Decoration: For a spooky flair, carve scary faces into the apples with a sharp paring knife prior to dipping them in the candy coating, creating fun and festive treats for Halloween celebrations.
Notes
- Use firm, fresh apples to ensure the best texture under the candy coating.
- Be very careful when working with hot sugar syrup to avoid burns.
- If you don’t have a candy thermometer, test the syrup by dropping a small amount in cold water; it should form hard, brittle threads.
- Store candied apples at room temperature and consume within 1-2 days for best freshness.
- The optional nuts add a nice crunch but can be omitted for a smooth shiny finish.
- Orange food coloring is optional but adds a festive Halloween look.


