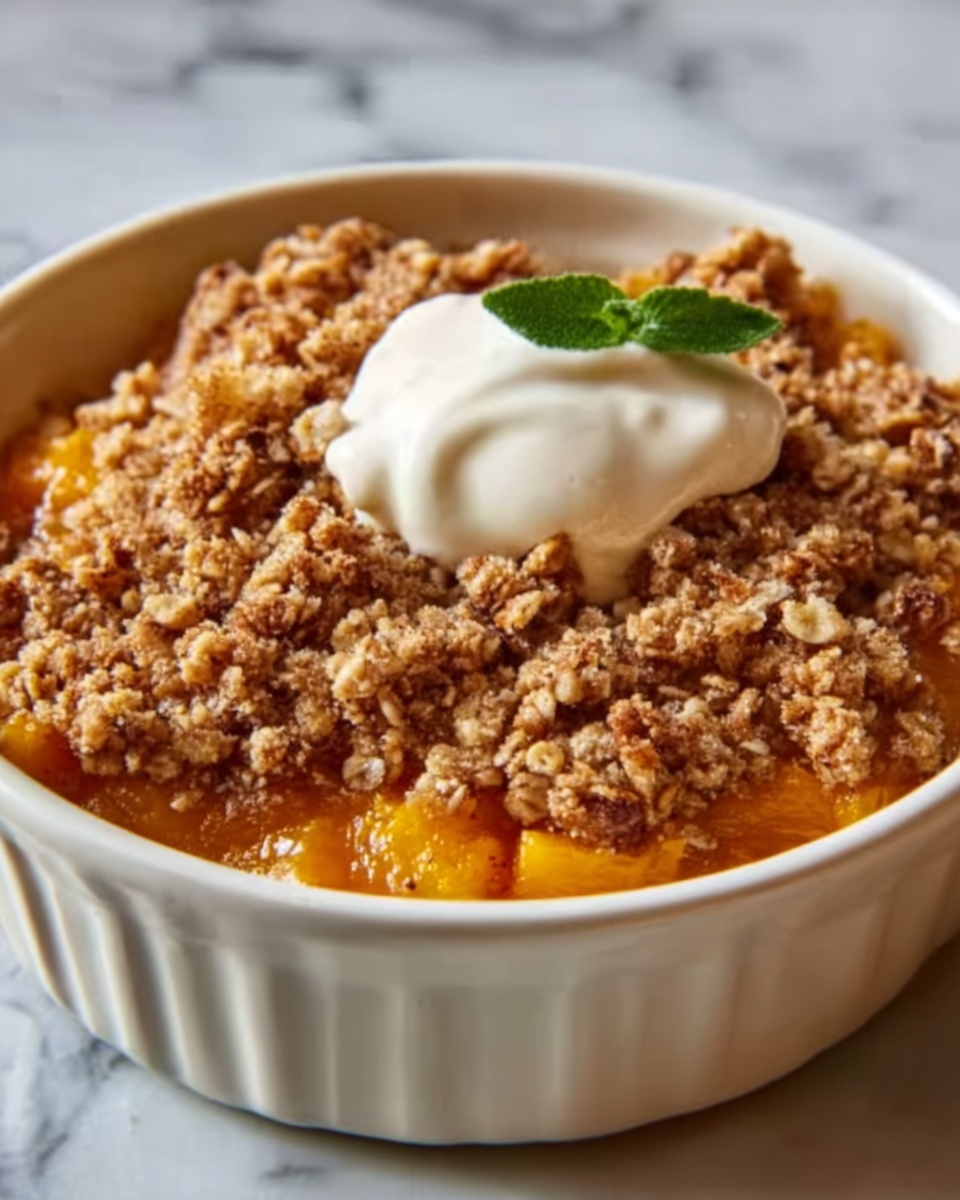
If you are searching for a dessert that perfectly captures the cozy flavors of fall with very little fuss, this Pumpkin Crisp Recipe is an absolute game-changer. It combines creamy, spiced pumpkin filling with a buttery, crunchy oat topping that delivers a delightful texture contrast in every bite. Whether you’re serving it for a family gathering or a simple weeknight treat, this recipe is easy to follow and guaranteed to warm hearts and fill bellies. You’ll quickly find yourself reaching for this Pumpkin Crisp Recipe again and again when pumpkin season arrives.
Ingredients You’ll Need
The beauty of this Pumpkin Crisp Recipe lies in its simple, wholesome ingredients that come together to create a comforting and flavorful dessert. Each component plays its part—pumpkin purée provides that rich, earthy base, warming spices add aromatic depth, and the crisp topping introduces that satisfying crunch you crave.
- 1 can (15 oz) pumpkin purée: The star ingredient bringing creamy texture and natural sweetness.
- 1 cup evaporated milk: Adds smoothness and richness without overpowering the pumpkin.
- 3/4 cup granulated sugar: Balances the earthiness of the pumpkin with just the right touch of sweetness.
- 2 eggs, lightly beaten: Helps bind the filling to set perfectly.
- 1 tsp cinnamon: Classic fall spice that pairs brilliantly with pumpkin.
- 1/2 tsp nutmeg: Adds subtle warmth and complexity.
- 1/2 tsp ginger: Gives a gentle spicy kick to keep flavors interesting.
- 1/4 tsp cloves: Just enough to enhance the overall aroma without dominating.
- 1/4 tsp salt: Enhances all the other flavors, making them pop.
- 1/2 cup old-fashioned oats: Provides a hearty and rustic topping texture.
- 1/2 cup brown sugar: Adds moisture and deep caramel notes to the crisp topping.
- 1/4 cup flour: Helps hold the topping together while baking.
- 1/4 cup cold butter, cubed: Creates that irresistible crumbly topping when worked in.
- 1/2 cup pecans, chopped (optional): Adds nutty crunch and an extra layer of flavor.
How to Make Pumpkin Crisp Recipe
Step 1: Prepare Your Baking Dish
Begin by preheating your oven to 350°F (175°C) and greasing an 8×8-inch baking dish. This small step ensures your pumpkin crisp won’t stick and will come out of the dish easily once baked.
Step 2: Mix the Pumpkin Filling
In a large bowl, whisk together the pumpkin purée, evaporated milk, granulated sugar, and lightly beaten eggs. Stir in the cinnamon, nutmeg, ginger, cloves, and salt until the mixture is smooth and fragrant. This spiced pumpkin filling is the heart of your dish and locks in that delightful autumn flavor.
Step 3: Prepare the Crisp Topping
In a separate bowl, combine the oats, brown sugar, and flour. Add the cold, cubed butter and use a pastry cutter or your fingers to work it into the mixture until crumbly and pea-sized bits form. If you like the added texture and taste, fold in the chopped pecans now—this little touch adds an extra layer of deliciousness.
Step 4: Assemble and Bake
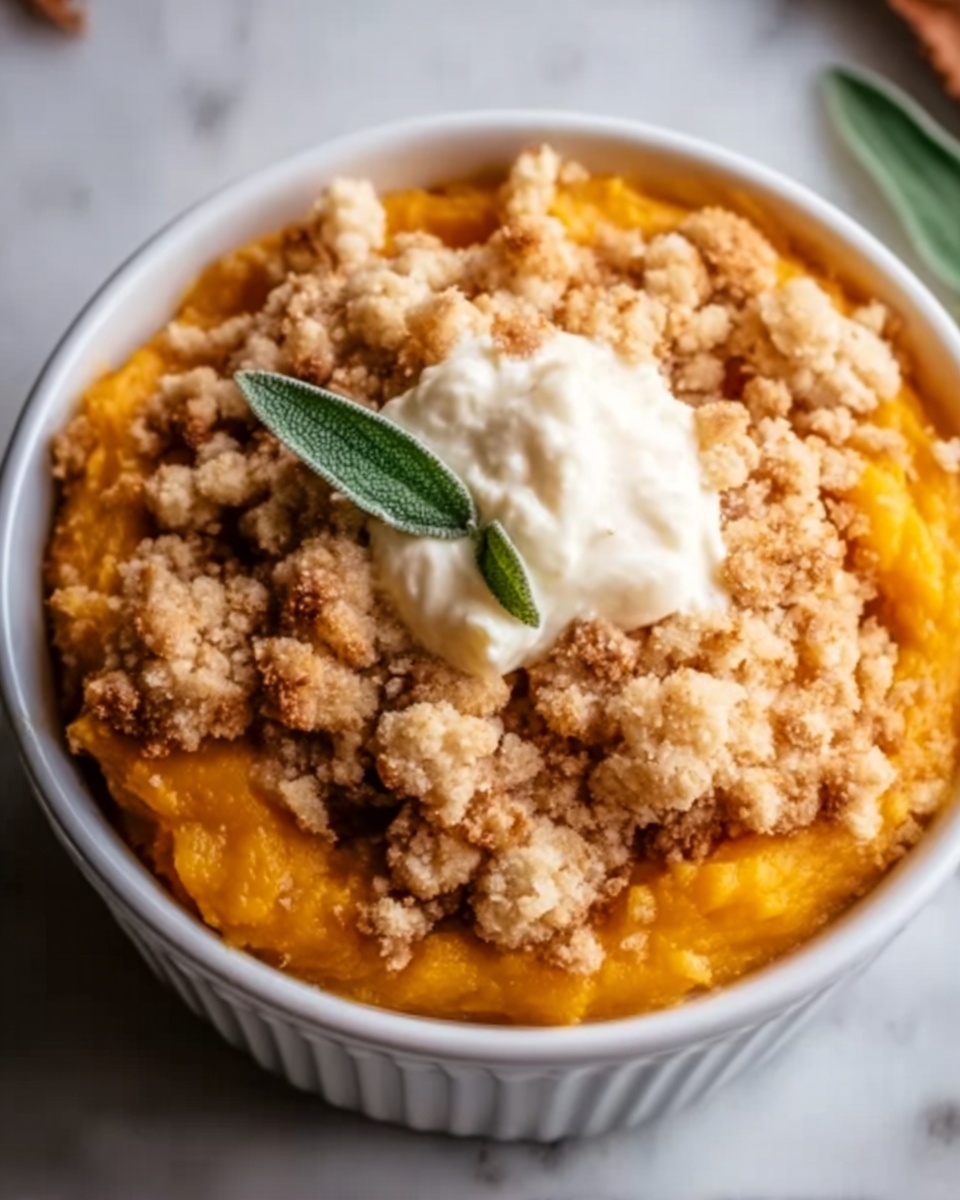
Pour the pumpkin filling into your prepared baking dish, spreading it evenly. Sprinkle the oat topping mixture over the surface, making sure to cover every inch for that perfect crunchy topping. Bake for 40 to 45 minutes, until the topping turns a gorgeous golden brown and the filling is set just right—this is where patience pays off!
Step 5: Cool Slightly and Enjoy
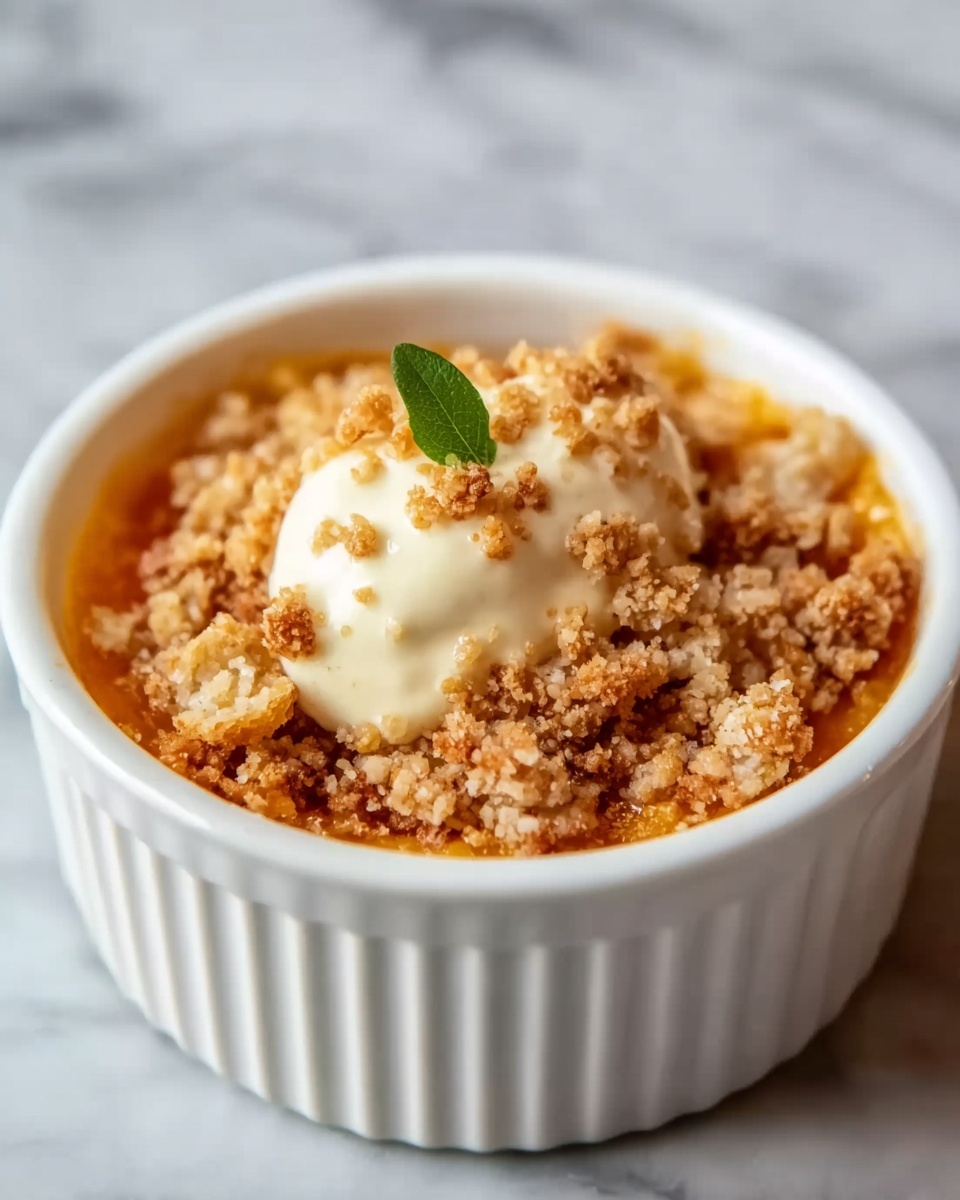
Once baking is complete, allow the Pumpkin Crisp Recipe to cool slightly. This resting time helps the filling firm up while keeping the topping crisp. Serve warm, ideally with a scoop of vanilla ice cream or a dollop of whipped cream for an indulgent finish.
How to Serve Pumpkin Crisp Recipe
Garnishes
A simple garnish can elevate this Pumpkin Crisp Recipe from delicious to unforgettable. Whipped cream adds lightness and a creamy contrast, while a scoop of vanilla ice cream melts beautifully over warm portions, enhancing both texture and flavor. For a fun twist, sprinkle a pinch of cinnamon or drizzle a little maple syrup on top before serving.
Side Dishes
This dessert pairs wonderfully with a cup of hot coffee, chai tea, or even a cozy glass of mulled cider. If you want to round out a fall-themed meal, try serving it alongside roasted autumn vegetables or a hearty turkey dinner for the ultimate seasonal spread.
Creative Ways to Present
Instead of one large dish, divide the Pumpkin Crisp Recipe into individual ramekins for a charming presentation, perfect for guests. You can also layer the pumpkin filling and crisp topping in clear glass cups to showcase the beautiful textures. Adding toasted nuts or a drizzle of caramel sauce at serving time makes it even more visually inviting and tasty.
Make Ahead and Storage
Storing Leftovers
If you have any leftovers, cover the pumpkin crisp tightly with plastic wrap or transfer it to an airtight container. It will keep well in the refrigerator for up to four days. Reheat in the oven or microwave until warm to enjoy that fresh-baked feeling again.
Freezing
This Pumpkin Crisp Recipe freezes beautifully. Allow it to cool completely before wrapping tightly in foil or placing in a freezer-safe container. Freeze for up to three months. To enjoy later, thaw overnight in the fridge and warm it up in the oven to bring back that perfect crisp topping.
Reheating
For the best texture, reheat in a preheated oven at 350°F (175°C) for 15 to 20 minutes, uncovered to keep the topping crisp. If you’re in a hurry, the microwave works too, though the topping may soften a little. Adding a fresh dollop of whipped cream or ice cream upon reheating makes every bite taste freshly made.
FAQs
Can I use fresh pumpkin instead of canned purée?
Absolutely! You can roast and puree fresh pumpkin yourself for an even fresher taste. Just be sure it’s cooked and mashed smoothly, and remember that volume may vary slightly compared to canned purée.
Is it possible to make this recipe dairy-free?
Yes, simply substitute the evaporated milk with a full-fat coconut milk or your favorite dairy-free milk. Use a vegan butter or margarine in place of regular butter to keep it crisp and delicious.
Can I omit the pecans or use other nuts?
Definitely. Pecans add a lovely crunch and flavor, but you can leave them out if you have nut allergies or swap them for walnuts, almonds, or even pumpkin seeds for a unique twist.
How long will the Pumpkin Crisp Recipe last after baking?
When stored properly in the fridge, the crisp will stay good for up to four days. The topping may soften over time but reheating it in the oven helps restore the crunch.
Can I double this recipe for a larger crowd?
Yes, you can double all ingredients and use a larger baking dish. Just keep an eye on baking time—it might take a little longer to cook through fully.
Final Thoughts
I truly hope you give this Pumpkin Crisp Recipe a try because it’s one of those that instantly feels like a warm hug from the inside out. The balance of creamy pumpkin and crunchy topping is downright irresistible! Whether you’re baking for loved ones or treating yourself, this dessert will fill your kitchen with wonderful aromas and your heart with joy.
Print
Pumpkin Crisp Recipe
- Prep Time: 15 minutes
- Cook Time: 45 minutes
- Total Time: 1 hour
- Yield: 8 servings
- Category: Dessert
- Method: Baking
- Cuisine: American
Description
This Pumpkin Crisp recipe is a comforting fall dessert featuring a smooth spiced pumpkin filling topped with a crunchy oat and pecan crumble. Baked to golden perfection, it’s a delightful treat perfect for cozy gatherings or holiday celebrations.
Ingredients
Pumpkin Filling
- 1 can (15 oz) pumpkin purée
- 1 cup evaporated milk
- 3/4 cup granulated sugar
- 2 eggs, lightly beaten
- 1 tsp cinnamon
- 1/2 tsp nutmeg
- 1/2 tsp ginger
- 1/4 tsp cloves
- 1/4 tsp salt
Topping
- 1/2 cup old-fashioned oats
- 1/2 cup brown sugar
- 1/4 cup flour
- 1/4 cup cold butter, cubed
- 1/2 cup pecans, chopped (optional)
Instructions
- Preheat and Prepare Dish: Preheat your oven to 350°F (175°C) and grease an 8×8-inch baking dish to prevent sticking.
- Make Pumpkin Filling: In a large bowl, whisk together the pumpkin purée, evaporated milk, granulated sugar, lightly beaten eggs, cinnamon, nutmeg, ginger, cloves, and salt until the mixture is smooth and well combined. Pour this pumpkin mixture into the prepared baking dish evenly.
- Prepare Topping: In another bowl, combine the old-fashioned oats, brown sugar, and flour. Add the cold cubed butter. Using a pastry cutter or your fingers, cut and press the butter into the dry ingredients until the mixture resembles coarse crumbs. Stir in chopped pecans if using, ensuring they are evenly distributed.
- Assemble Crisp: Evenly sprinkle the oat and pecan topping over the pumpkin filling layer in the baking dish, covering it completely.
- Bake: Place the dish in the preheated oven and bake for 40-45 minutes. The crisp is ready when the topping turns golden brown and the pumpkin filling is set (no longer jiggly).
- Cool and Serve: Allow the pumpkin crisp to cool slightly before serving to set further. Serve warm topped with whipped cream or vanilla ice cream for added indulgence.
Notes
- You can omit pecans for a nut-free version or substitute with walnuts or almonds if preferred.
- Ensure the butter is cold when mixing the topping to achieve a crumbly texture.
- Letting the crisp cool slightly before serving helps the pumpkin filling to set nicely.
- This dessert pairs beautifully with whipped cream or ice cream, but can also be enjoyed on its own.
- Store leftovers covered in the refrigerator for up to 3 days and reheat gently before serving.

