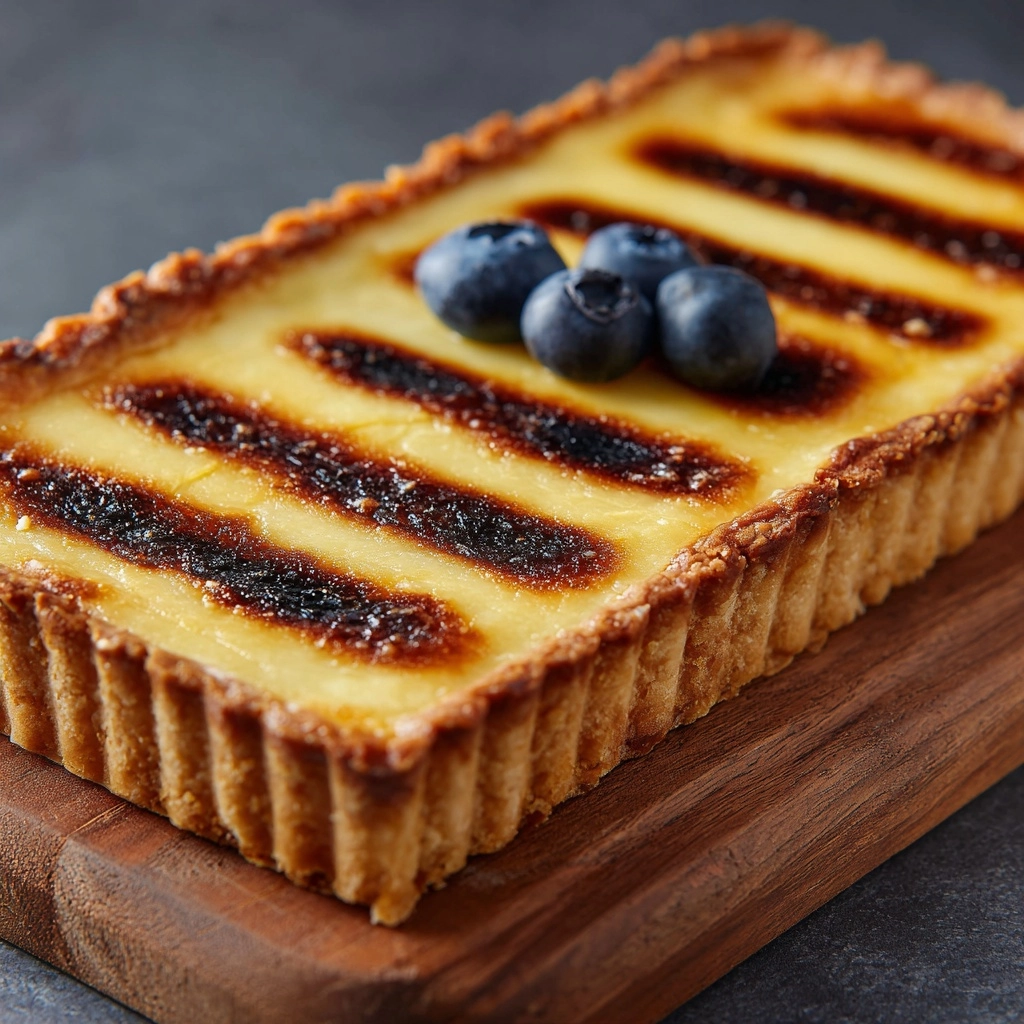
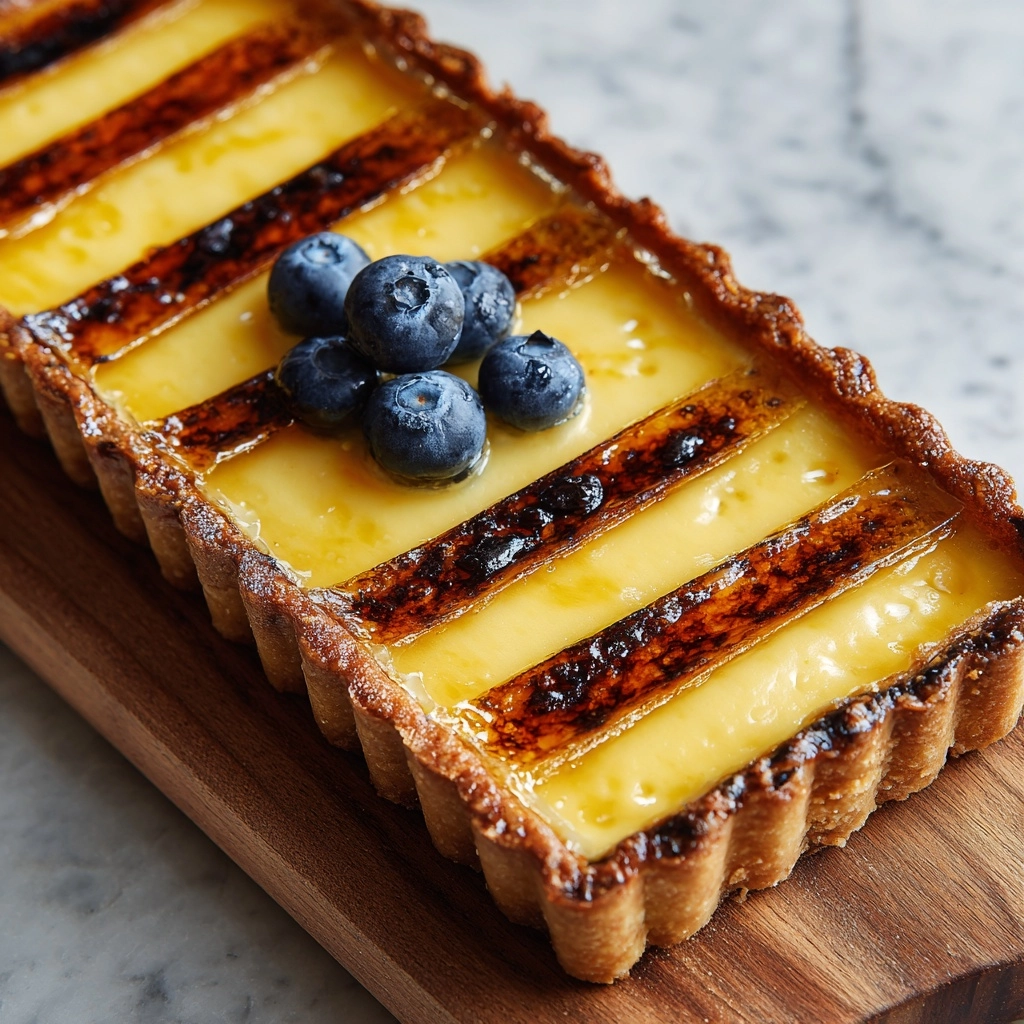
Silky, fragrant, and visually stunning, this Vanilla Bean Custard Tart is a true showstopper for any dessert table. The buttery, golden crust provides the perfect complement to a luscious, deeply vanilla-flecked custard filling that’s as smooth as it is rich in flavor. Whether you’re looking to impress guests at a special gathering or treat yourself to a slice of pure comfort, this classic tart feels both fancy and satisfying—the kind of dessert you’ll crave again and again. Follow along for all the tried-and-true tips you need to master this irresistible treat!
Ingredients You’ll Need
The magic of a Vanilla Bean Custard Tart lies in its simplicity—each ingredient plays a starring role, from the crisp pastry foundation to the melt-in-your-mouth custard. Choose quality ingredients, and you’ll be rewarded with spectacular texture and flavor every time.
- All-purpose flour: Gives the tart crust its delicate structure and tender crumb, ideal for encasing the creamy custard.
- Granulated sugar: Sweetens both the crust and custard just enough for balance without overpowering the vanilla notes.
- Salt: A small pinch brightens the flavors and keeps the crust from tasting flat.
- Unsalted butter (cold and cubed): Essential for a flaky, melt-in-your-mouth pastry—the colder, the better.
- Large egg yolk: Adds richness and helps the pastry dough hold together beautifully.
- Ice water: Start with one tablespoon, adding as needed to bring the dough together without overmixing.
- Whole milk: Forms the creamy base for your custard—choose whole for extra lusciousness.
- Vanilla bean (split and scraped) or vanilla bean paste: Nothing compares to the perfumed flavor and pretty specks of real vanilla.
- Egg yolks (for custard): Contribute to that unmistakable custard richness and dreamy yellow color.
- Cornstarch: Reliably thickens the filling without making it gummy.
- Butter (for custard): Stirred in at the end, it adds silkiness and shine to your custard.
How to Make Vanilla Bean Custard Tart
Step 1: Prepare the Tart Crust
Combine the flour, sugar, and salt in a mixing bowl. Add cold, cubed butter and work it in using a pastry blender or your fingertips. You’re aiming for a mixture that looks like coarse breadcrumbs with a few small pebbles of butter—these will create those gorgeous flakes when baked. Mix in the egg yolk, then add ice water a little at a time just until the dough comes together. Shape into a disk, wrap in plastic, and refrigerate for at least 30 minutes. This rest gives the flour time to hydrate and the butter to chill, ensuring a crisp, tender shell for your Vanilla Bean Custard Tart.
Step 2: Blind Bake the Shell
Once your dough is nicely chilled, roll it out on a floured surface and gently fit it into a 9-inch tart pan. Trim any overhang and prick the base a few times with a fork—this helps prevent bubbles. Line with parchment and fill with pie weights or dried beans, then bake at 375°F (190°C) for 15 minutes. Remove the parchment and weights, then return to the oven for another 10 minutes or until the shell is golden and crisp. Let the crust cool completely before adding the custard.
Step 3: Make the Vanilla Bean Custard Filling
In a saucepan, heat the whole milk and the seeds scraped from a vanilla bean (or use vanilla bean paste) over medium heat until the mixture is just simmering—don’t let it boil! Meanwhile, whisk together the egg yolks, sugar, and cornstarch in a bowl until smooth and light. Gradually whisk the hot milk into the egg mixture, which tempers the eggs and keeps the custard silky. Pour the mixture back into the saucepan and cook, stirring constantly, over medium heat for about 5 to 7 minutes. It will thicken and bubble, taking on a velvety texture. Remove from the heat and stir in the butter until fully incorporated.
Step 4: Assemble and Chill
Pour the warm custard into your cooled tart shell, using a spatula to smooth the top for an even finish. The custard will be pleasantly thick and glossy, flecked all over with tiny black vanilla seeds. Let the tart chill in the refrigerator for at least 2 hours (overnight works beautifully too), which allows the custard to set for clean, elegant slices. Patience is the hardest part—but oh, it’s worth it!
How to Serve Vanilla Bean Custard Tart

Garnishes
For an elegant finish, consider a dusting of powdered sugar or a shiny clear glaze to give your tart that pastry-shop polish. Fresh berries—think plump raspberries or jewel-like blueberries—bring a burst of color and bright, fruity contrast. A few edible flowers scattered delicately on top make this Vanilla Bean Custard Tart look straight out of a patisserie window.
Side Dishes
While the tart is a star in its own right, a small scoop of vanilla or berry sorbet on the side can be a dreamy pairing, especially in warm weather. For a slightly more decadent dessert, serve slices with a dollop of softly whipped cream or a spoonful of tangy crème fraîche to balance the custard’s richness.
Creative Ways to Present
Individual tartlets using mini pans are perfect for dinner parties and make serving a breeze. You could also slice the Vanilla Bean Custard Tart into slim wedges and arrange them on a large platter, alternating with fresh fruit for a buffet-style dessert spread. Or try cutting the tart into bite-sized bars for a small, satisfyingly sweet finish to any meal.
Make Ahead and Storage
Storing Leftovers
Cover any leftover Vanilla Bean Custard Tart tightly with plastic wrap and refrigerate. Properly stored, it stays fresh and delicious for up to three days. The crust will keep its pleasant crispness, and the custard will remain silky and flavorful.
Freezing
While the baked tart shell can be frozen for up to a month (just wrap it well), custard-based desserts don’t love the freezer—thawing can change the texture of the filling. For best results, freeze the unfilled crust and make the custard fresh when you’re ready to serve.
Reheating
Vanilla Bean Custard Tart is best enjoyed chilled or at cool room temperature, so reheating isn’t necessary. If you prefer a slightly warmer dessert, let it gently sit at room temperature for about 30 minutes before serving—the flavors come alive as it loses its chill.
FAQs
Can I use vanilla extract instead of a vanilla bean?
You can absolutely use vanilla extract if that’s what you have on hand, though for the signature speckled look and deep, aromatic flavor, vanilla bean or vanilla bean paste is worth seeking out. If substituting, use about 2 teaspoons of pure vanilla extract.
How do I prevent my tart crust from shrinking?
Chilling the dough before rolling and pressing it into the pan is essential. Also, avoid stretching the dough as you fit it into the tart pan, and be sure to use pie weights during the first bake to hold the crust’s shape—these steps make all the difference!
Why did my custard turn lumpy?
Constant whisking over moderate heat is key to smooth, lump-free custard. If you do spot a few lumps, quickly pass the finished custard through a fine-mesh sieve before pouring it into the tart shell.
Can I make this Vanilla Bean Custard Tart ahead of time?
Absolutely! In fact, the tart is even better after it’s had several hours to set in the refrigerator. You can assemble it a day in advance and garnish just before serving for the freshest look and flavor.
Is it possible to make the recipe gluten-free?
Yes—simply substitute your favorite cup-for-cup gluten-free flour for the all-purpose flour in the crust. The custard filling is naturally gluten-free, so you don’t have to modify that part at all.
Final Thoughts
If you’re searching for a no-fuss dessert with maximum wow-factor, give this Vanilla Bean Custard Tart a try. It’s timeless, elegant, and genuinely satisfying—perfect for sharing or savoring all to yourself. Happy baking!
Print
Vanilla Bean Custard Tart Recipe
- Prep Time: 25 minutes (plus 30 minutes chill time)
- Cook Time: 35 minutes
- Total Time: 1 hour 30 minutes
- Yield: 8 servings
- Category: Dessert
- Method: Baking
- Cuisine: French
- Diet: Vegetarian
Description
Indulge in the creamy decadence of this Vanilla Bean Custard Tart. A buttery crust cradles a luscious vanilla custard filling, creating a dessert fit for any occasion.
Ingredients
For the crust:
- 1 ¼ cups all-purpose flour
- ¼ cup granulated sugar
- ½ teaspoon salt
- ½ cup unsalted butter (cold and cubed)
- 1 large egg yolk
- 1–2 tablespoons ice water
For the custard filling:
- 2 cups whole milk
- 1 vanilla bean (split and scraped) or 2 teaspoons vanilla bean paste
- 4 large egg yolks
- ⅓ cup granulated sugar
- 3 tablespoons cornstarch
- 1 tablespoon unsalted butter
Instructions
- To make the crust: Combine flour, sugar, and salt. Cut in cold butter until mixture resembles coarse crumbs. Add egg yolk and ice water, mix until dough forms. Chill for 30 minutes.
- Preheat oven to 375°F (190°C). Roll out dough, fit into tart pan, prick bottom, line with parchment and weights. Bake, cool.
- To make the custard: Heat milk and vanilla. Whisk egg yolks, sugar, cornstarch. Combine mixtures, cook until thickened. Stir in butter.
- Pour custard into tart shell, chill for 2 hours. Serve plain or with berries.
Notes
- For added elegance, top with a clear glaze or dust with powdered sugar.
- You can also flavor the custard with lemon or almond extract for variation.
Nutrition
- Serving Size: 1 slice
- Calories: 310
- Sugar: 14g
- Sodium: 125mg
- Fat: 18g
- Saturated Fat: 11g
- Unsaturated Fat: 6g
- Trans Fat: 0g
- Carbohydrates: 30g
- Fiber: 1g
- Protein: 5g
- Cholesterol: 125mg


