
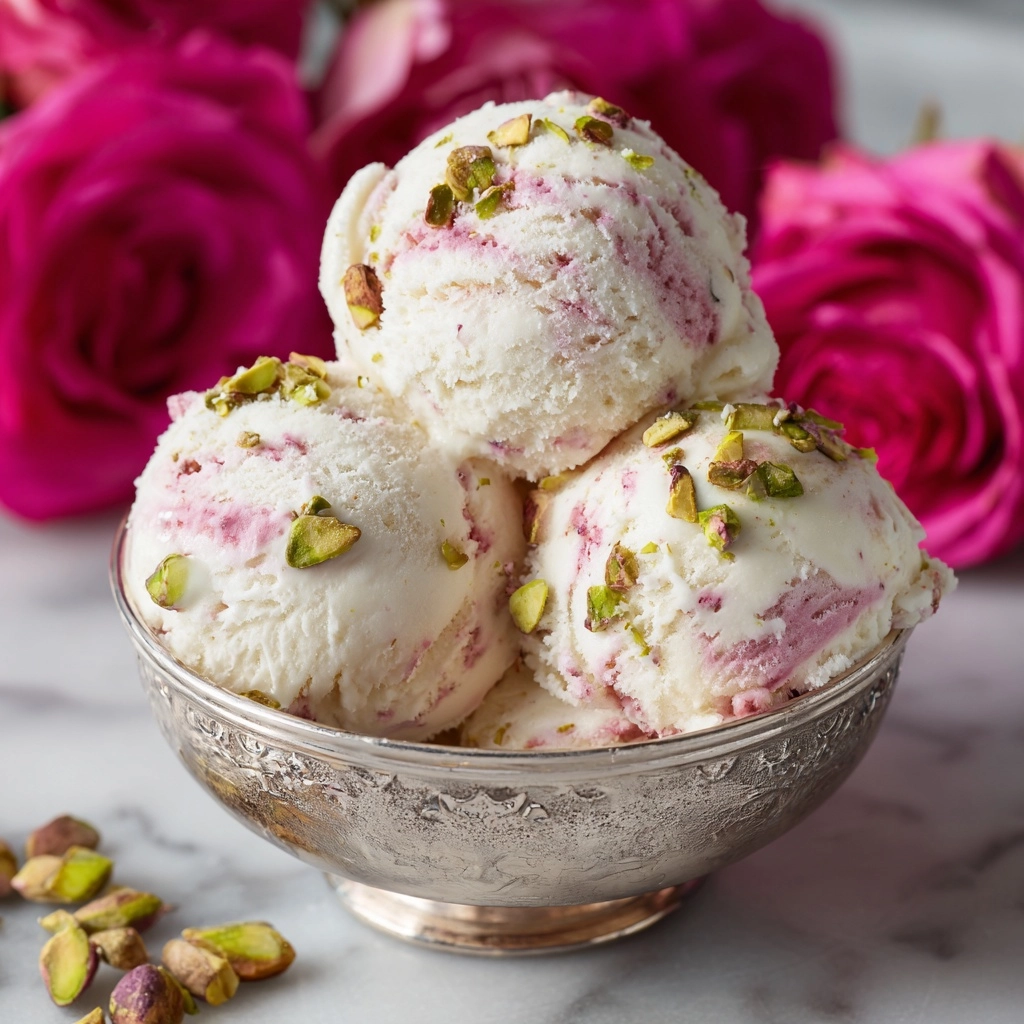
If you’re looking for a dessert that tastes like pure magic, I can’t wait for you to try this Rose Pistachio Cheesecake Ice Cream! Imagine the creamy tang of cheesecake, delicate hints of rose dancing through every bite, and the satisfying crunch of roasted pistachios, all swirled together in an unbelievably dreamy homemade ice cream. What makes this recipe extra special is its simplicity—no eggs, no fuss, just pure silkiness with a gentle floral aroma. Whether you’re celebrating a summertime picnic or indulging after a long day, this is the frozen treat you’ll want to scoop again and again.
Ingredients You’ll Need
The ingredients in Rose Pistachio Cheesecake Ice Cream are straightforward, but each one makes a big impact on flavor, color, and texture. Don’t skimp—using high-quality basics ensures every bite is as luscious and memorable as possible.
- Cream cheese (8 oz, softened): Gives the ice cream its signature tangy richness, creating an ultra-creamy cheesecake base.
- Whole milk (1 cup): Balances luxurious creaminess with just the right scoopable consistency.
- Heavy cream (1 1/2 cups): Essential for that classic homemade ice cream silkiness and body.
- Granulated sugar (3/4 cup): Sweetens the ice cream and helps give it a smooth, velvety texture.
- Salt (1/4 teaspoon): Enhances all the flavors, making each note of rose and pistachio pop.
- Rose water (1 tablespoon): Adds an unmistakably floral bouquet and exotic twist that makes this recipe so memorable.
- Vanilla extract (1/2 teaspoon): Rounds out flavors and deepens the dessert’s aroma.
- Pistachios, chopped (1/2 cup): Bring crunch, nuttiness, and that perfect green jewel color; make sure they’re unsalted and shelled.
- Pink food coloring (a few drops, optional): For a soft rosy hue—totally optional but beautiful if you want your ice cream to look as romantic as it tastes.
- Crushed graham crackers (optional): Swirls through like a crumbly cheesecake crust; sprinkle in for extra texture and flavor.
How to Make Rose Pistachio Cheesecake Ice Cream
Step 1: Blend the Ice Cream Base
Start by combining the cream cheese, whole milk, heavy cream, granulated sugar, salt, rose water, and vanilla extract in a blender or food processor. Blend until the mixture is completely smooth and creamy—no lumps allowed! If you’d like that lovely delicate pink color, now’s the moment to add in a few drops of food coloring and blend again. The result should be silky and slightly thick, smelling like a garden in springtime.
Step 2: Chill the Mixture
Pour your blended base into a bowl, cover, and chill it in the fridge for at least two hours. This not only deepens the flavors but ensures everything gets ultra-cold—key for a smooth churn. A well-chilled base means fewer ice crystals and maximum creaminess in your finished Rose Pistachio Cheesecake Ice Cream.
Step 3: Churn to Perfection
Once your base is thoroughly chilled, pour it into your ice cream maker and churn according to the manufacturer’s instructions, usually 20 to 25 minutes. You’ll see it transform into a dreamy, thick soft-serve. About five minutes before the churning finishes, sprinkle in the chopped pistachios so they evenly distribute without sinking or clumping.
Step 4: Swirl In the Cheesecake Crust (Optional)
If you’re all about the cheesecake experience, gently fold in crushed graham crackers by hand after churning. Be careful not to overmix—just a few folds so you get ribbons of crumbly crust running through your Rose Pistachio Cheesecake Ice Cream.
Step 5: Freeze and Set
Scoop your churned ice cream into a freezer-safe container. Smooth out the top, cover tightly, and let it set in the freezer for at least four hours, or until it’s firm enough to scoop. For the best texture, let it sit on the counter for five minutes before serving—trust me, it’s worth the extra patience!
How to Serve Rose Pistachio Cheesecake Ice Cream

Garnishes
The finishing touches transform a good scoop into a showstopper. Sprinkle a little extra chopped pistachio and a few softly crushed dried rose petals over each bowl for a touch of elegance. If you’re feeling extra, a drizzle of honey or a few white chocolate curls will take your Rose Pistachio Cheesecake Ice Cream right over the top!
Side Dishes
This ice cream pairs wonderfully with simple butter cookies or delicate shortbread on the side for a buttery-sweet contrast. Fresh summer berries, especially raspberries or strawberries, add a tangy brightness that plays off the rich floral notes. You could also serve it alongside cups of lightly sweetened black tea to echo Middle Eastern dessert vibes.
Creative Ways to Present
For a wow-worthy presentation, try scooping the Rose Pistachio Cheesecake Ice Cream into crisp, edible waffle bowls and topping with pistachio dust. Or sandwich it between pistachio cookies for homemade ice cream sandwiches with an irresistible crunch. Serving in vintage glassware or small teacups makes for charming individual desserts at dinner parties—just remember the garnish for that “ooh and ahh” effect!
Make Ahead and Storage
Storing Leftovers
Transfer any leftover Rose Pistachio Cheesecake Ice Cream to an airtight container right away to keep it from collecting freezer smells or ice crystals. Pressing a piece of parchment or plastic wrap directly onto the surface will help maintain its creamy texture until your next craving hits.
Freezing
This ice cream is a make-ahead dream! It’ll keep well in the freezer for up to two weeks, though you’ll want to enjoy it within the first week for optimal flavor and texture. Be sure your container seals tightly, and don’t store it near strong-smelling foods like onions or garlic to avoid flavor transfer.
Reheating
Ice cream and reheating don’t quite go hand-in-hand, but if your Rose Pistachio Cheesecake Ice Cream is a little hard straight from the freezer, simply let it rest on the counter for about five minutes. This brings it back to the perfect scooping consistency—creamy and ready to melt in your mouth.
FAQs
Can I make Rose Pistachio Cheesecake Ice Cream without an ice cream maker?
Absolutely! After blending and chilling the base, pour it into a loaf pan, sprinkle in those pistachios, and freeze, stirring every 45 minutes for around 3 hours to break up large ice crystals. The texture won’t be quite as airy, but the flavor will still be divine.
Is there a vegan version of this recipe?
Yes! Use vegan cream cheese and swap in full-fat coconut milk or a rich plant-based cream for the heavy cream and milk. Choose a vegan-friendly cookie for the crust swirl and make sure your sugar is vegan too. The result is still creamy, floral, and decadent.
How strong is the rose flavor in Rose Pistachio Cheesecake Ice Cream?
The rose is present but gentle—think of it as a background note rather than the main event. If you’re new to rose water, start with the suggested 1 tablespoon and taste before adding more. Different brands can vary in intensity, so a little goes a long way!
Can I use roasted salted pistachios instead of unsalted?
If you love a savory-sweet bite, lightly salted pistachios can work, but be cautioned that too much salt might overwhelm the delicate rose and cheesecake flavors. Unsalted lets the floral and nutty notes truly shine.
What if I don’t want to use food coloring?
No worries! The food coloring is purely optional for that dreamy pink hue. Without it, your Rose Pistachio Cheesecake Ice Cream will have a lovely natural cream color, still beautiful with the vibrant pops of green pistachio.
Final Thoughts
I can’t help but smile every time I make this Rose Pistachio Cheesecake Ice Cream. It’s the kind of dessert that makes you feel a little bit fancy, a lot nostalgic, and totally satisfied. I hope you give it a try, share it with someone you love, and see just how special homemade ice cream can be!
Print
Rose Pistachio Cheesecake Ice Cream Recipe
- Prep Time: 15 minutes
- Cook Time: 0 minutes
- Total Time: 5 hours
- Yield: 8 servings
- Category: Dessert
- Method: Churned
- Cuisine: Middle Eastern-Inspired
- Diet: Non-Vegetarian
Description
Indulge in the luxurious flavors of this Rose Pistachio Cheesecake Ice Cream. Creamy and rich with a hint of floral rose water, studded with crunchy pistachios and a delightful cheesecake swirl, this homemade ice cream is a perfect summer treat.
Ingredients
Cheesecake Base:
- 8 oz cream cheese (softened)
- 1 cup whole milk
- 1 1/2 cups heavy cream
- 3/4 cup granulated sugar
- 1/4 teaspoon salt
- 1 tablespoon rose water
- 1/2 teaspoon vanilla extract
Additional Ingredients:
- 1/2 cup chopped pistachios (unsalted and shelled)
- A few drops of pink food coloring (optional)
- Crushed graham crackers for swirl (optional)
Instructions
- Prepare the Cheesecake Base: In a blender, combine cream cheese, milk, heavy cream, sugar, salt, rose water, and vanilla extract until smooth.
- Chill the Mixture: Refrigerate the mixture for at least 2 hours until cold.
- Churn the Ice Cream: Pour the base into an ice cream maker and churn for 20-25 minutes. Add pistachios in the last 5 minutes.
- Add Swirl (Optional): Fold in crushed graham crackers after churning.
- Freeze: Transfer to a container and freeze for at least 4 hours until firm.
- Serve: Allow the ice cream to sit for 5 minutes before scooping and serving.
Notes
- Rose water can be strong, adjust to taste.
- For added texture, consider folding in white chocolate chips or dried rose petals.
Nutrition
- Serving Size: 1/2 cup
- Calories: 310
- Sugar: 22g
- Sodium: 100mg
- Fat: 22g
- Saturated Fat: 13g
- Unsaturated Fat: 8g
- Trans Fat: 0g
- Carbohydrates: 24g
- Fiber: 1g
- Protein: 4g
- Cholesterol: 70mg


